# Introduction

XBStation Platform For Internet Drone Base On Real Time 4G/5G Connectivity

**XBStation** is a solution for streaming video and controling UAV via internet (3G/4G/5G cellular network). **XBStation** has been designed to provide the drone applications for delivery, surveys, security, ambulance and emergency response with low latency and reliable data transfer.

<br>

![](/files/-Ma1nf6t_AIunV1EFbI3)

![](/files/-Mdzpeyz3MO0AktWb8JV)

**It include 3 main parts:**

* [**XBLink**](https://docs.xbstation.com/xblink)**:** XBLink is the companion computer of your UAV, combine video streaming, networking, cellular connection in one small factory design equipment.
* **XBCloud:** Fleet management and real-time monitoring center
  * Admin/Manager: Manage pilot accounts, analyst flights, real-time tracking drone
  * Guest: Only watch the drone flight information and video information
* [**XBStationPilotApp**](https://docs.xbstation.com/xbstation-pilot-app)**:** Software on your station to control XBLink and transmit video and telemetry streaming from XBLink to Ground control station software (MissionPlanner, QGroundControl, ...)

> If you would like to know more about a *product* or technology, or how we can *help* you be more successful, please *contact us: **<creator@xb-uav.com>***


# Quickstart Guide

This section provides a Quickstart guide

When you received XBLink, all software has been installed, you can check your credential on your box. **Note:** Please do not install any software or flash XBLink

### Video

{% embed url="<https://youtu.be/E9wIh-zCMcw>" %}
XBLink - Initial Setup
{% endembed %}

### Step 1: Setup XBLink

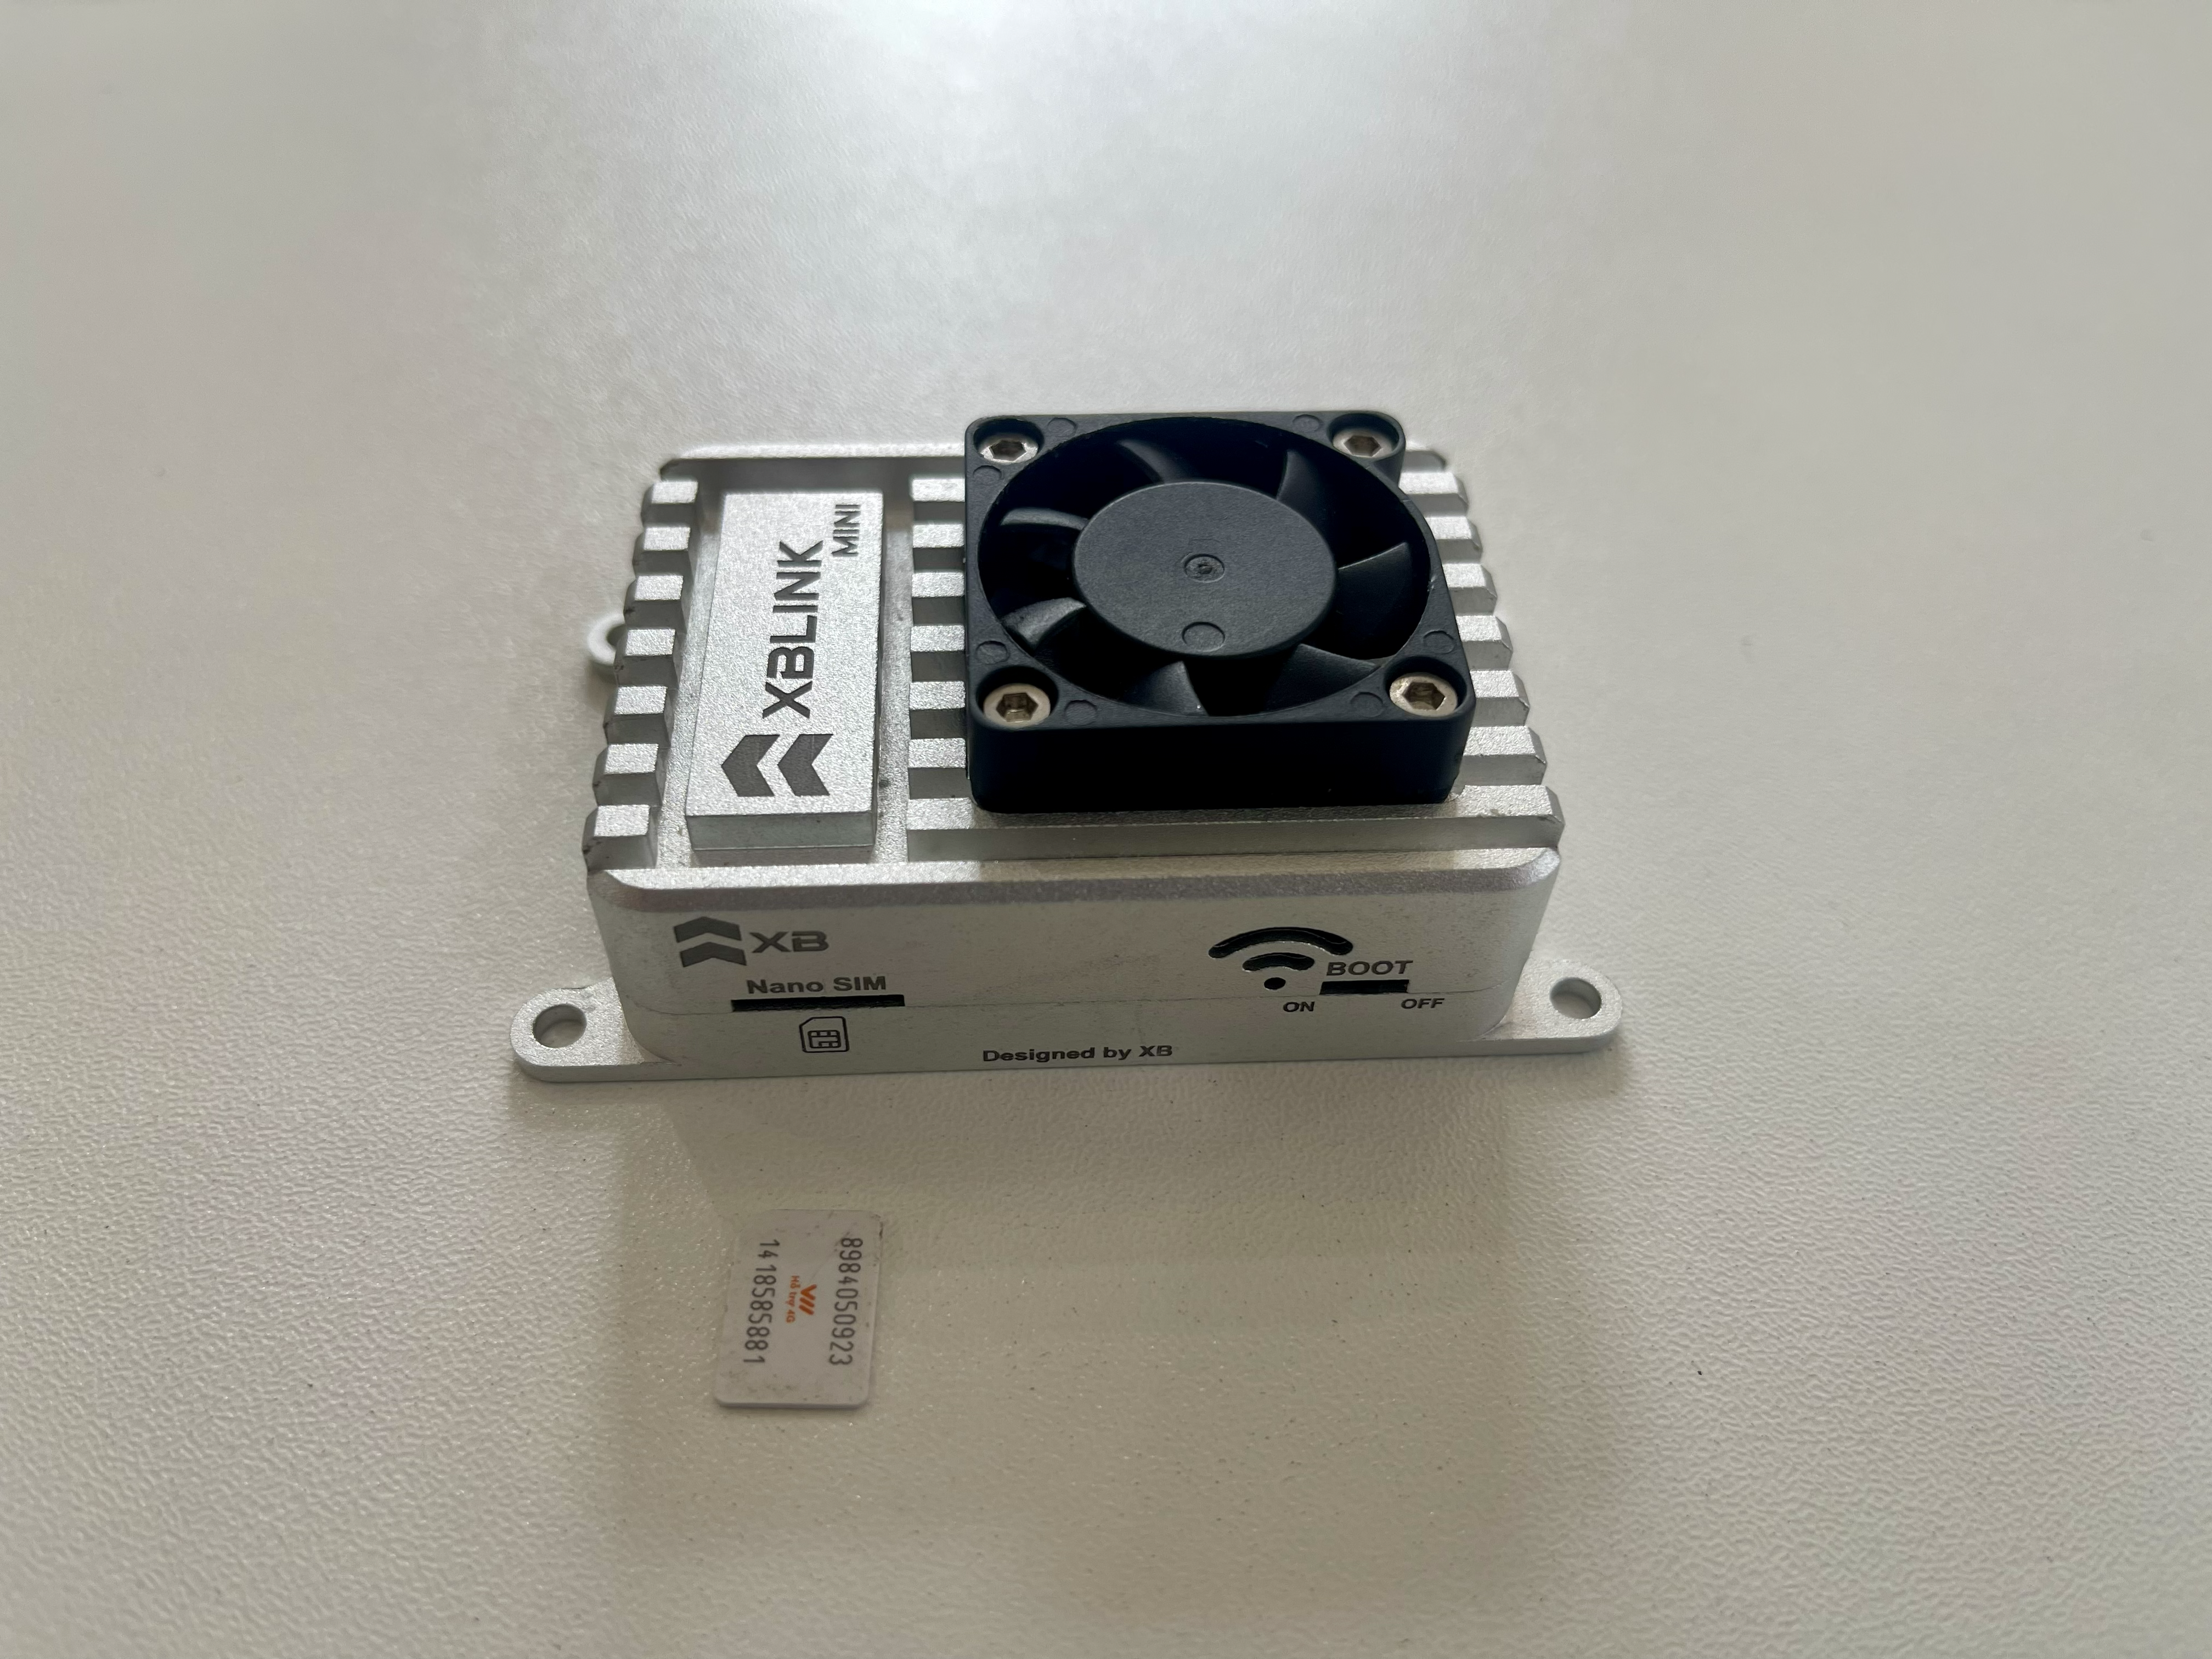
#### Insert your nano SIM card

![Insert nano SIM to XBLink](/files/-MbKOasWh6I9GcbNdr5d)

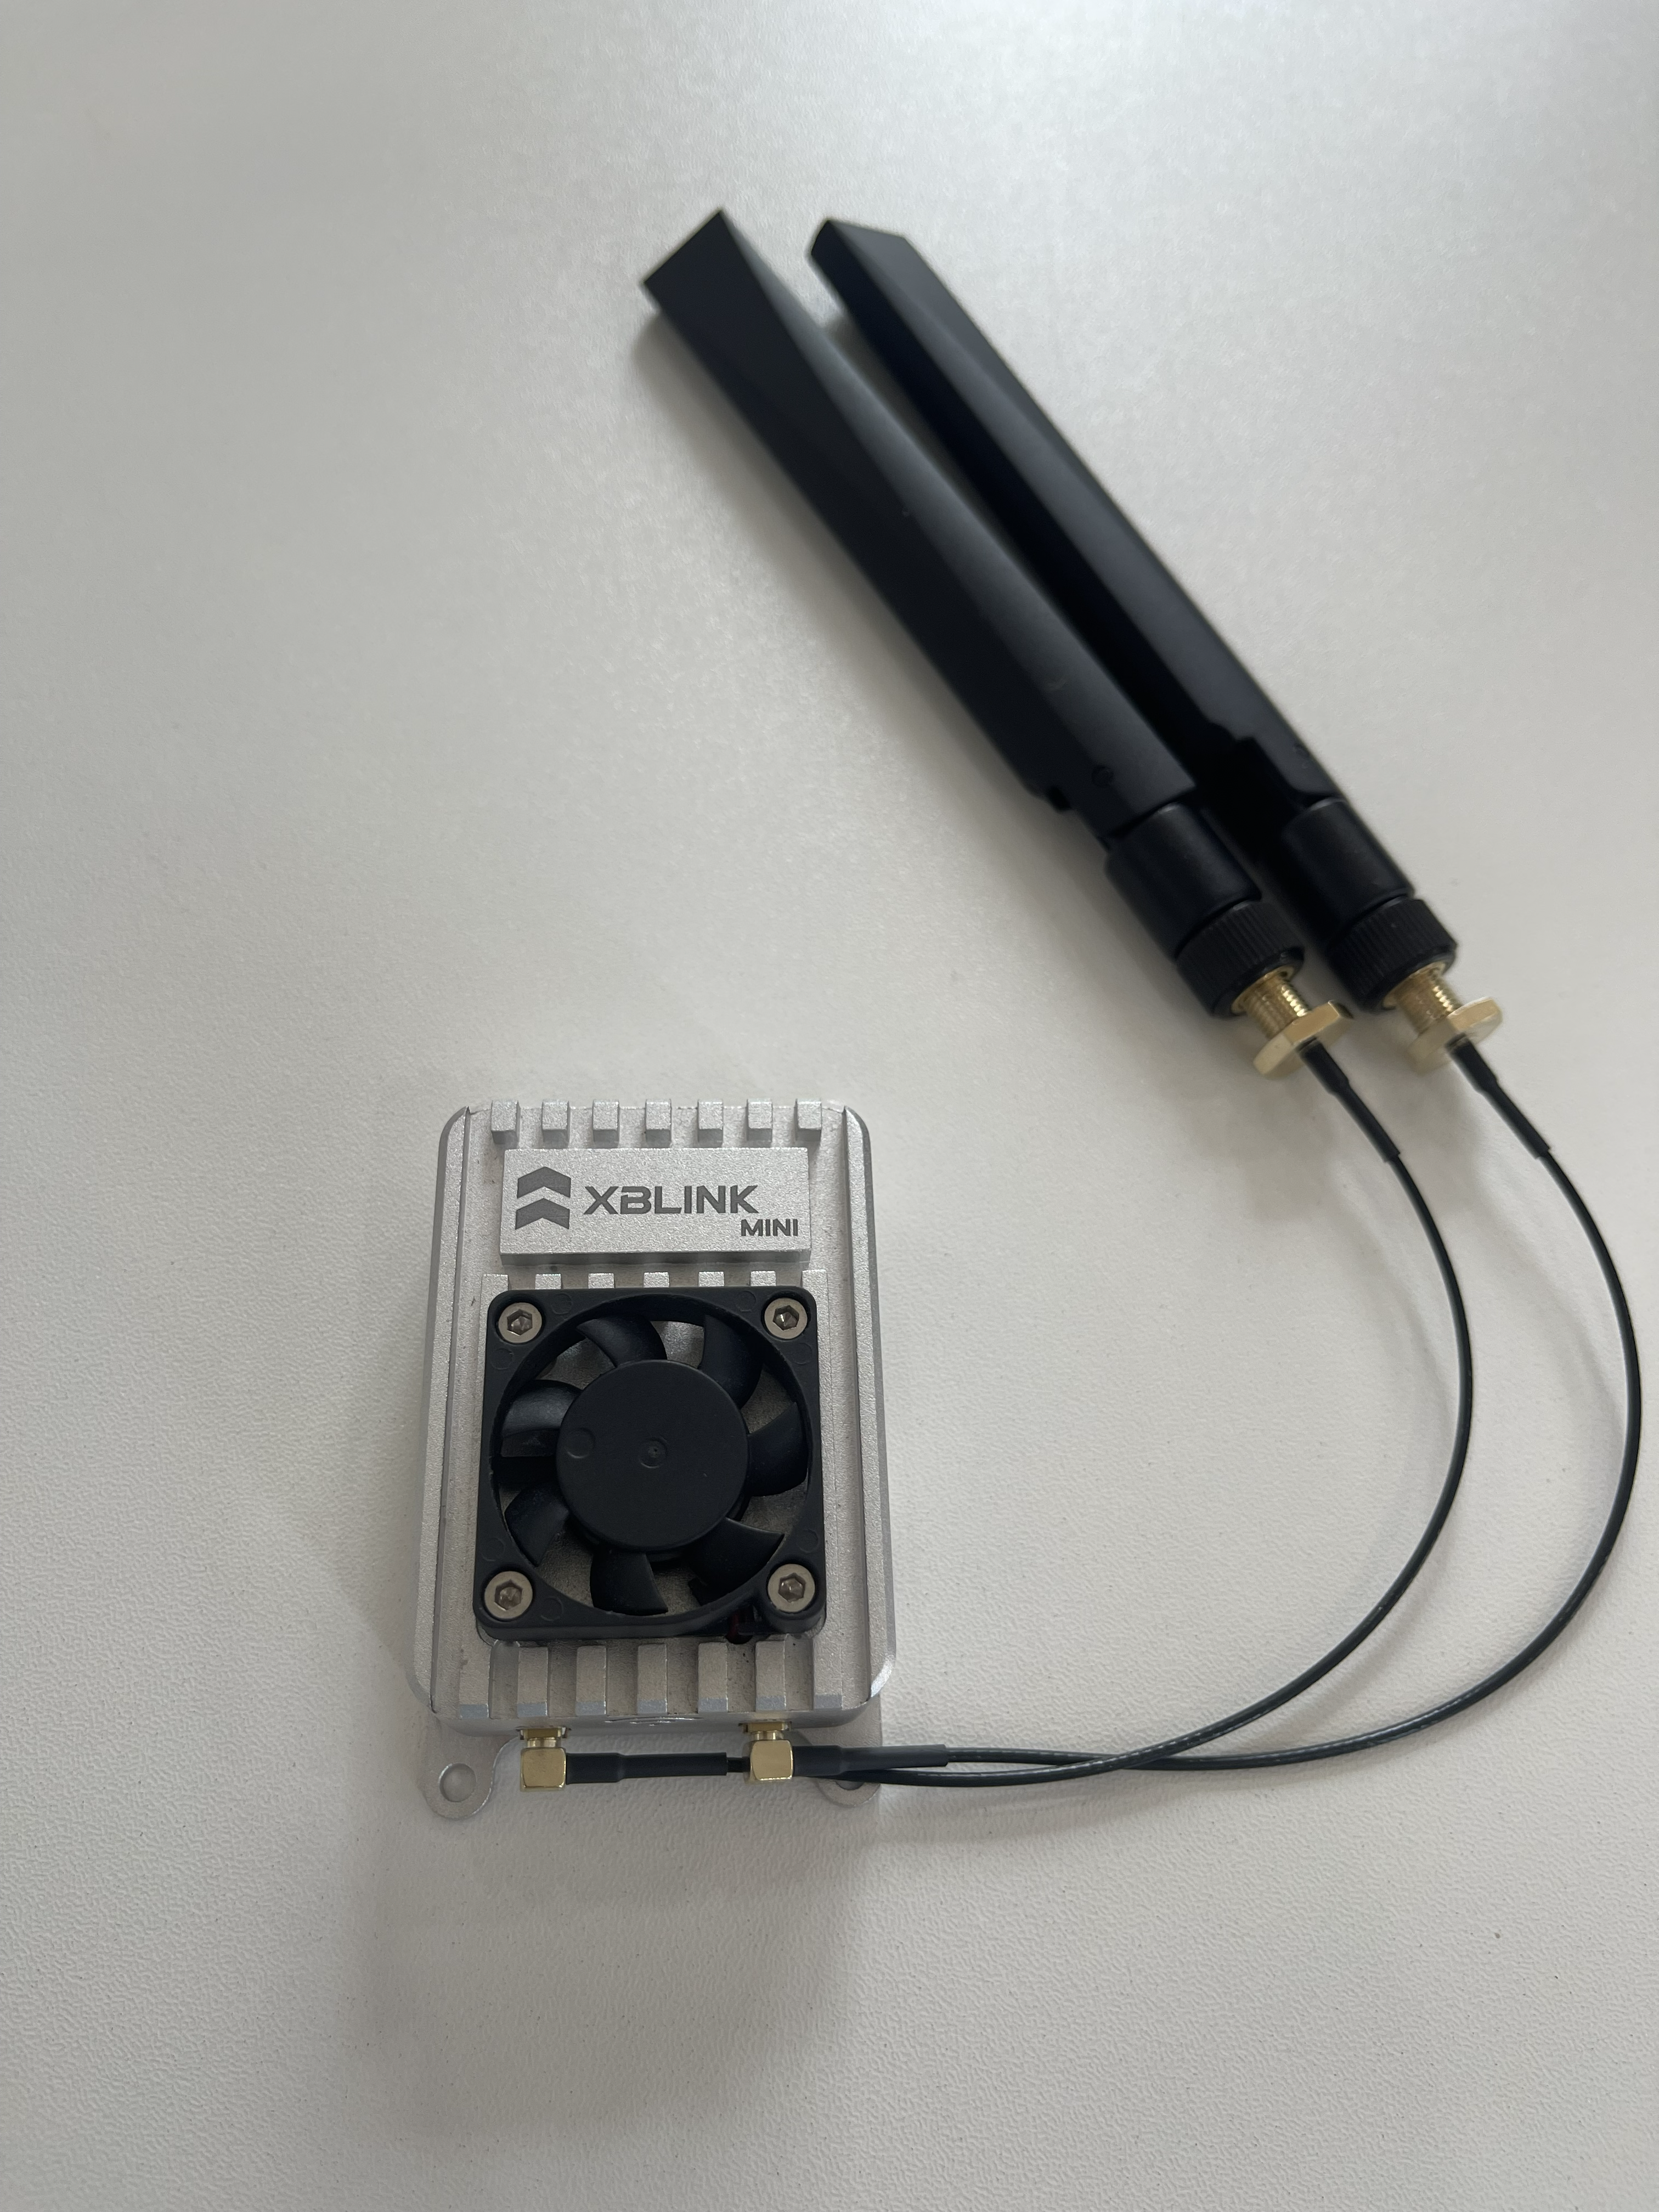
#### Connect LTE antennas

{% hint style="info" %}
**Note:** Be careful with the antenna port. Remove or Install it in a **straight angle**. **We are not responsible if the antenna is damaged due to physical impact**&#x20;
{% endhint %}

![Connect LTE antennas to XBLink](/files/-MbKPFT0cJkpTl0Q9RIn)

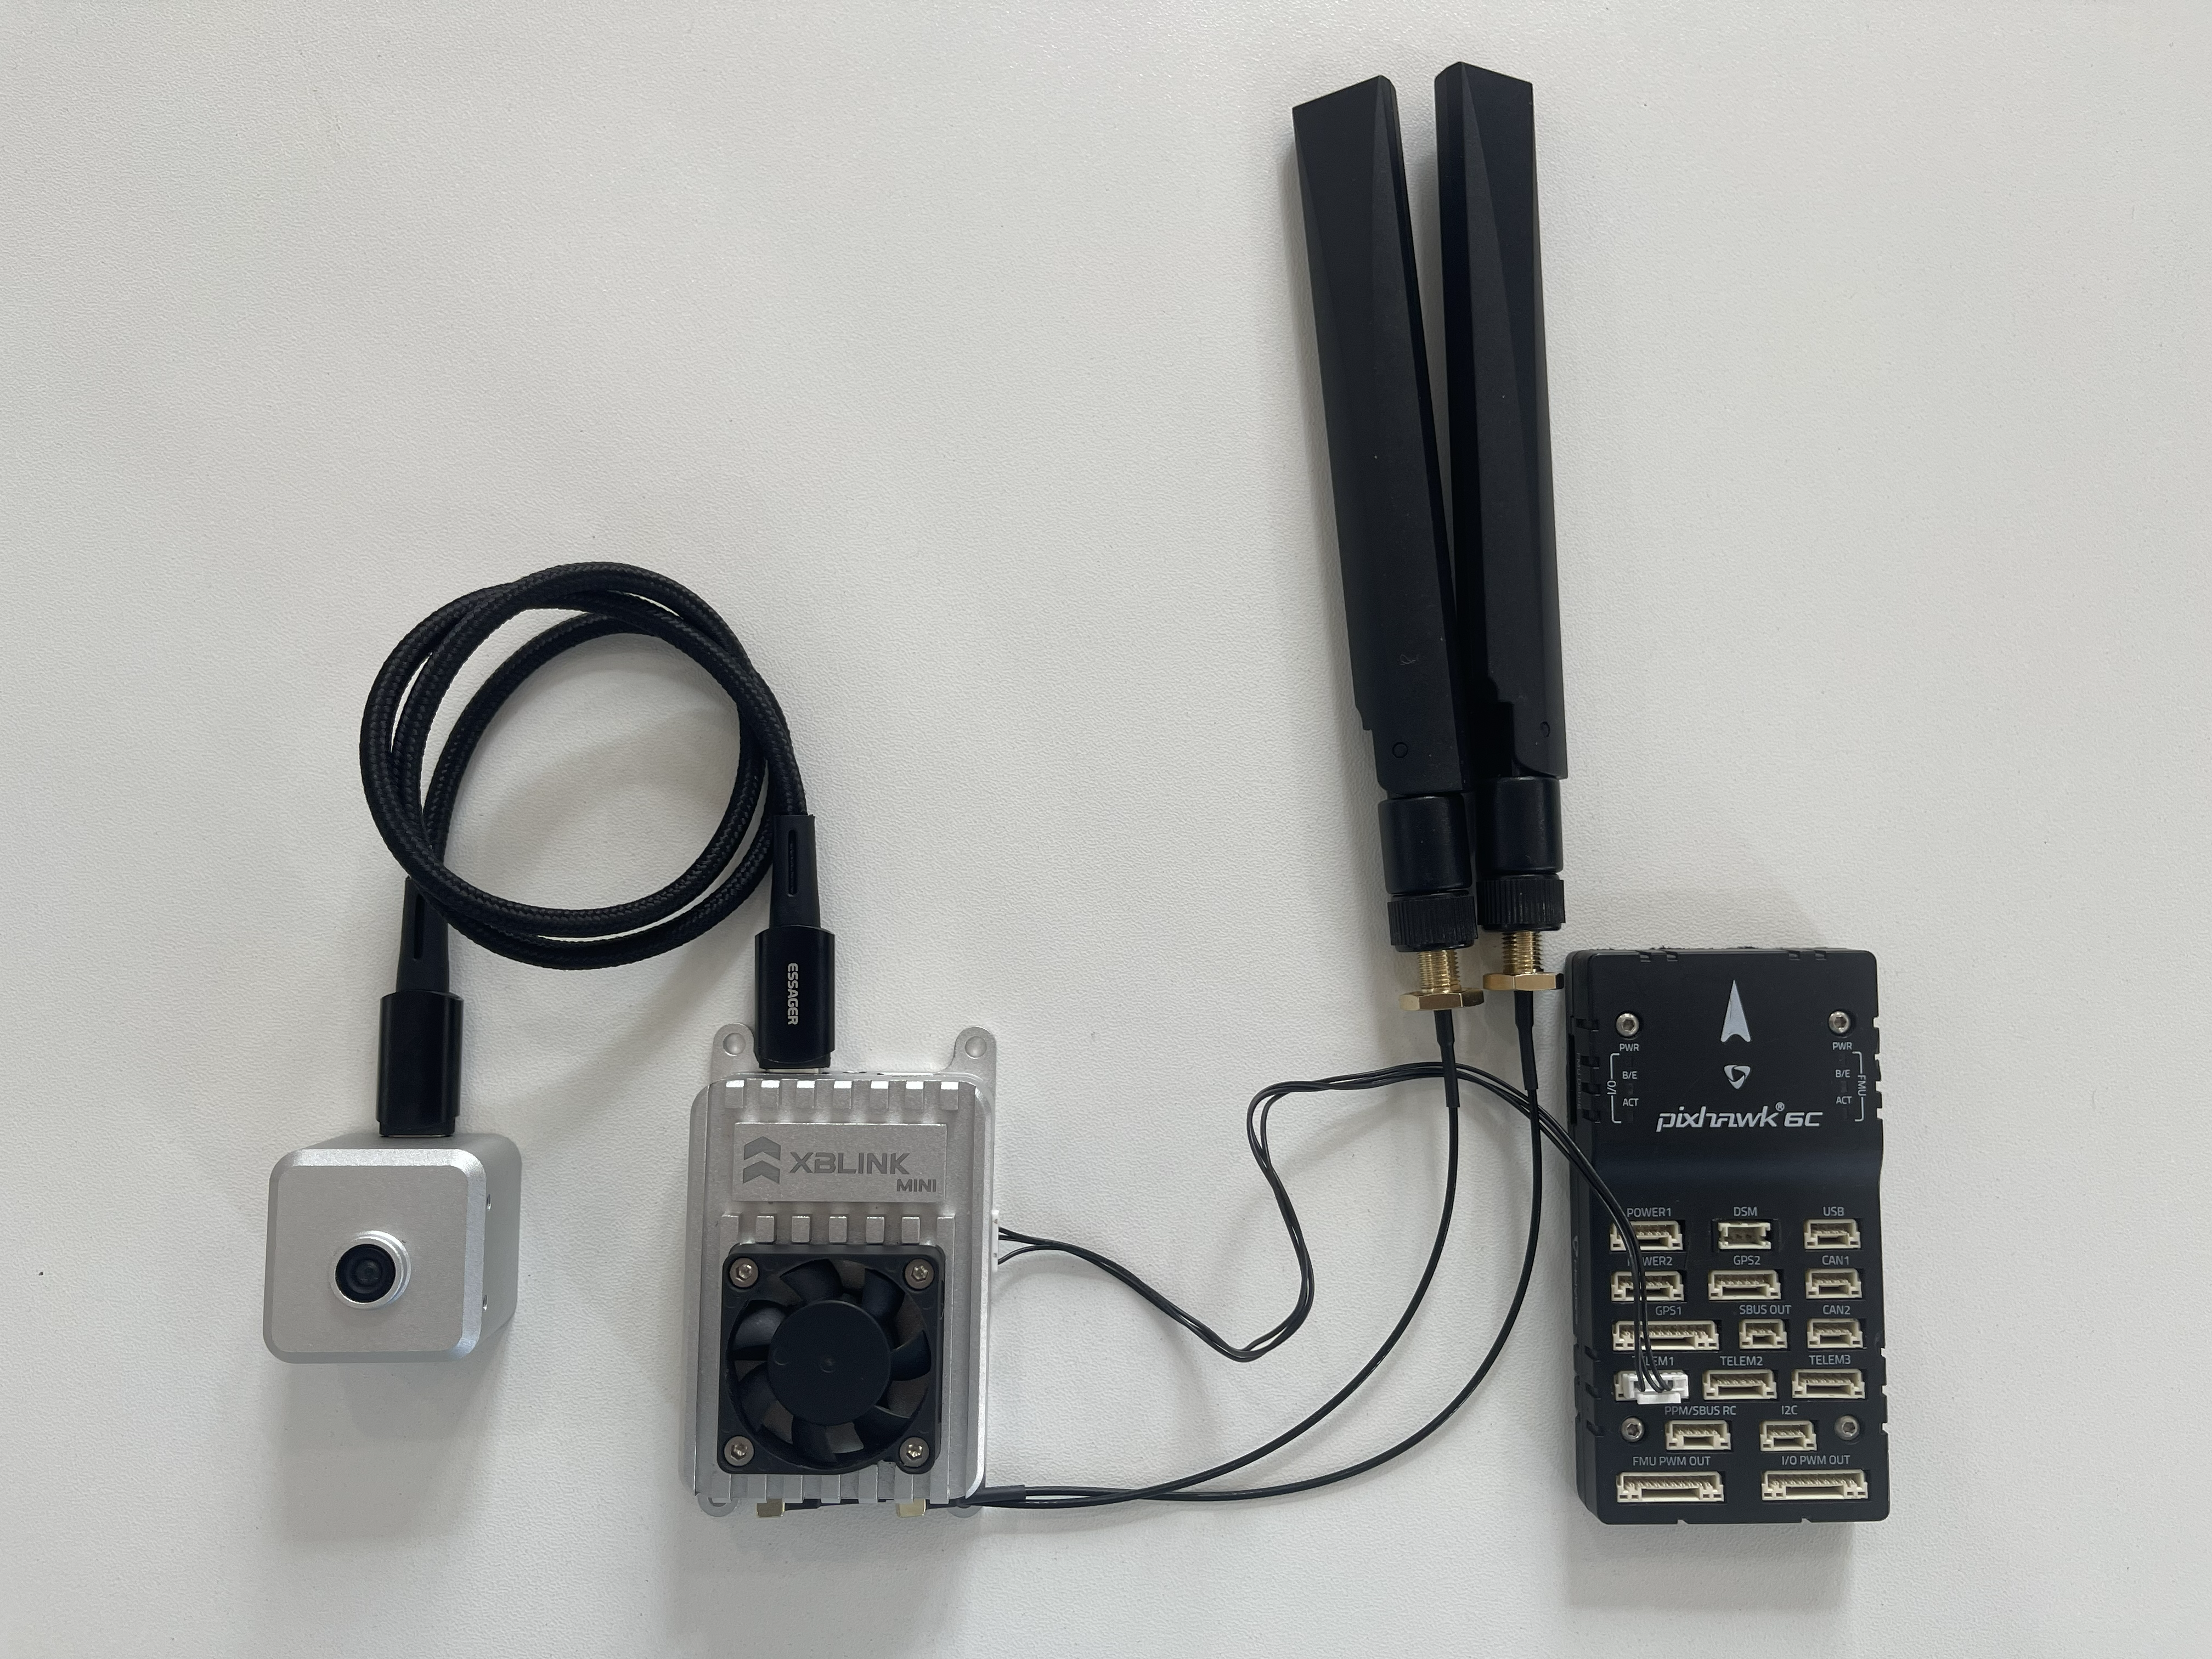
#### Connect Flight Controller

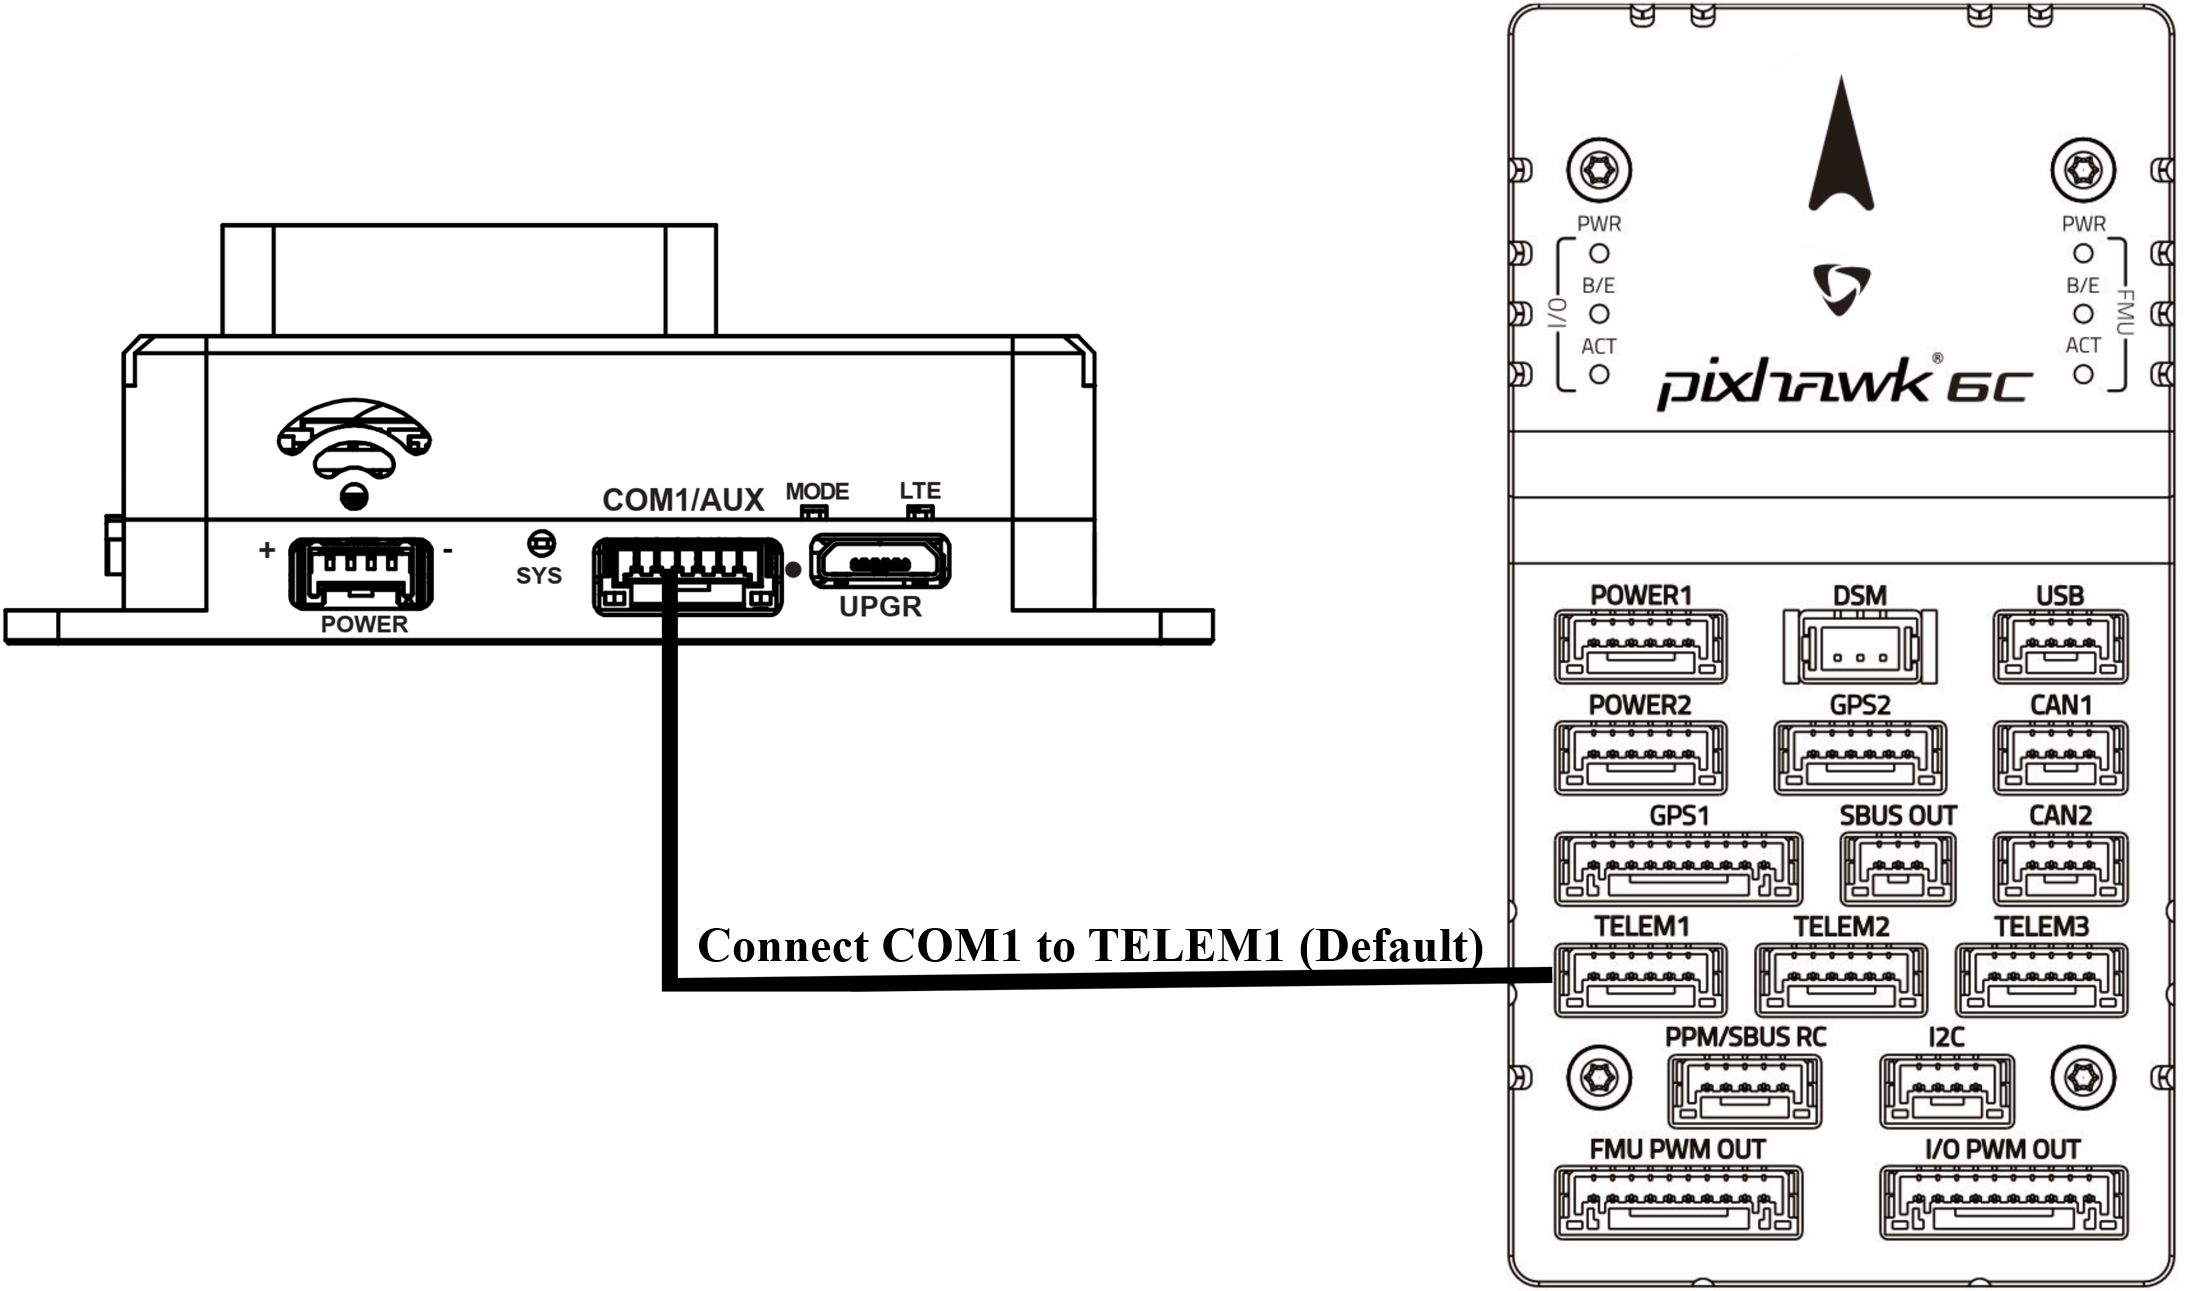
You can use Telemetry 1 or 2 of pixhawk for connection with XBLink. Telemetry 1 is normally used for Telemetry Radio (like: RFD900...) and Telemetry 2 for XBLink.

![XBLink connect to Pixhawk Cube](/files/-Md5mVIY5hzX7mf868o6)

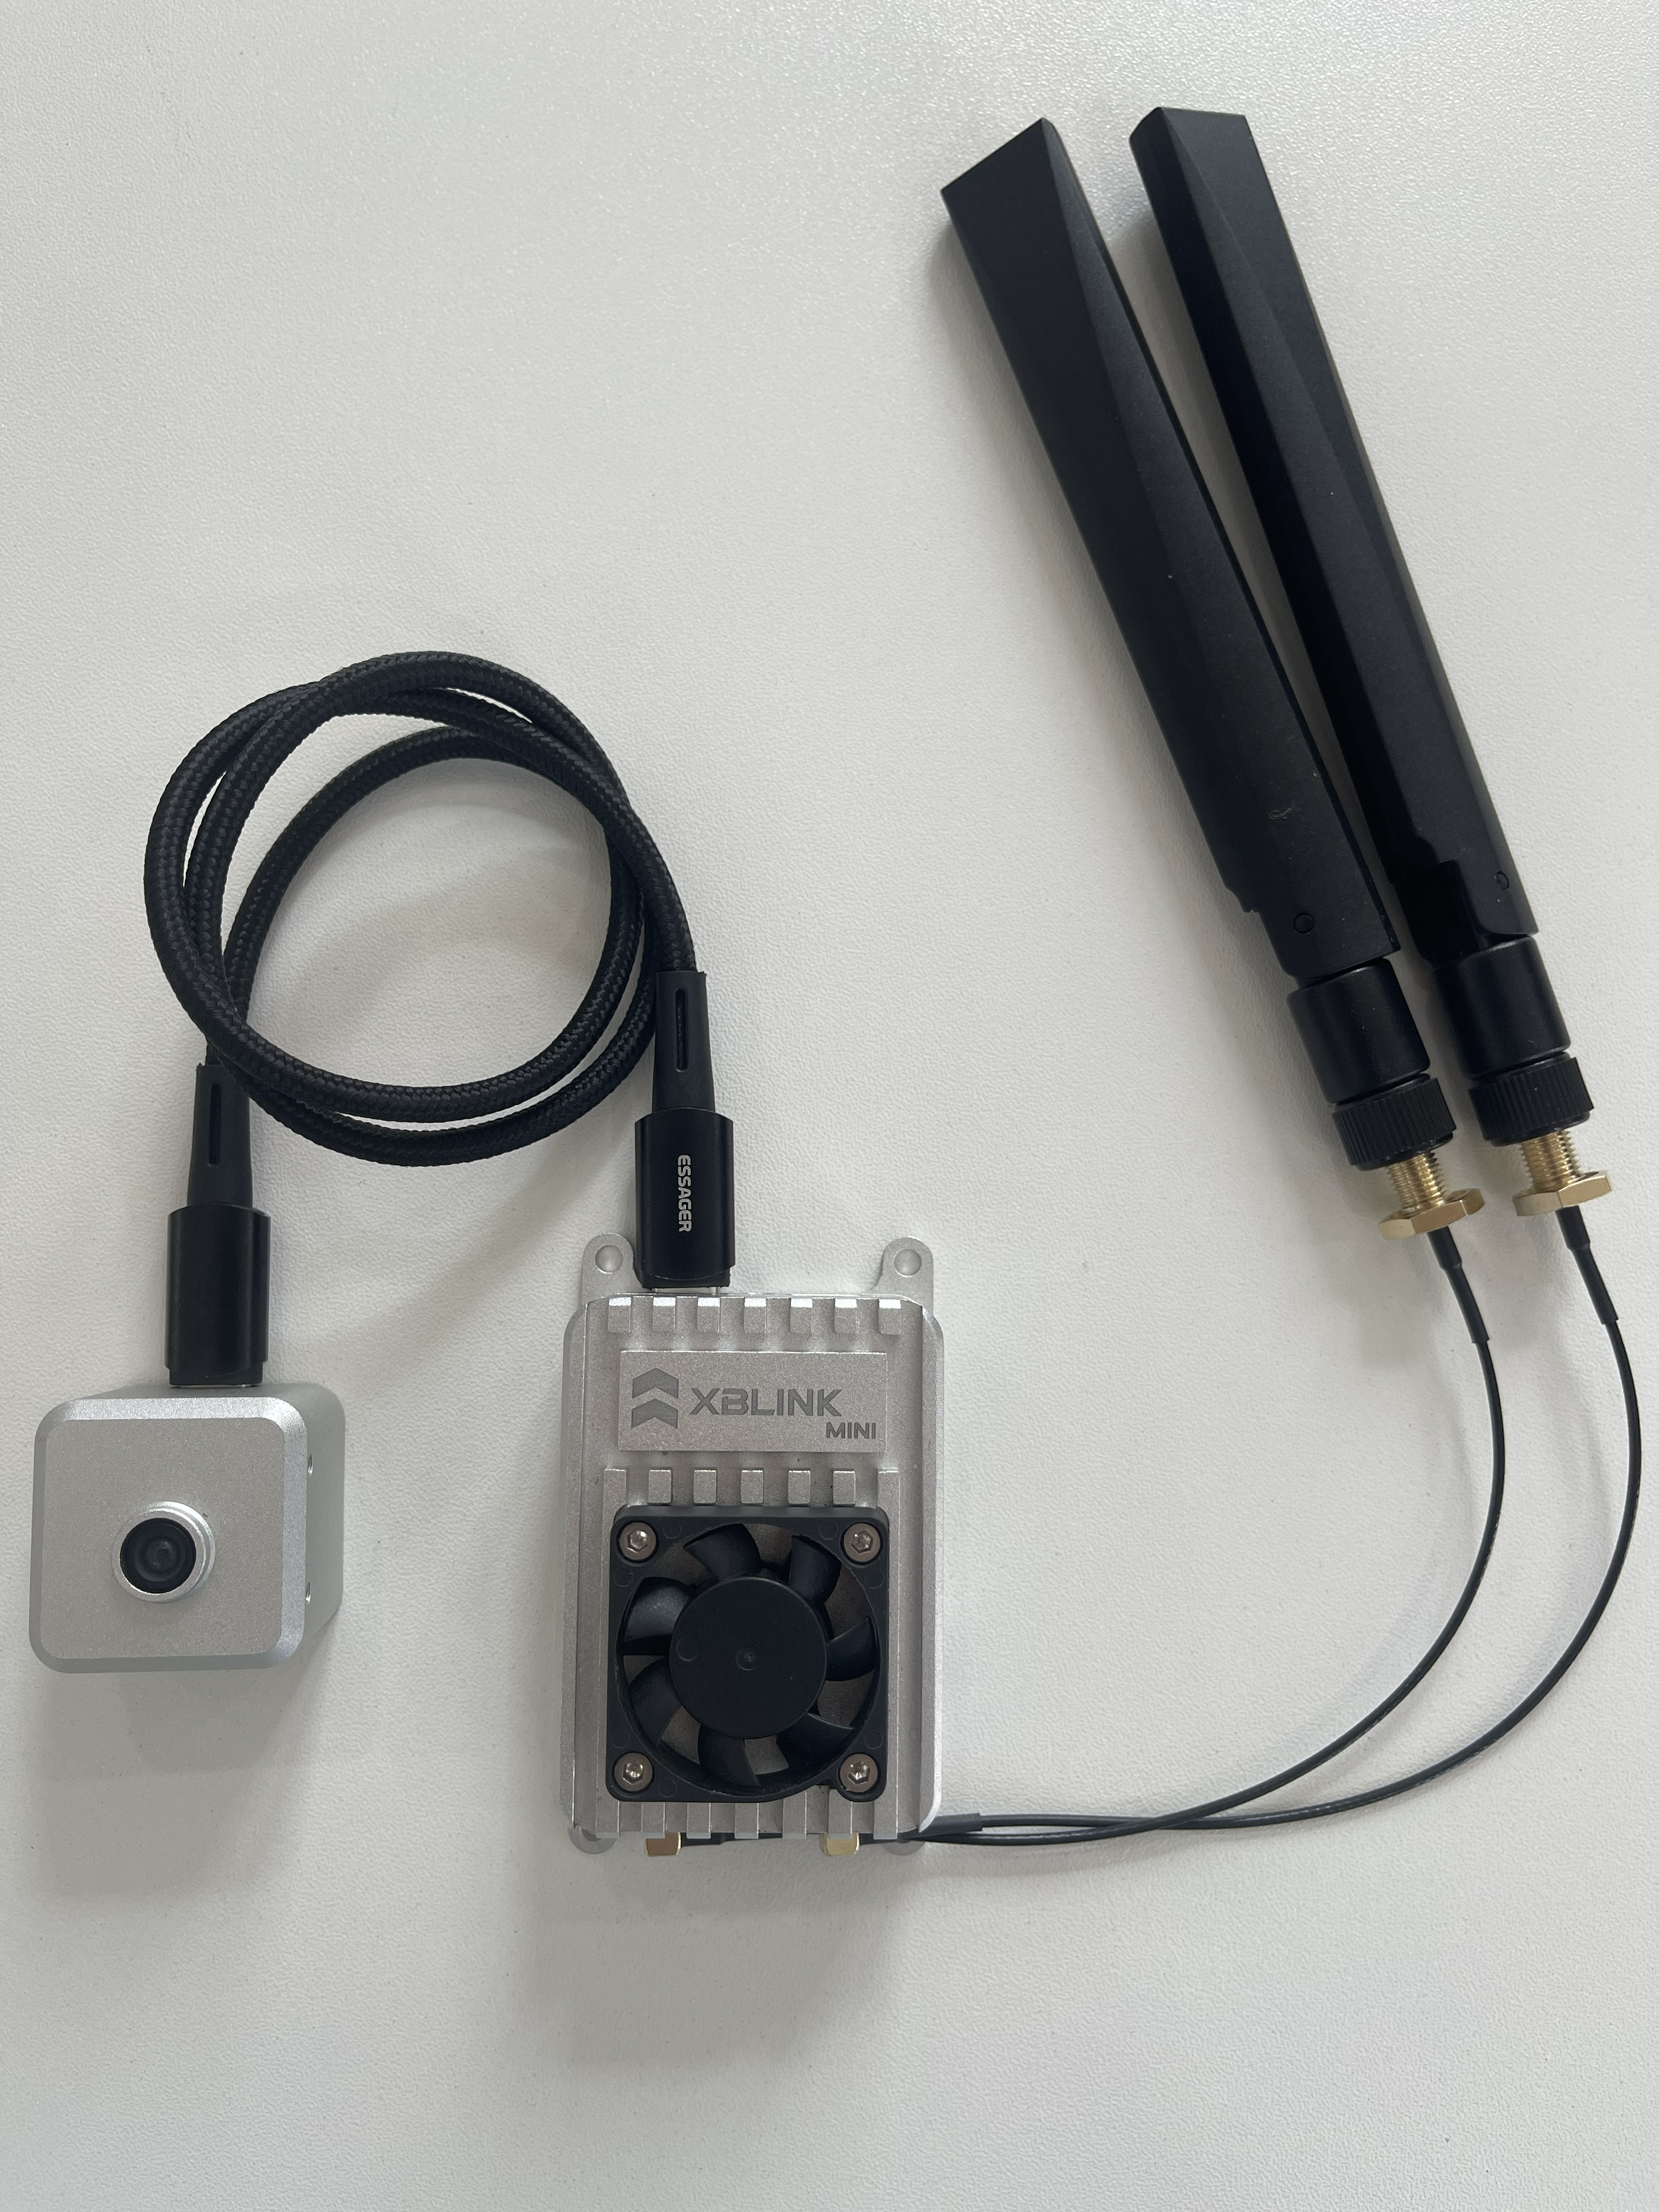
#### Connect Camera

![](/files/-MbjOsz5vWPiYvvyKEGJ)

\
**Note:** For another payload via CSI or HDMI, please conntact us

#### Power

XBLink supports 7-16V voltage input. You can directly connect 3 S battery to power XBLink (6S battery is inefficient and unstable with long-term use)

**Note: Please use 3S battery or 12V DC Ubec** (minimum 3A) for high effective and stable performance power supply to XBLink. If you use 6S high discharge battery for drone, we are not responsible for damage

&#x20;&#x20;

![](/files/-MbKQrsesYg7BVFo_NTr)

{% hint style="info" %}
**Note:** Please check carefully, **avoid wrong between Power Port and UART Port** (also use for Cooling Fan), both is JST-GH 4 Pin. We are not responsible for this confusion.
{% endhint %}

{% hint style="info" %}
More detail, follow this section: <https://docs.xbstation.com/xblink/quick-start>
{% endhint %}

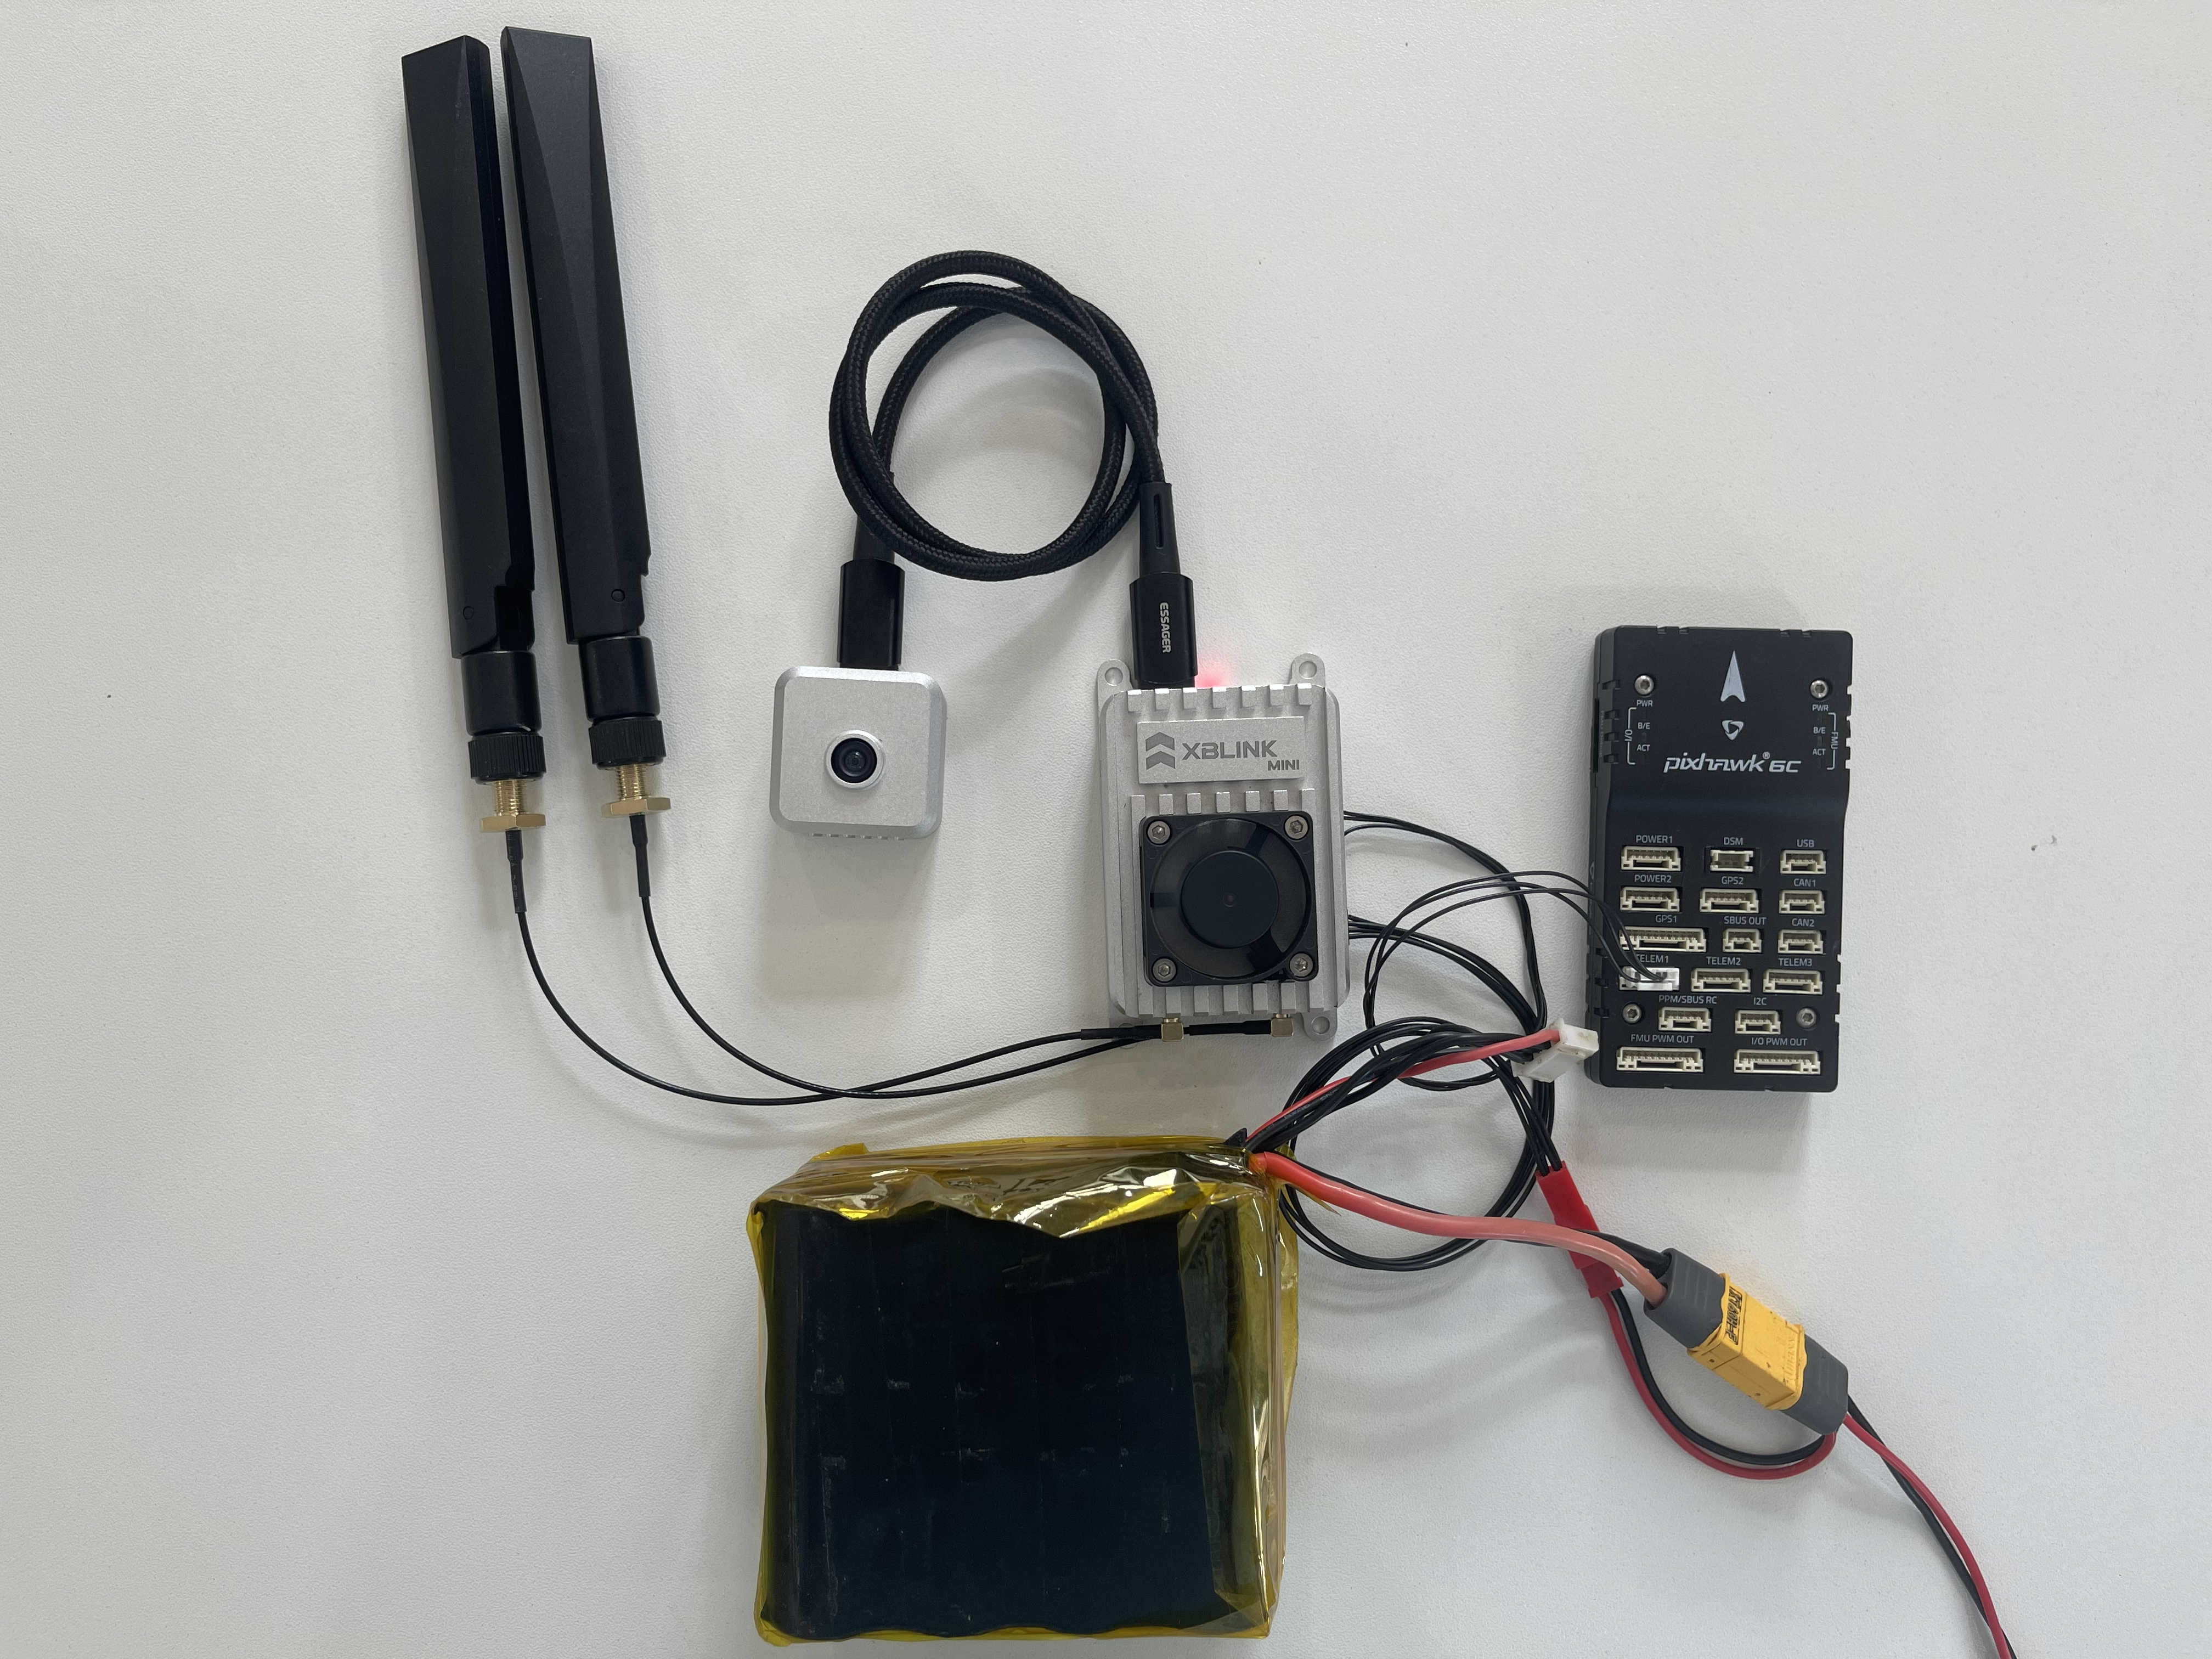
#### Done

![XBLink connect to Pixhawk Cube](/files/-Md5l8xJmMoCgzY2ScCI)

### Step 2: Connect Flight Controller

You can use Telemetry 1 or 2 of pixhawk for connection with XBLink. Telemetry 1 is normally used for Telemetry Radio (like: RFD900...) and Telemetry 2 for XBLink.

The baudrate on XBLink **must be same** with Pixhawk baudrate (Telemery **1** or **2**).&#x20;

* For ArduPilot: **SERIAL2\_BAUD = 57**(Default, it means 57600), **SERIAL2\_PROTOCOL**=**2** (MAVLink 2)      &#x20;
* For PX4: **SER\_TEL2\_BAUD = 57600** (Default 921600, you should change to 57600 for save data)

**Note:** If you have problem with Telemetry 2 port, you can use Telemetry 1 Port (Default baud rate Telemetry 1 is 57600, MAVLink:1). XBLink still works normally with both MAVLink 1 and MALink 2.

### Step 3: Connect XBStationPilotApp and Ground Station Software

* Open XBStationPilotApp
* Login (Username and password in XBLink box)
* Connect to GCS

**More detail, refer this link:**

{% content-ref url="/pages/-MZWolPBkgeTpx8EcYo3" %}
[XBStationPilotApp](/xblink-basic/xbstation-pilot-app)
{% endcontent-ref %}

### Step 4: Test and Flight

1. Put XBLink on your drone
2. Check the connection between XBLink to Pixhawk, Camera, SIM Card, Antennas
3. Connect battery
4. Waiting about 30s for XBLink start up
5. Check led Indicator: <https://docs.xbstation.com/xblink/led-indicator>
6. Open XBStationPilotApp, Login
7. Connect to GCS: QGroundcontrol or Mission Planner

### **Optional: Register your Email and change your Password**

Please refer this link:&#x20;

{% content-ref url="/pages/-McswiciCg5hZRokg2NG" %}
[Broken mention](broken://pages/-McswiciCg5hZRokg2NG)
{% endcontent-ref %}


# XBLink

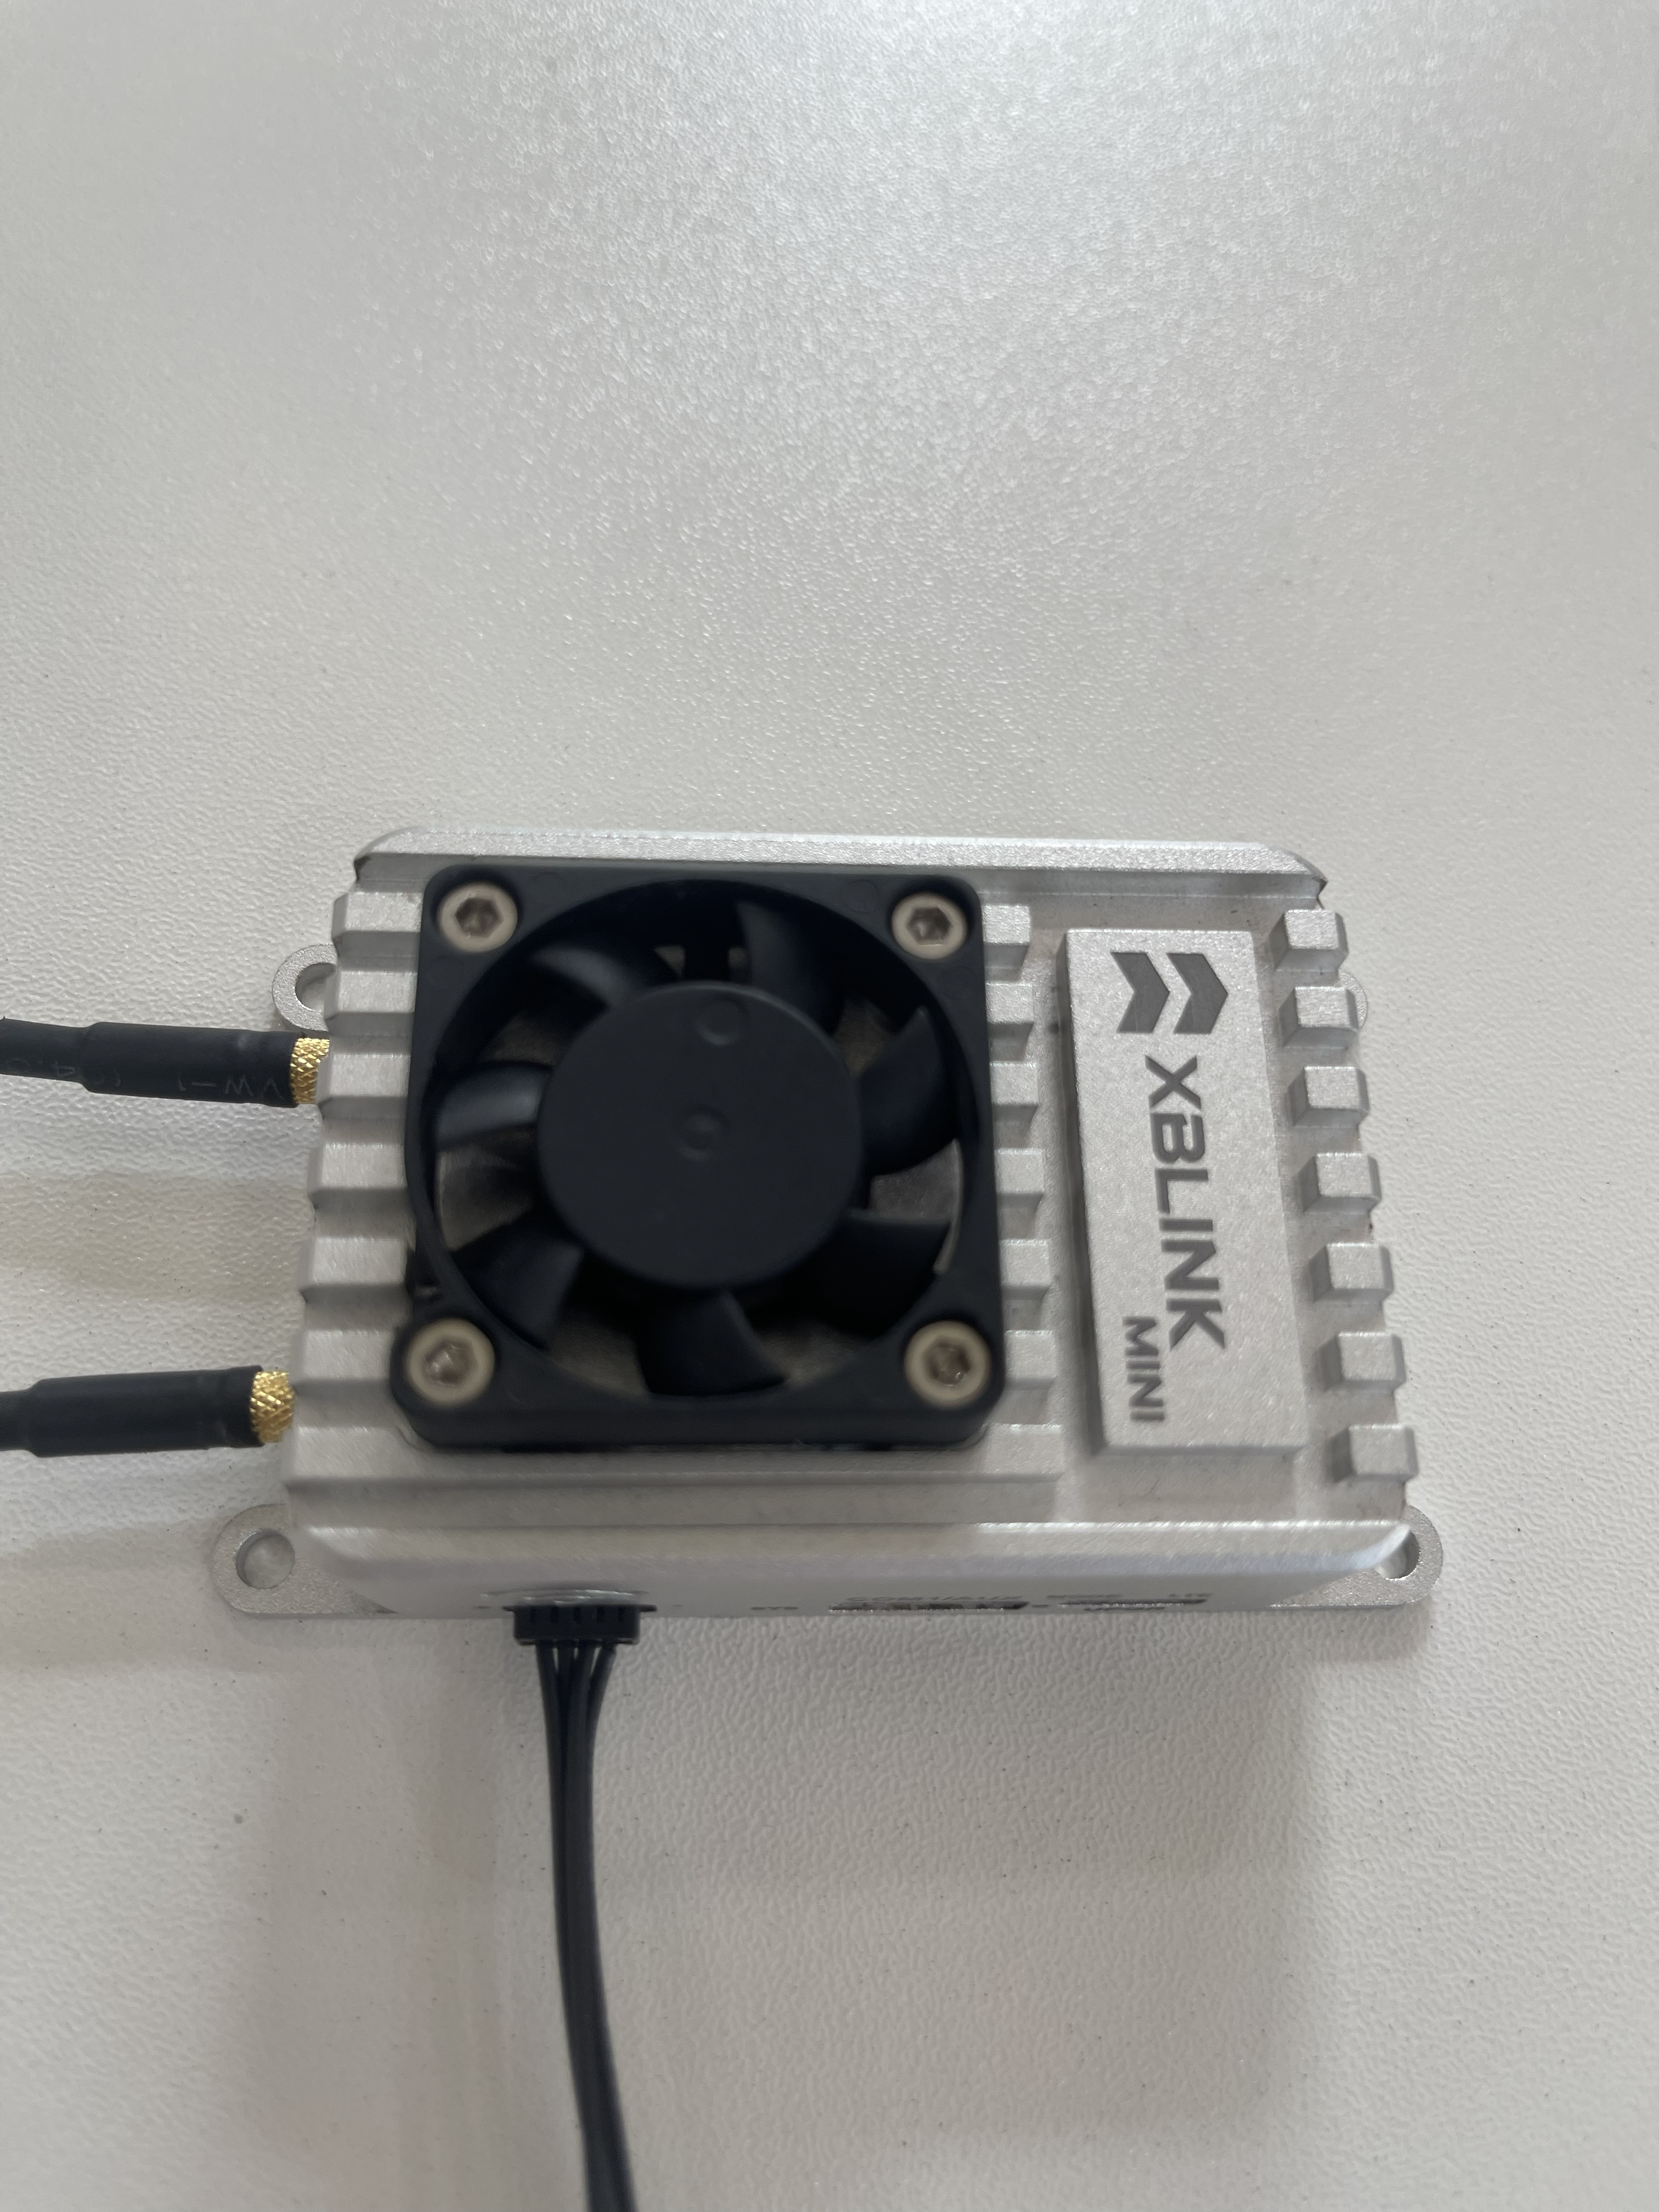
XBLink is 4G LTE Connectivity for UAVs. Perfect fit with Cube. Designed for Ardupilot ecosystem.

XBLink is a Plug and Play hardware for BVLOS Flight based on Real time 4G LTE connective.

To discover XBLink, we need to understand the main components:

* [**XBlink Hardware**](https://docs.xbstation.com/xblink/overview)**:** Companion computer combine cellular networking equipment and power module in one small factory design
* **XBFirm process:** a set of softwares base on Linux making an platform for live streaming and control telemetry data. It is also designed to easily integrate other functions, e.g. Gimbal/Payload control, computer vision, AI, UTM, ...
* [**XBLinkApp(Wifi Hotspot)**](https://docs.xbstation.com/xblink/advanced-configuration)**:** Web interface to easily configure and communicate with XBLink without touching and wiring. You can connect XBLinkApp via Wifi hotspot from your phone, table or PC.


# Overview

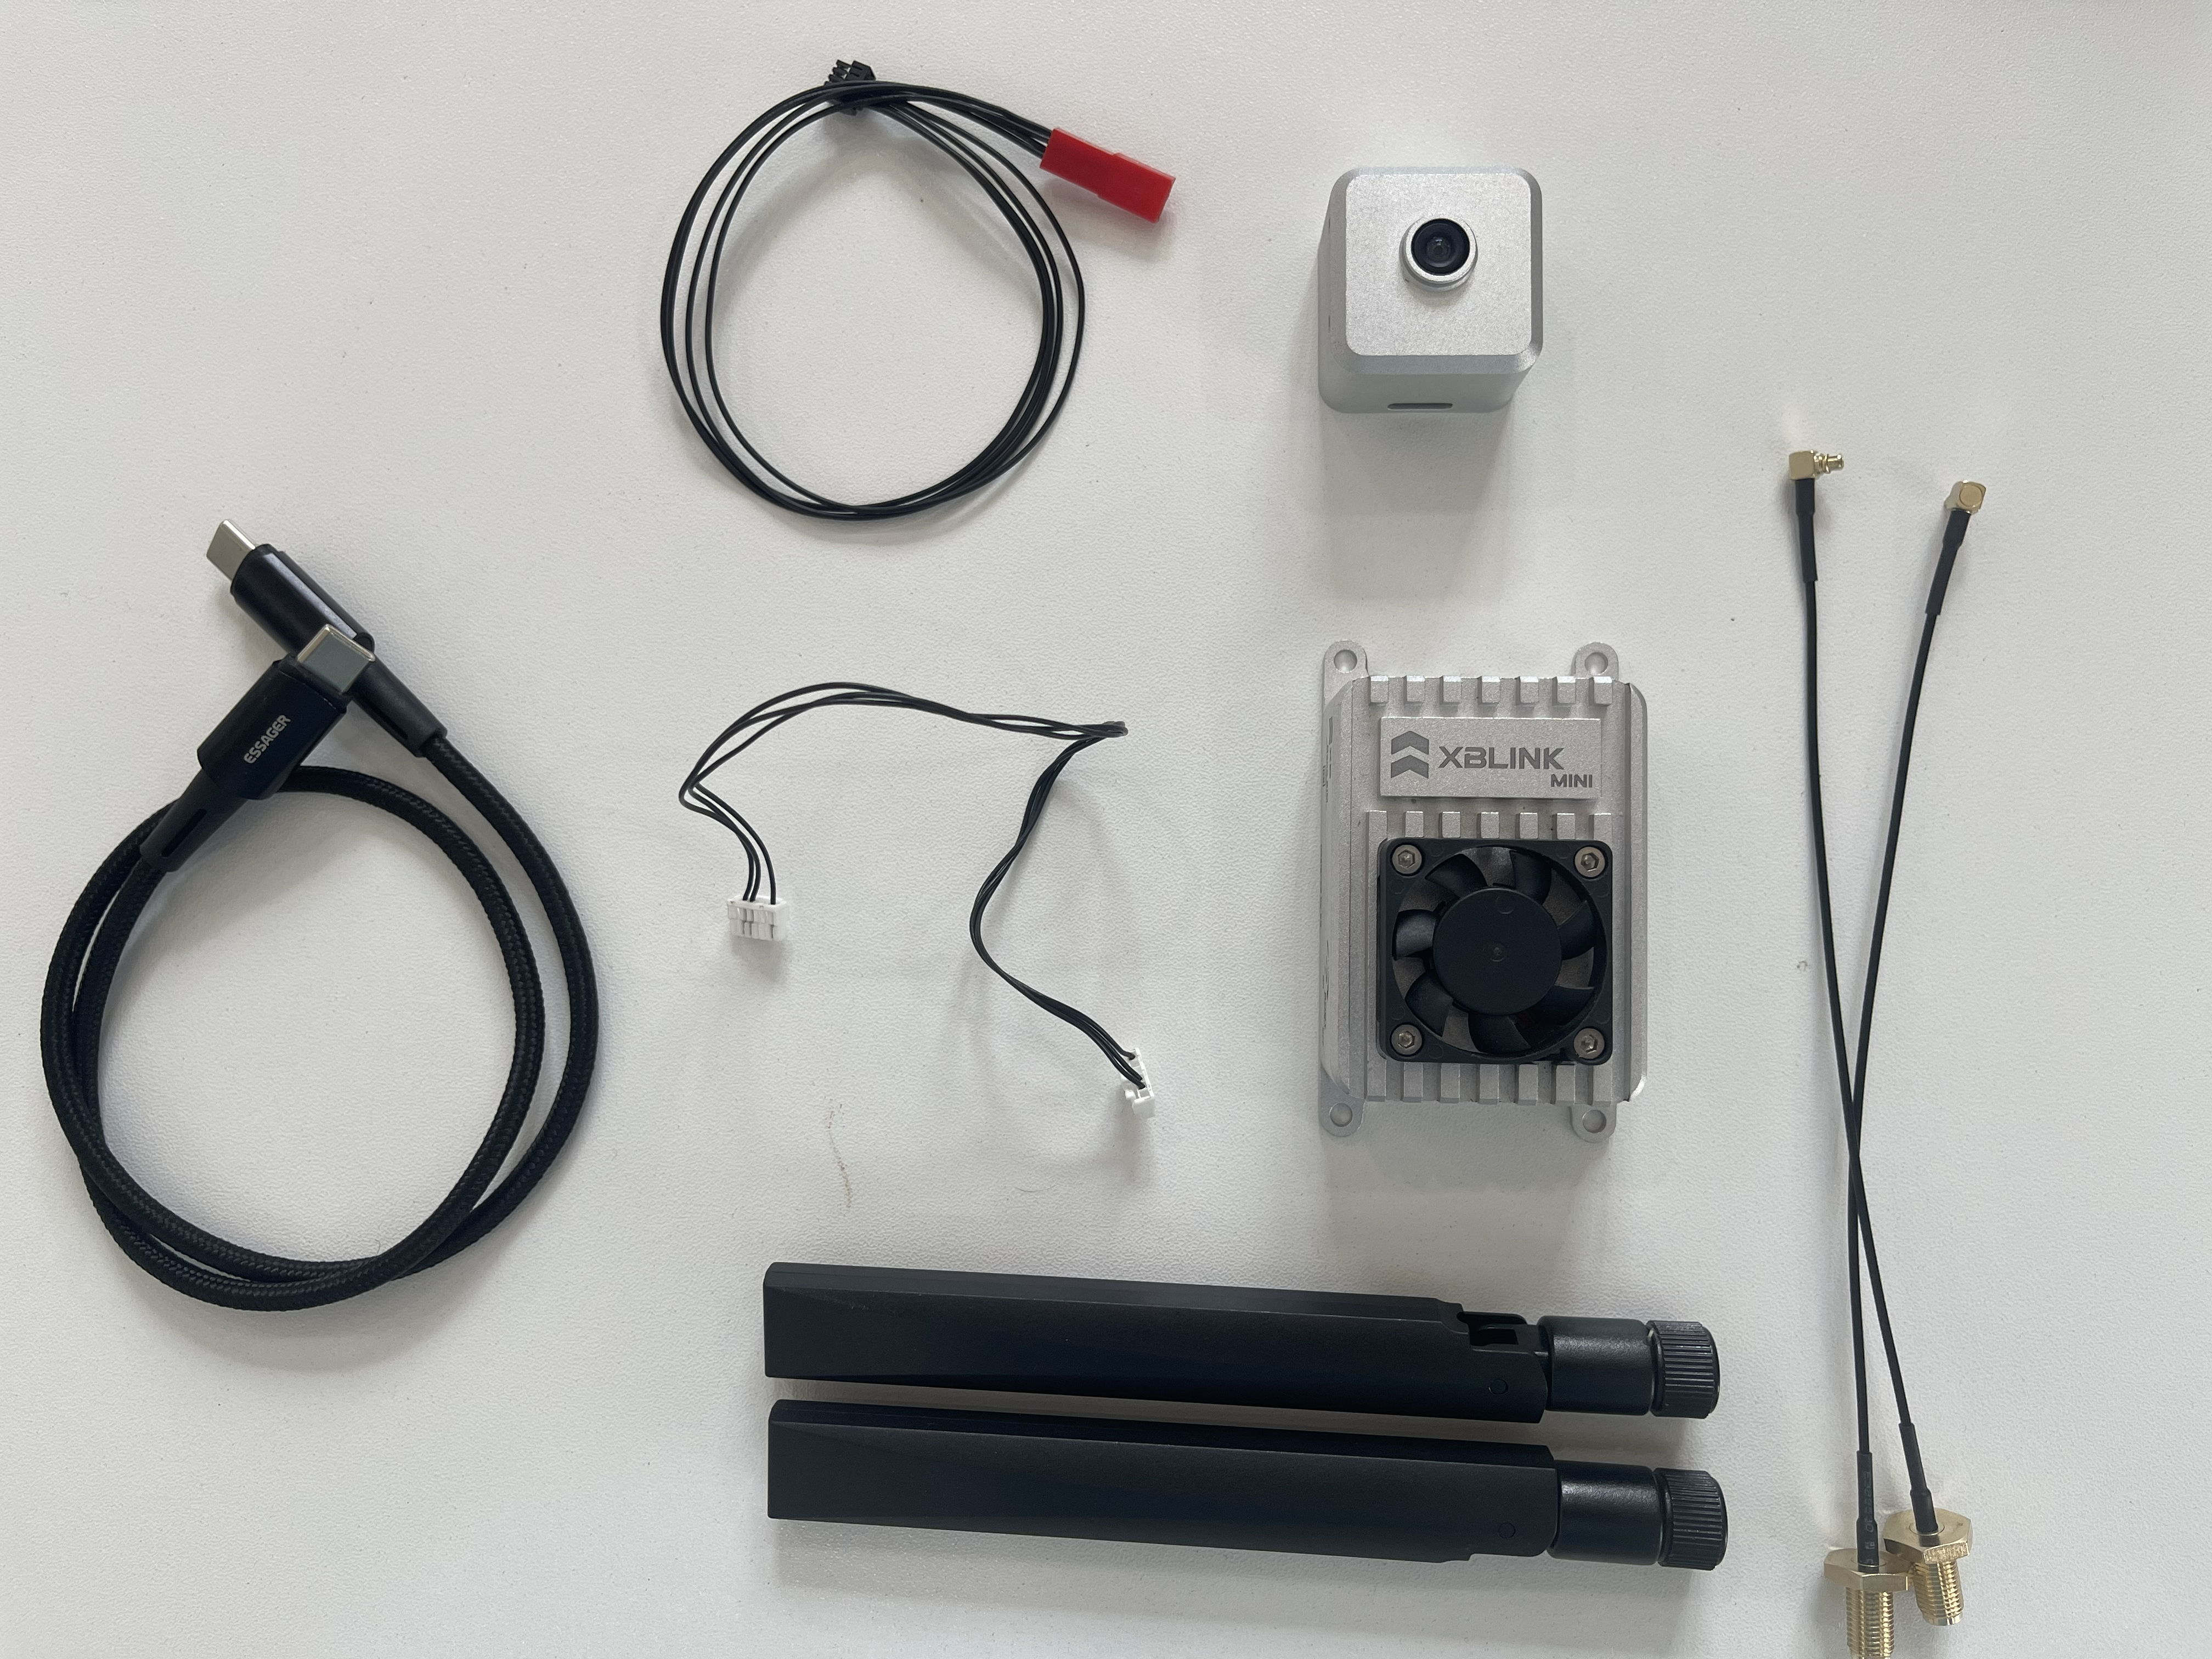
This section contains information about components included in the XBlink and Accessories.

### Components

![XBLink BVLOS Kit](/files/-Maim_OwuEwT0JaacHR8)

### Electronics

| Name                  | Quantity |
| --------------------- | -------- |
| XBLink                | 1        |
| XBCam                 | 1        |
| Telemetry Cables      | 1        |
| Power Cables          | 1        |
| Micro HDMI Cables     | 1        |
| 4G LTE Antenna        | 2        |
| 4G LTE  Antenna Cable | 2        |

### Other (not include)

| Name                                              | Description                       |
| ------------------------------------------------- | --------------------------------- |
| XB Module 3                                       | HDMI to CSI convert physically    |
| B101 HDMI to CSI convert                          | Read video for HDMI camera output |
| Fan                                               | Cooling Fan                       |
| USB Type A Female to Micro USB Male Adapter Cable | Conecting External hardware       |
| USB to Ethernet Convert                           | LAN ethernet                      |
| USB Type-A to Micro USB Cable                     | Update Firmware                   |

### Spectifications <a href="#spectifications" id="spectifications"></a>

| #                       | ​Title                                                 |
| ----------------------- | ------------------------------------------------------ |
| **Product Performance** | ​**Content**                                           |
| Autopilot               | Pixhawk Cube, Pixhawk 4,Pixhawk etc...                 |
| Data protocol           | Mavlink1, Mavlink2                                     |
| Camera                  | XBCam 8 MP                                             |
| Video output            | 1080p、720p、480p、320 - Custom                           |
| Video codec             | H264                                                   |
| **Interface**           | ​**Content**                                           |
| Video input             | CSI (XBCam 8MP) , HDMI (option - need extension board) |
| Antenna interface       | MMCX                                                   |
| Uart                    | Uart 1 (telmetry), Uart 2 (Gimbal control)             |
| **Work Environment**    | ​**Content**                                           |
| Voltage input           | 7 - 30V                                                |
| Temperature             | -10 - +60°C                                            |
| **Appearance Size**     | ​**Content**                                           |
| Size                    | 73.4mmX43.4mmX18.5mm                                   |
| Weight                  | 74g                                                    |
| **Ground station**      | ​**Content**                                           |
| Support                 | PC (Windows, IOS), Android device                      |
| Software                | XBStation Pilot App                                    |
| Compatible              | MissionPlanner, QGroundControl                         |

### **XBCam** <a href="#xbcam" id="xbcam"></a>

| **Performance**     | ​Title         |
| ------------------- | -------------- |
| Size                | 26mmX26mmX23mm |
| 26mmX26mmX23mm      | 14.5g          |
| Megapixels          | 8 Megapixels   |
| Field of view (FOV) | 160 degree     |

### 4G LTE **Performance** <a href="#id-4g-lte-performance" id="id-4g-lte-performance"></a>

<table data-header-hidden><thead><tr><th width="174">Performance</th><th>​Title</th></tr></thead><tbody><tr><td><strong>Performance</strong></td><td>​Title</td></tr><tr><td>Network Frequency</td><td><p><strong>LLTE-FDD:</strong> B1/ B2/ B3/ B4/ B5/ B7/ B8/ B12/ B13/ B18/ B19/ B20/ B25/ B26/ B28 <strong>LTE-TDD:</strong> B38/ B39/ B40/ B41 </p><p><strong>WCDMA:</strong> B1/ B2/ B4/ B5/ B6/ B8/ B19</p><p><strong>GSM:</strong> B2/B3/B5/B8</p></td></tr><tr><td>Region</td><td>Global (All countries and carriers): Europe/Middle East/Africa/Korea/Thailand/India North America Australia/New Zealand/Taiwan/Brazil Japan</td></tr><tr><td>Network Rate</td><td><p><strong>LTE:</strong> </p><p>LTE FDD: Max 150Mbps (DL)/Max 50Mbps (UL) </p><p>LTE TDD: Max 130Mbps (DL)/Max 30Mbps (UL) </p><p><strong>UMTS:</strong> </p><p>DC-HSDPA: Max 42Mbps (DL) </p><p>HSUPA: Max 5.76Mbps (UL) </p><p>WCDMA: Max 384Kbps (DL)/Max 384Kbps (UL) </p><p><strong>GSM:</strong> </p><p>EDGE: Max 296Kbps (DL)/Max 236.8Kbps (UL) </p><p>GPRS: Max 107Kbps (DL)/Max 85.6Kbps (UL)</p></td></tr></tbody></table>


# Quick Start

This section contains the hardware connection of XBLink.

**Buy link:** <https://store.xbstation.com/xblink>

## Connection

XBLink hardware connection mainly includes Antenna, SIM, and Flight Controller, Camera.

### Nano SIM Card <a href="#sim-card" id="sim-card"></a>

XBLink support push-push NanoSim connector

Insert your SIM card into the SIM Card slot, the chip contacts have to **face up**.&#x20;

{% hint style="info" %}
The SIM card is recessed into the enclosure and you might need a tool to push it into the socket. You can hear a click when the card is inserted.
{% endhint %}

\
To remove the SIM card, push onto the card with a tool. You can hear a click and the card will be pushed out of the enclosure.To remove the card again, push it in once more and it will pop out.

![](/files/-M_u1WIjQsm6d9TWZSLj)

![](/files/-M_u2yqBsbMXRm-w7zb6)

### Antenna <a href="#antenna" id="antenna"></a>

Connect the two LTE antennas to the MMCX connectors.&#x20;

![XBLink Antennas ](/files/-M_u3NEG3z3V9IuJ-1Ll)

{% hint style="info" %}
Be very careful with the port antenna. Remove or Install the antennas in a **straight angle**. We are not responsible if the antenna is damaged due to physical impact
{% endhint %}

**Video**: [Link](https://youtu.be/lAXGtti88gc)

### Connect Flight Controller (Telemetry)

You can use Telemetry 1 or 2 of pixhawk for connection with XBLink. Telemetry 1 is normally used for Telemetry Radio (like: RFD900...) and Telemetry 2 for XBLink.

![](/files/-Md5mm-RBSlbR-XHGjCM)

**Note:** Config baudrate of Pixhawk to 57600,  SERIAL1\_BAUD (Default 57, it means 57600), SERIAL1\_PROTOCOL: 2 (MAVLink 2)

### XBCamera

![](/files/-M_u47W_8kt61tBK0BpK)

**Note:** For another payload via CSI or HDMI, please conntact us

### Power

XBLink supports 7-16V voltage input. You can directly connect 3 S battery to power XBLink (6S battery is inefficient and unstable with long-term use)

**Note: Please use 3S battery or 12V DC Ubec** (minimum 3A) for high effective and stable performance power supply to XBLink. If you use 6S high discharge battery for drone, we are not responsible for damage.

![](/files/-M_u4GHp-n_jFSfnYuD_)

{% hint style="info" %}
&#x20;Please check carefully, **avoid wrong between Power Port and UART Port** (also use for Cooling Fan), both is JST-GH 4 Pin. We are not responsible for this confusion.
{% endhint %}

### Done

![](/files/-Md5ms3nGKSP3zPV_915)

### Video


# LED indicator

This article will describe the led indicator of XBLink

| LED       | Color  | Description                       |
| --------- | ------ | --------------------------------- |
| Main led  | RGB    | Indicates the status of XBLink    |
| SYS led   | Green  | System led                        |
| LTE led   | Blue   | Status of the cellular connection |
| Power led | Yellow | On/Off                            |

![Main led](/files/-Ma70gUFR66pQ94bFh0l)

![SYS Led, LTE Led and POWER Led](/files/-Ma70JLwD0X9u0JtuNN0)

### 1.Main Led

| **Color** | Blink                                                         | Solid                                       |
| --------- | ------------------------------------------------------------- | ------------------------------------------- |
| Red       | Start up, Initializing                                        | Error                                       |
| Blue      | Trying to establish cellular network                          |                                             |
| Green     | XBFirm process is running - waiting the singal from Pilot App | All good - XBLink is connected to Pilot App |

> If the network cannot be connected, please check your hardware connection (SIM card status, antenna) and apn configuration, the current network environment.

### **2.SYS led**

* Blinks - Normal operation
* Solid - Firmware Upload

### **3. LTE led**

* When the connection is established and data is being transmitted/received, this led will blink at special intervals. Otherwise, if there is no connection, the led will remain off.

### **4.Power led**

* Light - Power is OK
* Off - No power input


# Dimensions

### Dimensions

![](/files/-MZaCY0f0oO9ekxdaVXe)

### 3D CAD Models


# Interfaces

## Interface Function Map

![](/files/-Ma77UmyCrBMXHEbv0j_)

## Connectors

<table data-header-hidden><thead><tr><th width="141">ID</th><th>Name</th><th>Connector</th><th>Description</th></tr></thead><tbody><tr><td>ID</td><td>Name</td><td>Connector</td><td>Description</td></tr><tr><td>J1</td><td>USB </td><td>Micro USB</td><td>External Hardware (Coral AI, Payload, Microhand, Ethernet...)</td></tr><tr><td>J2</td><td>CSI </td><td>Micro HDMI</td><td>CSI Video Input (XBCAM or extension board)</td></tr><tr><td>J3</td><td>Telem </td><td>JST GH 3pin</td><td>Connect Flight controller</td></tr><tr><td>J4</td><td>Uart </td><td>JST GH 4pin</td><td>Gimbal/Payload or external hardware</td></tr><tr><td>J5</td><td>Power </td><td>JST GH 4pin</td><td>Power Input</td></tr><tr><td>J6</td><td>UPGR </td><td>Micro USB</td><td>Upgade Firmware </td></tr><tr><td>J7</td><td>CSI</td><td>MIPI-CSI (4 lane)</td><td>OEM or Business only</td></tr></tbody></table>

### Pinout

#### Telem (J3)

| Pin | Description |
| --- | ----------- |
| 1   | UART1\_RX   |
| 2   | UART1\_TX   |
| 3   | GND         |

#### Uart(J4)

| Pin | Description |
| --- | ----------- |
| 1   | VBUS 5V 2A  |
| 2   | UART2\_RX   |
| 3   | UART2\_TX   |
| 4   | GND         |

**Note:** Please be careful with the UART Port. It has the **same connector** as the **Power Port**. **We are not responsible if you insert the wrong port**.

#### Power(J5)

| Pin | Description |
| --- | ----------- |
| 1   | GND         |
| 2   | GND         |
| 3   | 7-30V Input |
| 4   | 7-30V Input |

**Note:** Please careful with the UART Port. It has the **same connector** as the **Power Port**. We are not responsible if you insert the wrong port.


# Peripherals - Payload

### Module 3: HDMI TO CSI Covert Module

![](/files/-Ma7lSgi90YAsl5YnrwS)

### B101

![](/files/-Ma7lkA_dRAtFRJjG6jw)

### Gimbal

### Fan


# Gripper


# XBLinkApp(Wifi Hotspot)

With XBLink, All configs will be done via webgui and XBFirm hospot Wifi

Web interface to easily configure and communicate with XBLink without touching and wiring. You can connect XBLinkApp via Wifi hotspot from your phone, table or PC

**Note:** when you buy XBLink, It is ready to use. Nothing to do. This section is usefull when you want to flash new img, check device or re-login new accont .

##


# Connect

**Connect XBLink Wifi hotspot**

* Turn on XBlink.
* Connect your PC/Phone to XBLink Wifi Hotspot

```
Name: XBLink
Pass: xbstation.com
```

**PC**

![XBLink Wifi PC](/files/-Ma20PTPsjiObg7dSBy1)

**Phone/Tablet**

![](/files/-Mb0S9gh78yirne5T35U)

**WebGUI**

* Open web browser on PC/Phone and go to this address **<http://xblink.local>** or **<http://10.0.0.1>**

![](/files/-Mb0pFhypjWWg6M4axn1)


# Device

This section is to checks the antenna and SIM status.

* If **Antennas Fail**, please check and make sure the antenna is installed correctly or you are in a weak signal area (like a closed room). No need to reset XBLink.
* If **SIM** **Fail**, Please **insert** SIM and **reset** XBLink

![](/files/-Mb0rE3jS_1tBcLDJkdX)


# Config APN

### APN <a href="#apn" id="apn"></a>

We have 2 ways to configure the apn: **Auto** and **Manual**. XBLink support Automatic APN detection (Default).&#x20;

### **Auto**

![](/files/-Mb0qwQUVD5_ks9pAX3C)

### **Manual**

![](/files/-Mb0rPxUTSWWdn7WTjMN)


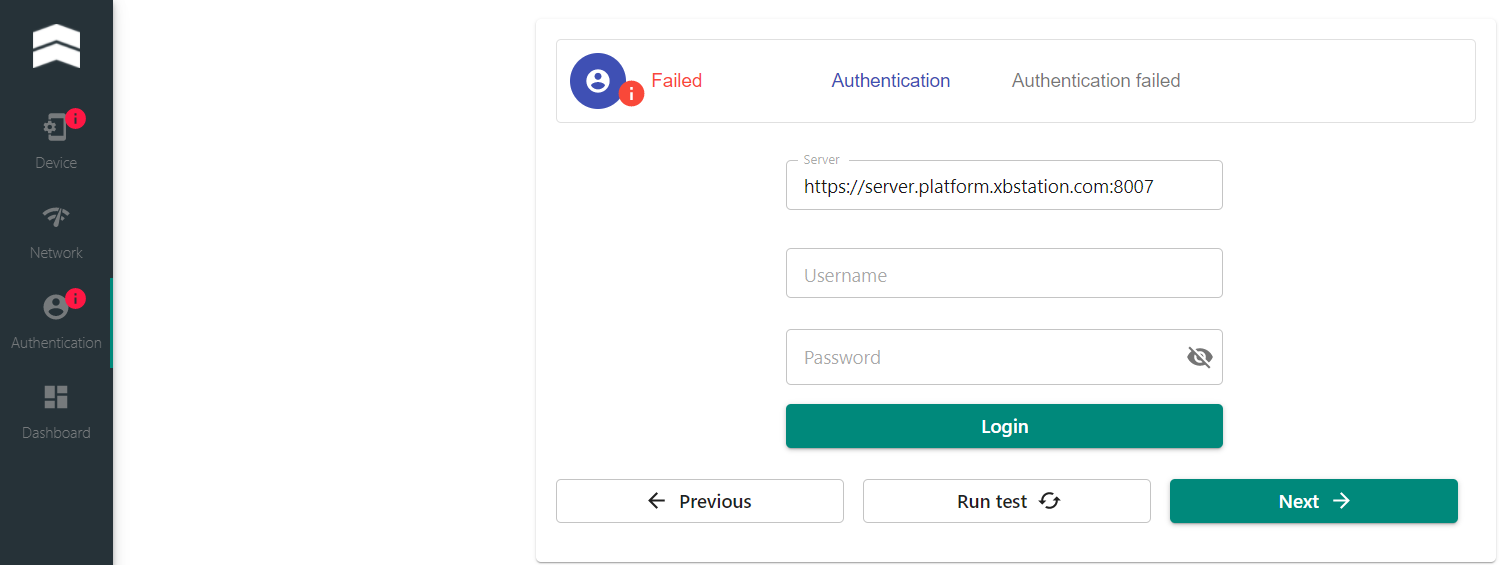
# Login

Input XBStation Account:&#x20;

* Username&#x20;
* Password&#x20;

**Note:** Please don’t change the IP Server

Click **LOGIN** <br>

![](/files/-Mb0sMLRptAyiqrVfdOs)

Make sure success

![](/files/-Mb0qpJQftUQvZeTOZWV)

After success, you need to reset XBlink<br>


# Dashboard

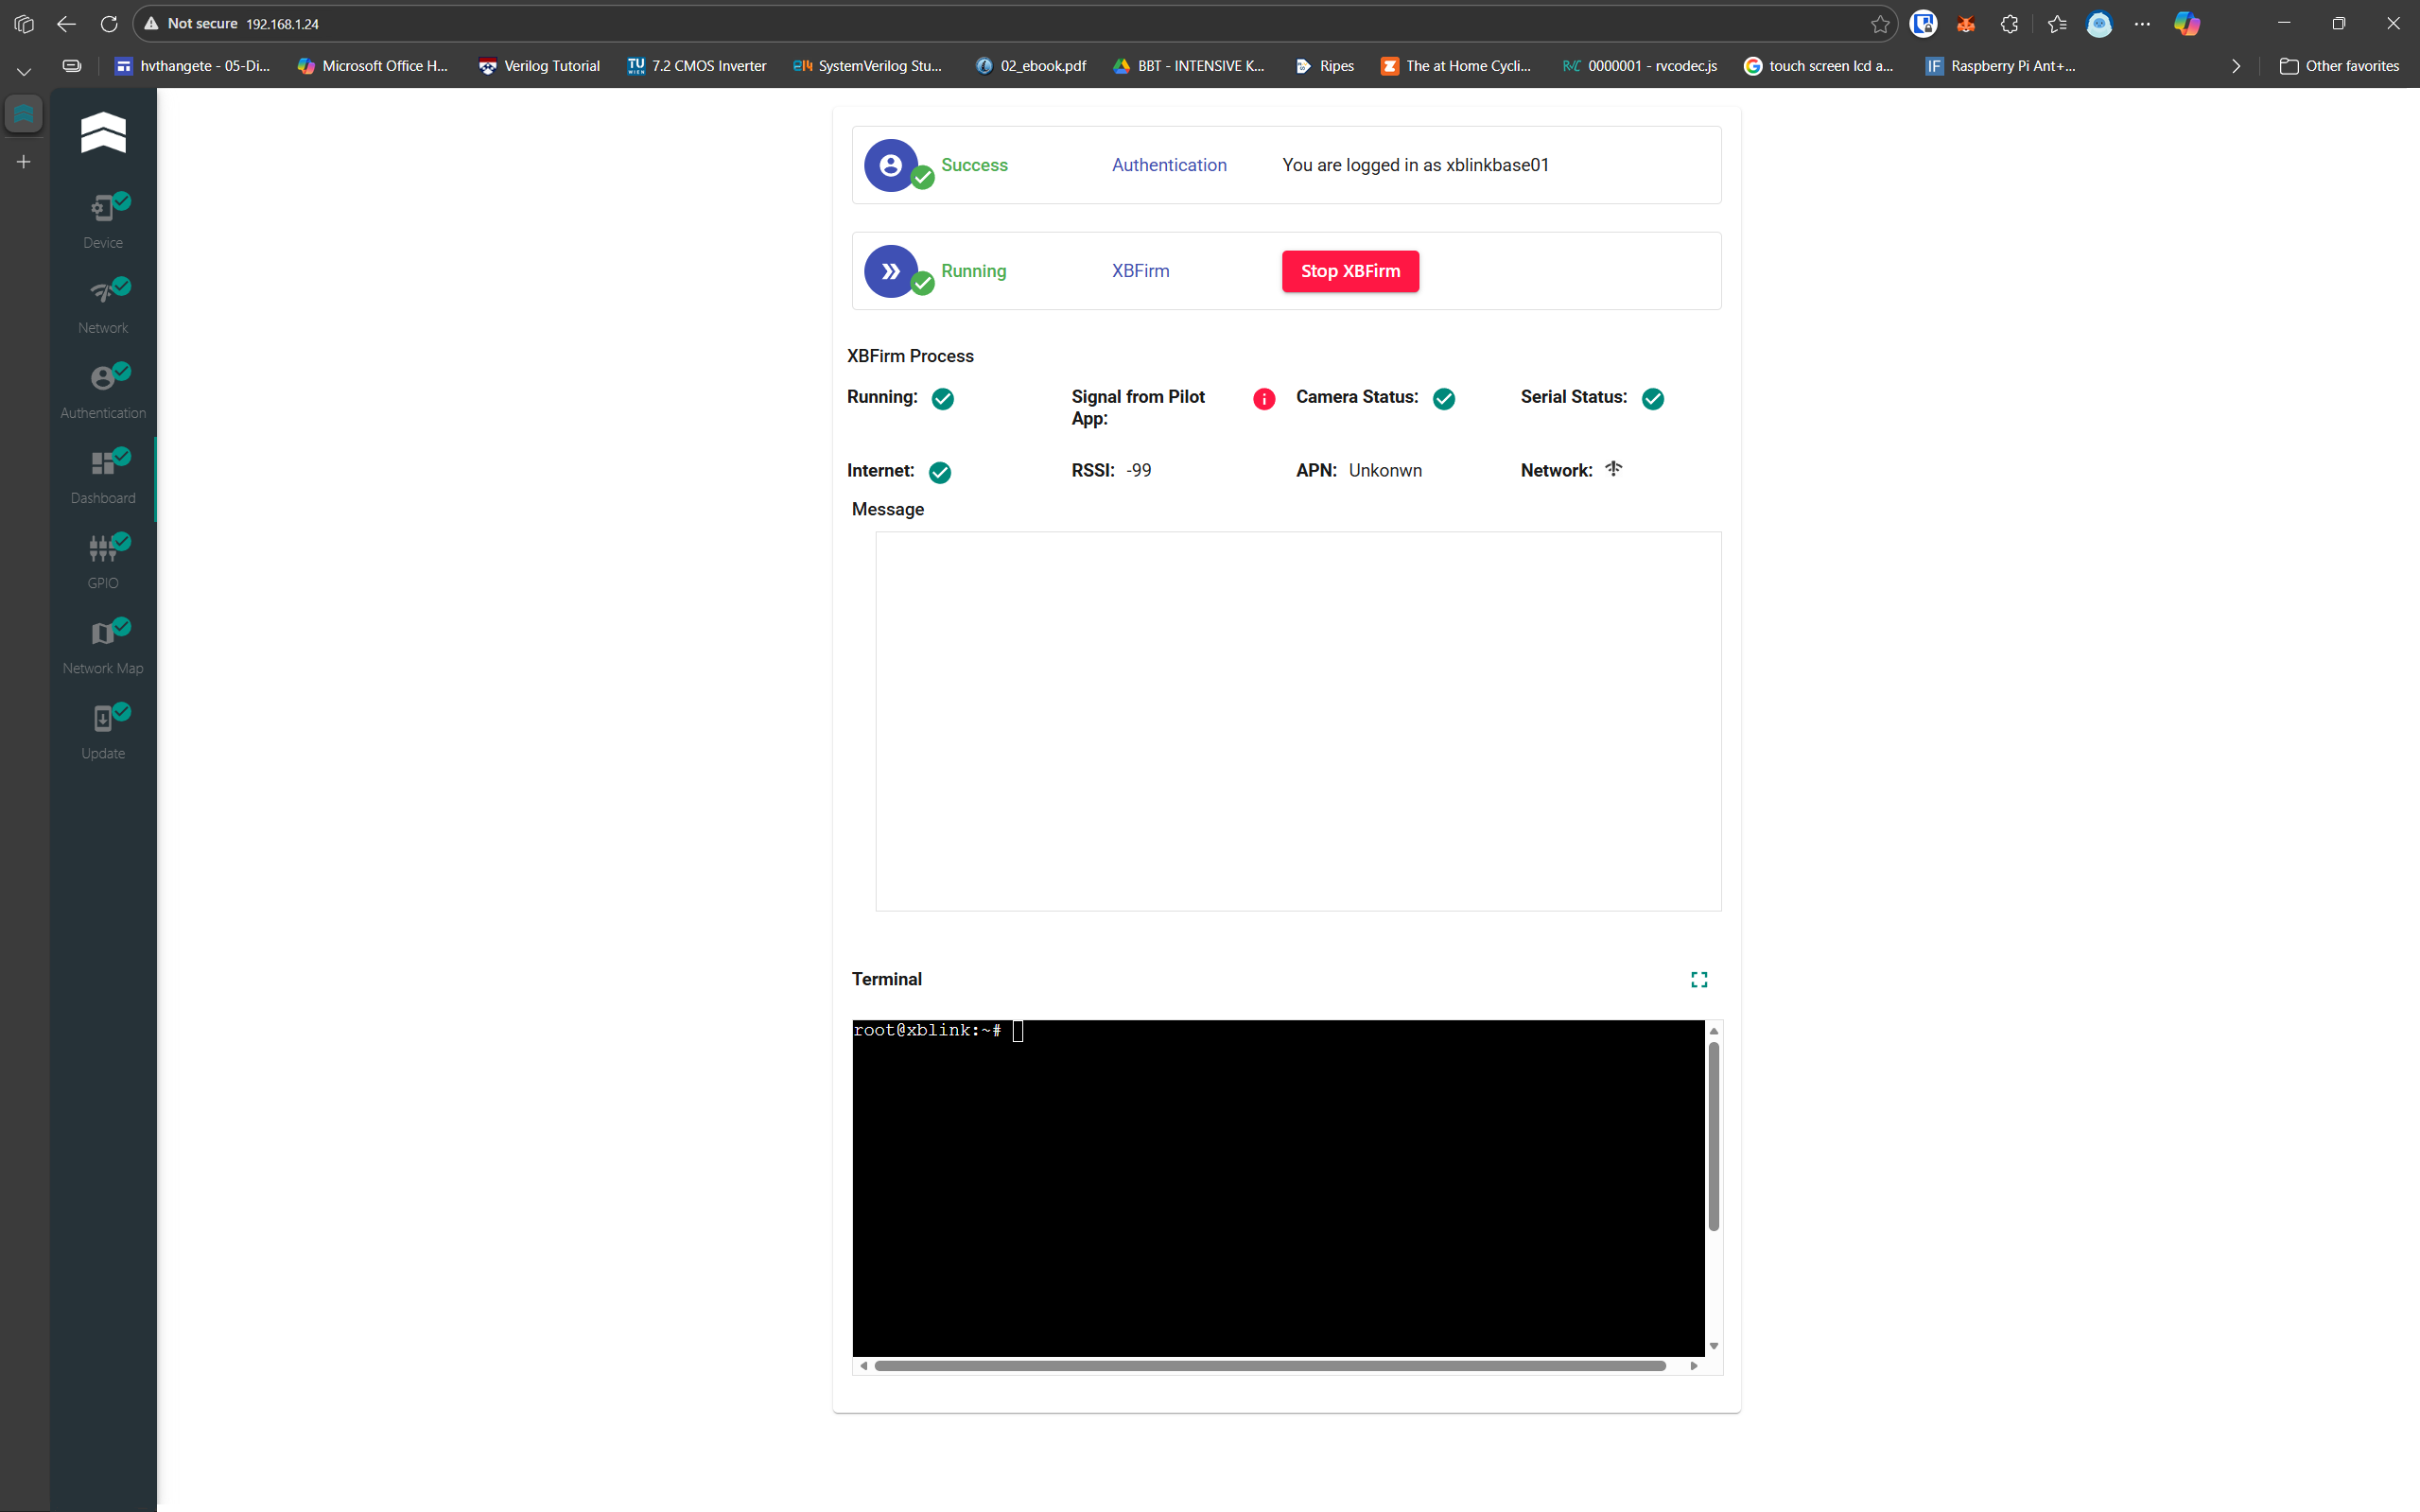
### **Dashoard**

![](/files/-Mb0wpmwalRsyBfOxN1k)

### **Telemetry and Log**

![](/files/-Mb0wuBOeP8vEjuILRJo)

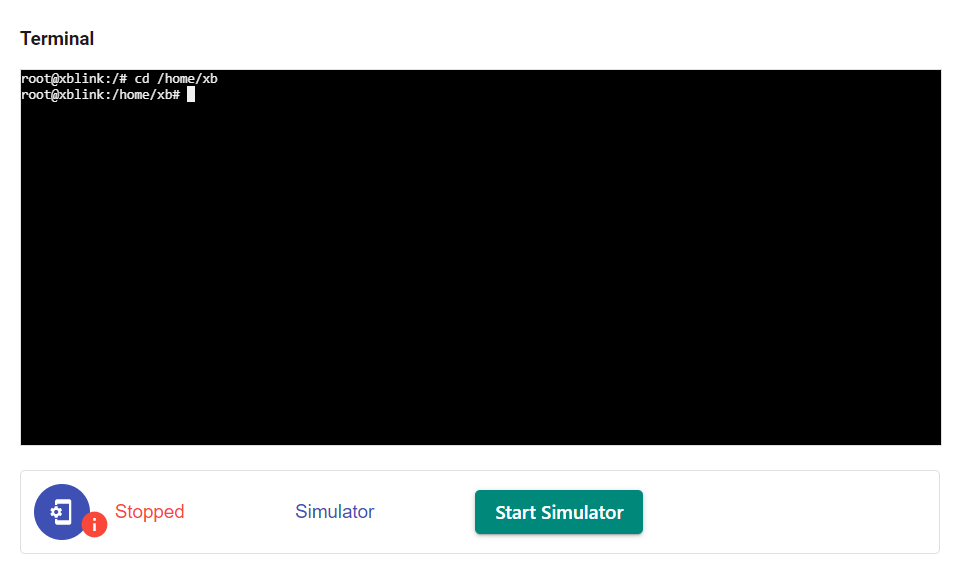
### **Terminal and Simulator**

You can SSH directly to XBLink via wifi hotspot

![](/files/-Mb0x-QVB0SJHbLnezsO)


# Ardupilot SITL Simulator

> The **SITL** (software in the loop) simulator is a software on XBLink allows you to run Plane, Copter or Rover in your specific location without any hardware.

> This allows ArduPilot to be tested on a very wide variety of vehicle types:
>
> * Multi-rotor aircraft
> * Fixed wing aircraft
> * Ground vehicles
> * Underwater vehicles
> * Antenna trackers

![](/files/-MbMkSqpE8PbdnEdEvmB)

You can simulate a flight in XBLink by following these steps

## Configure SITL software

* In XBLinkApp, go to **Dashboard** tab -> **Simulator**
* Configure your vehicle type and choose the location
* Click **Start Simulator** button

![](/files/-MbMmmB_P3ZPP8ghQ1Fq)

{% hint style="info" %}
The simulator will auto run in your XBLink, you should turn it off if you don't use it anymore by clicking button **Stop Simulator**
{% endhint %}

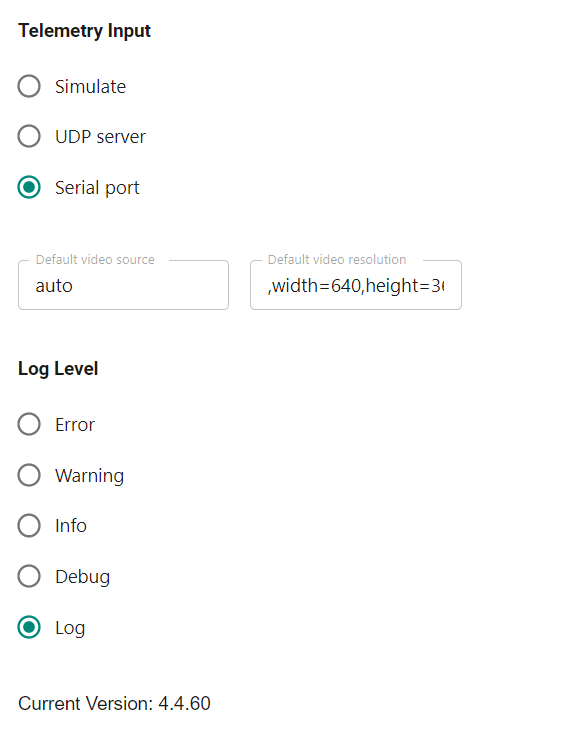
## Change XBFirm telemetry input to Simulate Mode

By default, XBFirm is in **Serial port** telemetry input mode(The telemetry data will be received from the real flight controller), you should change it to **Simulate** mode

* In XBLinkApp, go to **Dashboard** tab -> **Telemetry Input -> Choose Simulate**
* Stop XBFirm, then Start it again

![](/files/-MbMo69YD0grBECXXXfn)

{% hint style="info" %}
You should change the telemetry input mode to **Serial port** if you don't use simulate mode anymore
{% endhint %}

{% embed url="<https://www.youtube.com/watch?v=jIbFjtX0LBU&t>" %}


# Firmware

This section contains the firmware uploading of XBLink

### Overview

There are 2 methods to update new firmware for XBLink:

1. **Flash Firmware via hardware: new device, need to login after flash**
2. **Upgarde Firmware via software: update software, not need login after update**

## Method 1: Dowload Firmware

XBLink Firmware (XBFirm): Contact us

Release Note

Tool: Link

### Flash Firmware:

This section will guide you how to flash new firmware of XBLink:

1. Turn on **"Boot"**

![](/files/-MaCBZa-7rUpIBv9GBVr)

2\. Connect UPGR USB port to your PC by USB cable

![](/files/-MaCCzHJF0QBSY6qIB7k)

3\. Turn on [boot software](https://github.com/raspberrypi/usbboot/raw/master/win32/rpiboot_setup.exe) on your PC, before Power On

4\. Power On XBLink ( plug battery), sys led will be solid

5\. Format [SD Card](https://www.sdcard.org/downloads/formatter/)

6\. Flas new firmware with [Win32DiskImgare](https://sourceforge.net/projects/win32diskimager/)

## Method 2: **Upgarde Firmware**

**Upgarde firmware via wifi hostpost**


# XBStationPilotApp

XBStationPilotApp is a Software on your station to control XBLink and transmit video and telemetry streaming from XBLink to Ground control station(MisisonPlanner, QGroundControl, ...).

![](/files/-M_yeZW5ndrm7BgrfMFl)

## Supported

PC: Windows, MacOS

Phone/Talet: Android

Note: XBStation PilotApp on Android version is beta version. you only fly with **limited time 15 minutes**

## Video Tutorials

#### XBStationPilotApp - MissionPlanner: [link](https://youtu.be/WxmOfRFRJh4?si=WqxiXfhK4aHvsko7)

{% embed url="<https://youtu.be/WxmOfRFRJh4?si=WqxiXfhK4aHvsko7>" %}

#### XBStationPilotApp - QgroundControl: [link](https://www.youtube.com/watch?v=WEN5GLEctyI\&t=1s)

{% embed url="<https://www.youtube.com/watch?v=WEN5GLEctyI&t=1s>" %}


# Overview

## Dashboard

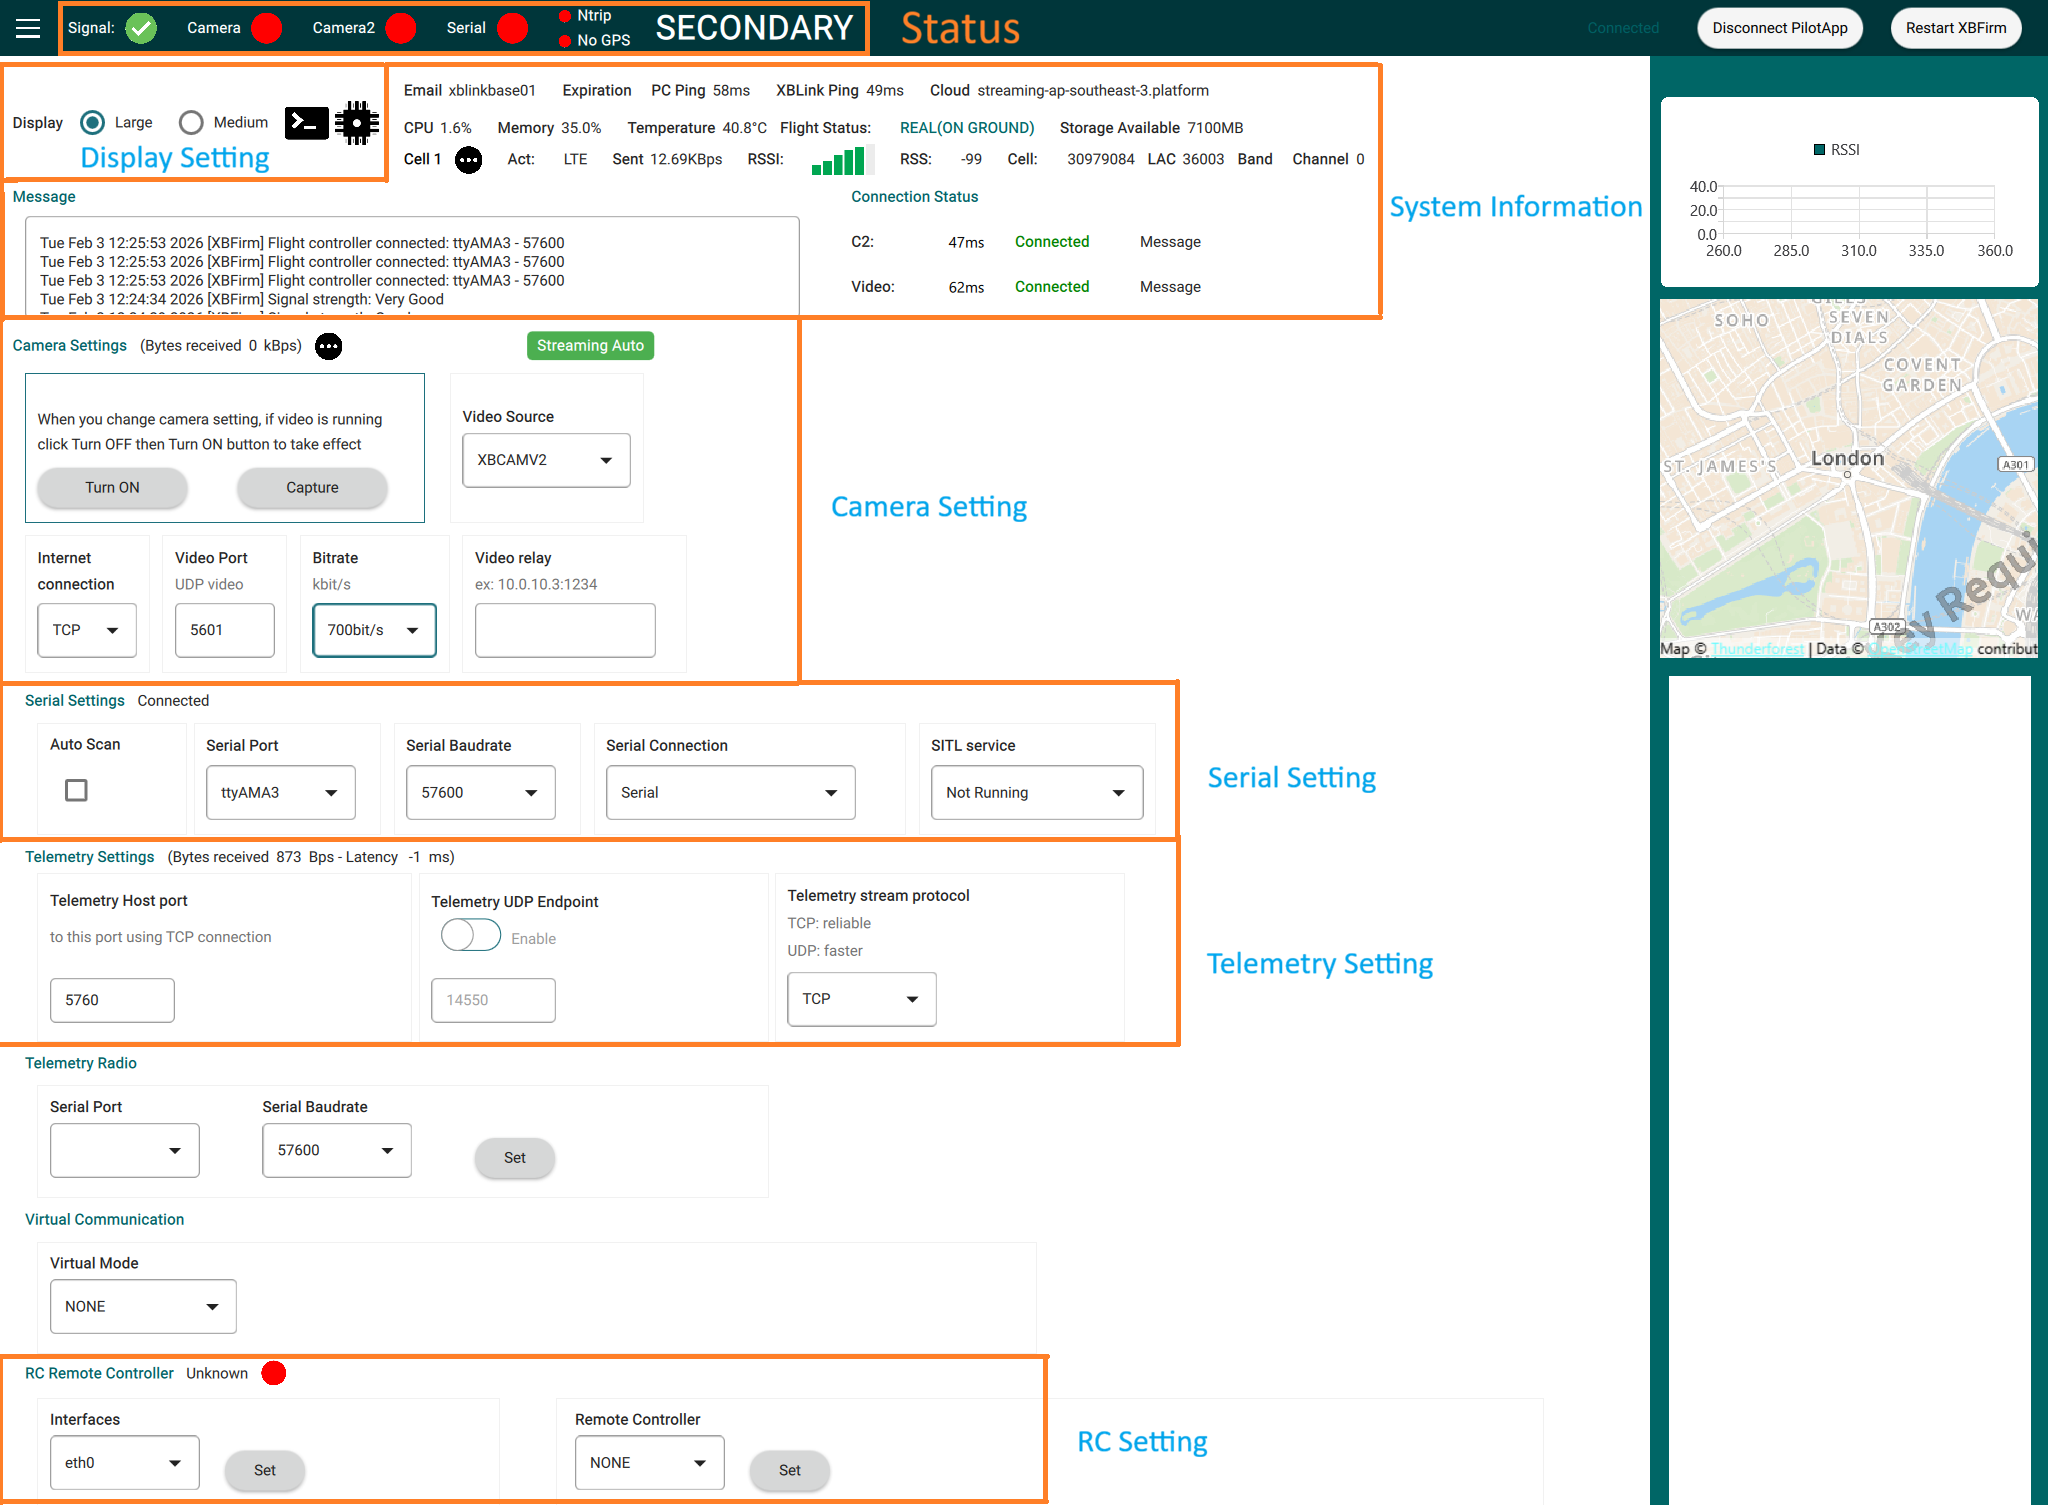
After login Pilot App is ready to use.&#x20;

![](/files/-M_yrhzPXlY9ZoFbda9v)

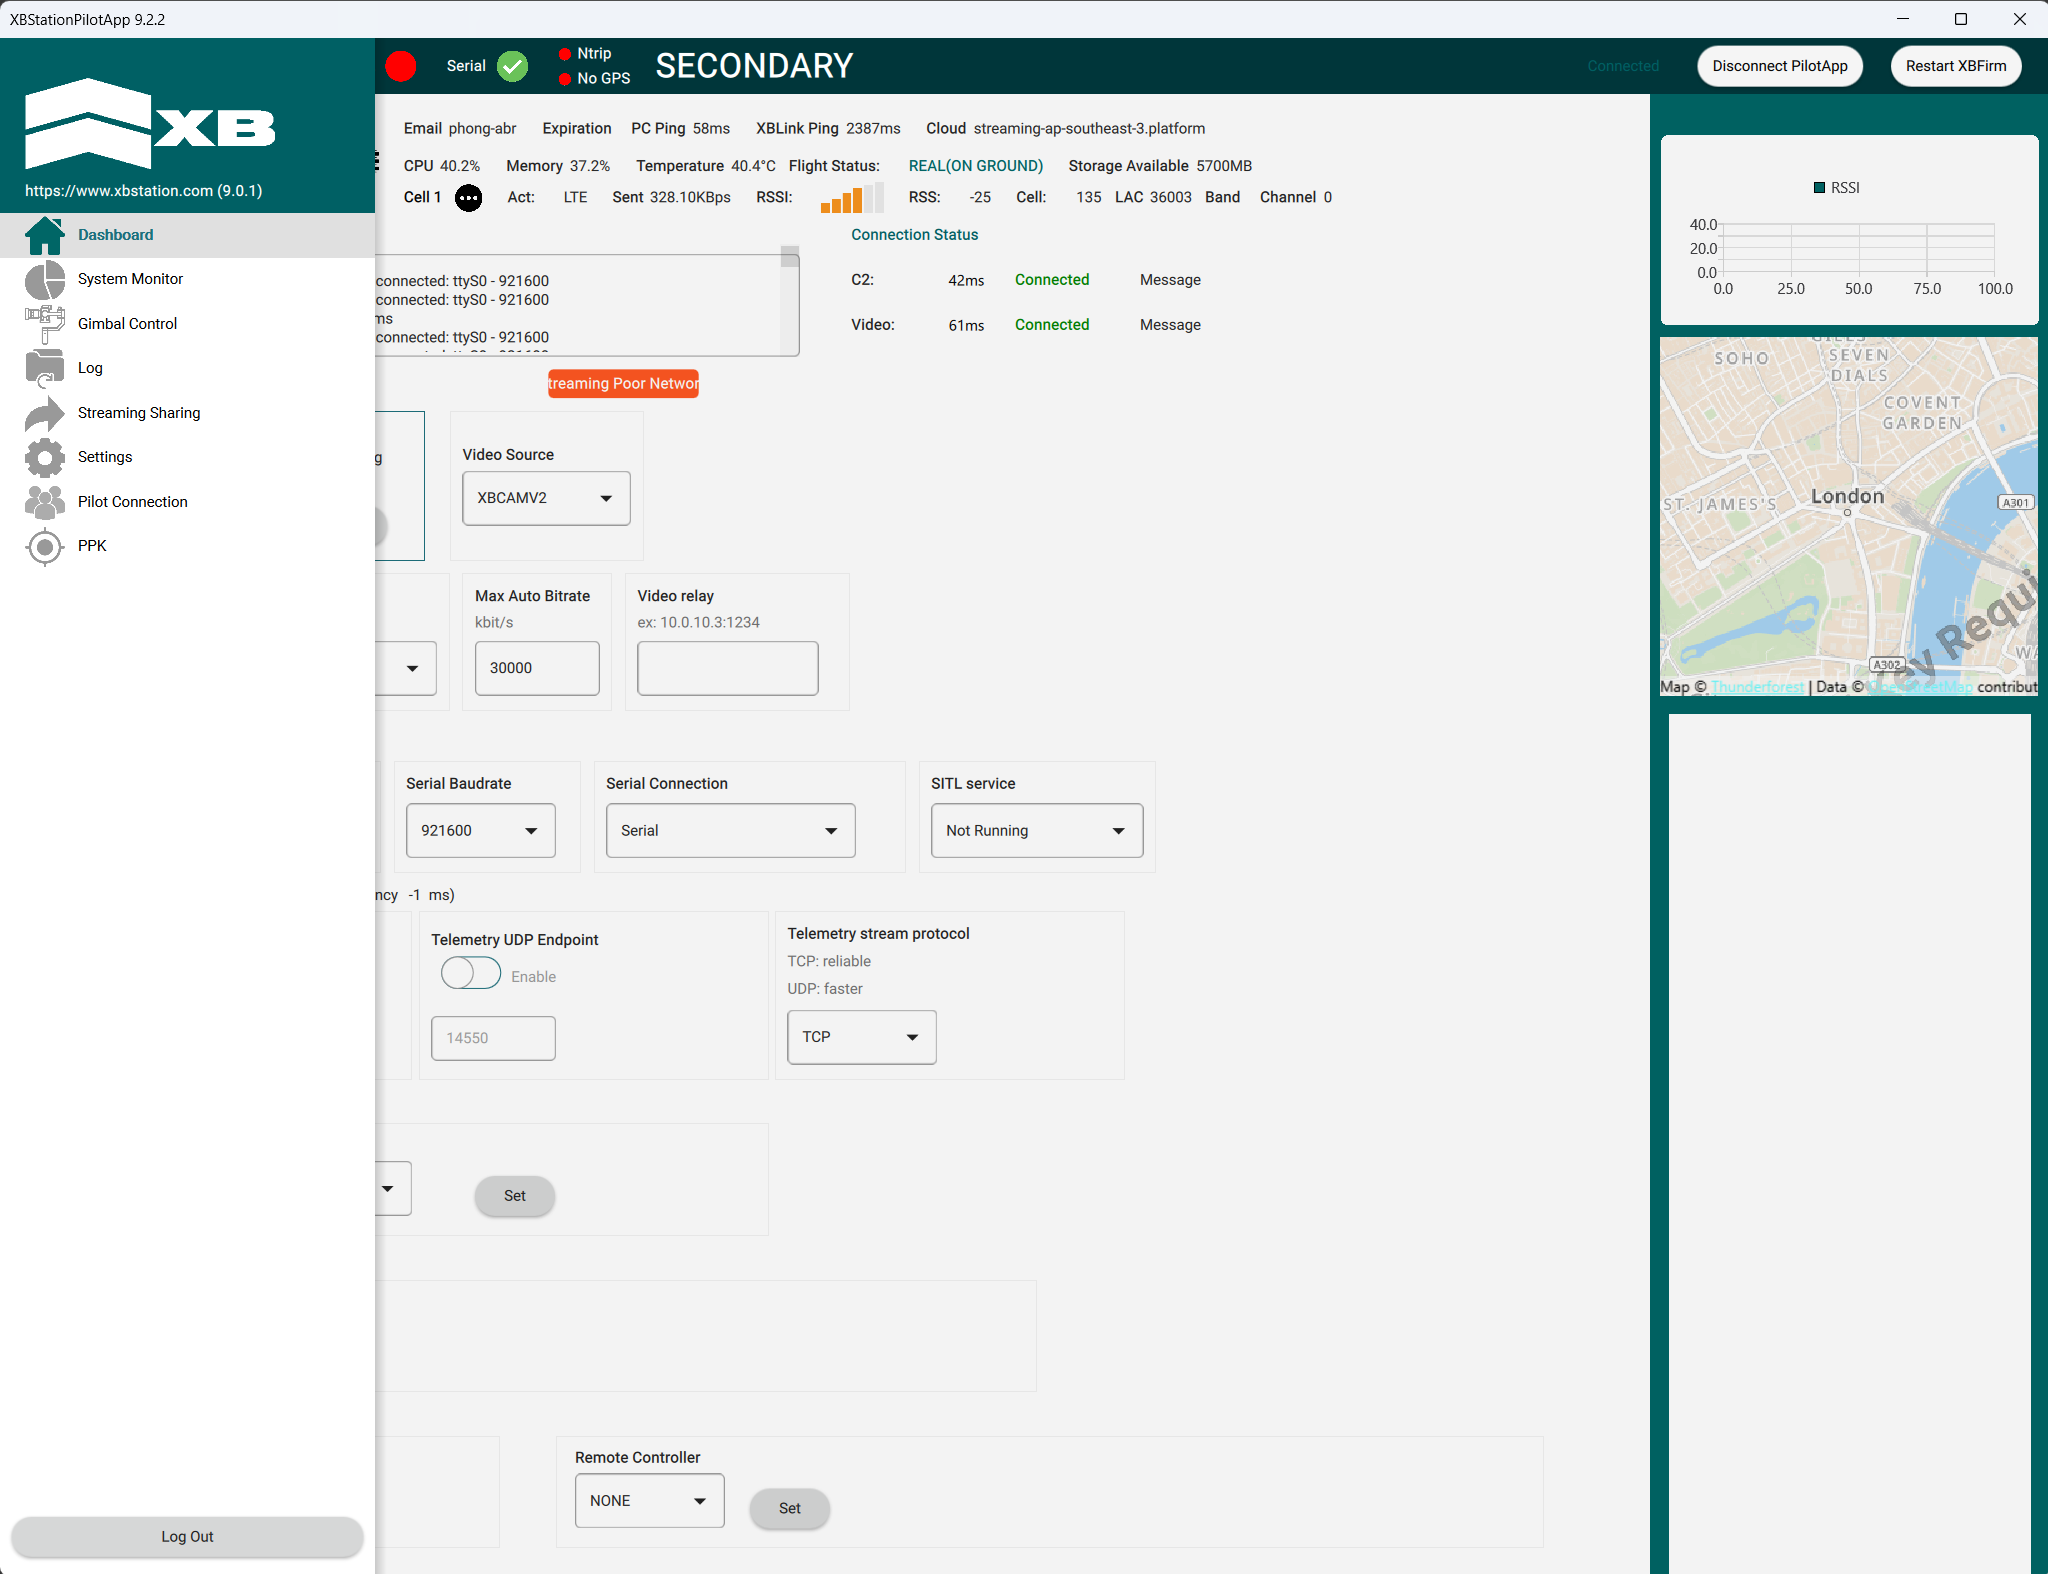
## Menu

Explore more functions on the Menu Tab

![](/files/-M_yv4-pGQaNc9wM0lgI)

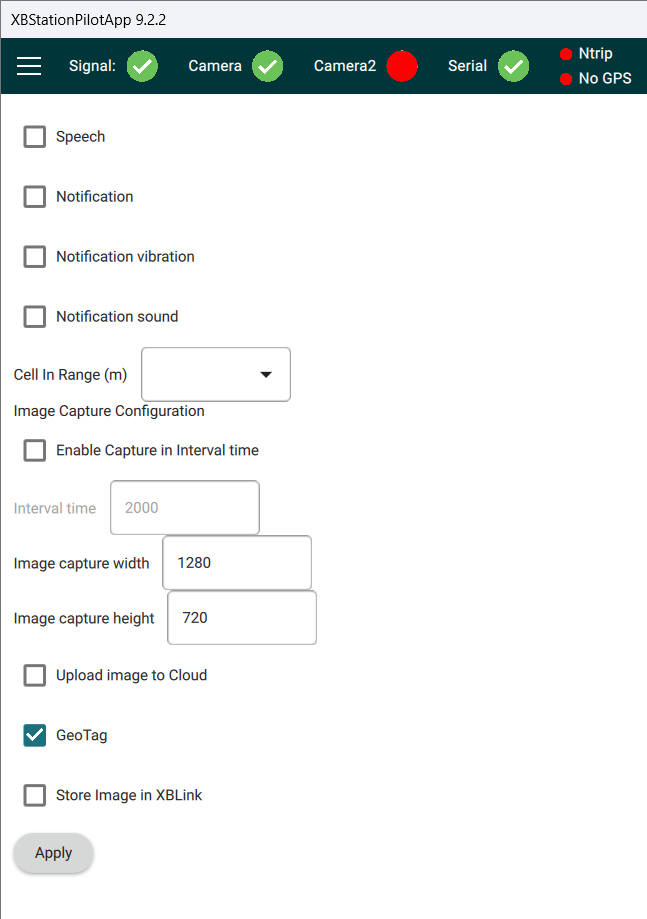
**Setting Tab**&#x20;

![](/files/-M_yw2tpv-GTu8DN7pfl)

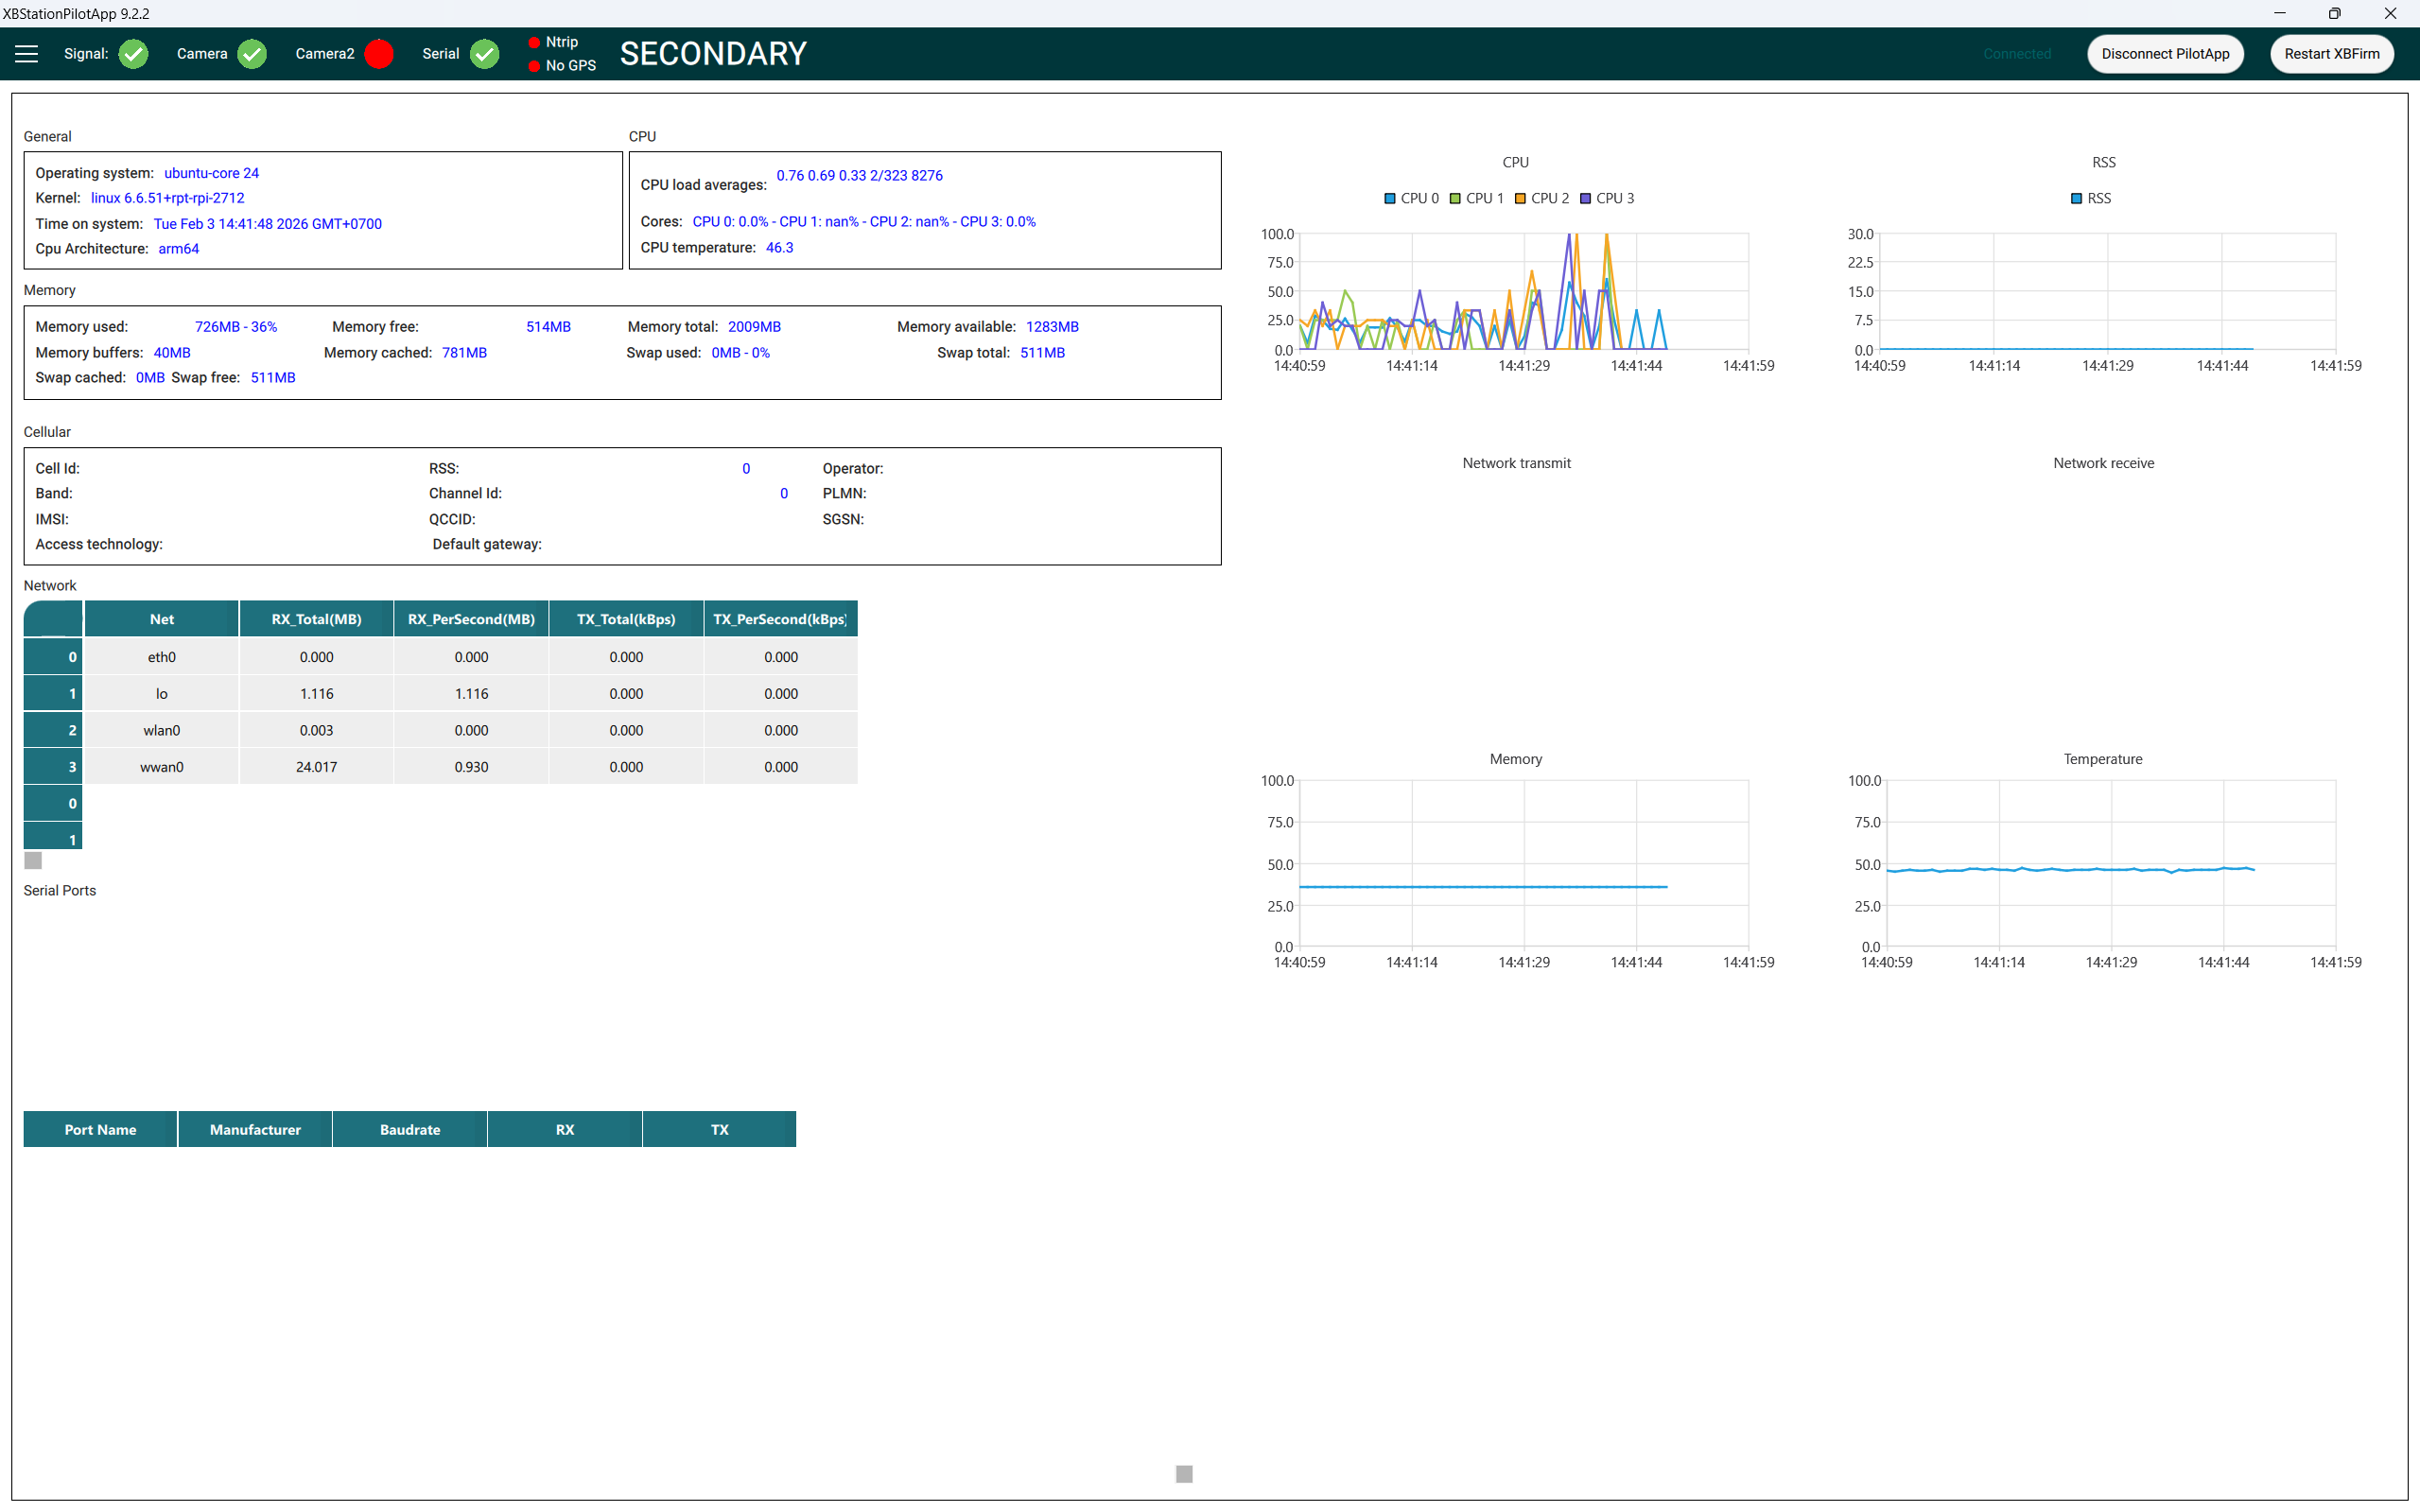
**System Monitor Tab**&#x20;

Real time monitor the XBLink's performance.&#x20;

![](/files/-M_yveNmaa3YB39HwPIW)

More Info, please refer:

{% content-ref url="/pages/-Md1FV6iCqCMm3KKpJhY" %}
[System Monitor](/xblink-basic/xbstation-pilot-app/system-monitor)
{% endcontent-ref %}

**Gimbal Control tab**&#x20;

We're support gimbal control via PWM.&#x20;

{% hint style="info" %}
If you want to integrate your gimbal/payload (UART - Serial Interface), please contact us
{% endhint %}

{% hint style="info" %}
Refer this link to setup your PWM gimbal: <https://ardupilot.org/copter/docs/common-camera-gimbal.html>
{% endhint %}

![](/files/-M_ywKQ0eGTWoQLP3aak)

**Streaming Sharing Tab**

Share live data(telemetry and video) with your field operators/clients/customers

{% hint style="info" %}
This feature is for Enterprise user, contact us to upgrade your account
{% endhint %}

![](/files/-Md1ZdGLQ8fo0skT-2FM)

More Info, please refer:

{% content-ref url="/pages/-Md1Xw1diWp7oP5WNpvt" %}
[Broken mention](broken://pages/-Md1Xw1diWp7oP5WNpvt)
{% endcontent-ref %}

**Payment Tab**&#x20;

![](/files/-M_ywTtl_TPMtyxLbjGF)


# Download

## Ground Control station software

* MissionPlanner: ([Link Download](http://firmware.ardupilot.org/Tools/MissionPlanner/))&#x20;
* QGroundControl: ([Link Download](https://docs.qgroundcontrol.com/en/getting_started/download_and_install.html))

## GStreamer

GStreamer is required in case you need to play the video on MissionPlanner. If you're using QGroundControl, skip this step.

* &#x20;GStreamer x86\_64 ([Link Download](https://gstreamer.freedesktop.org/download))

Note: Please select **complete** when installing gstreamer.

![](/files/-Ma9Hn8x9LXqzWLgqdy5)

## XBStationPilotApp <a href="#xbstationpilotapp" id="xbstationpilotapp"></a>

* Android Version 8.7.4: [Link](https://www.mediafire.com/file/xtih83oj53a9p2b/XBStationPilotApp-8.7.4.apk/file)
* MacOS Version 8.6.6.6: [Link](https://www.mediafire.com/file/q14idbl9s491u48/XBStationPilotApp-8.6.6.6.dmg/file)
* WindowsOS Version 8.6.6.17: [Link](https://www.mediafire.com/file_premium/2mgwz7zsk25nrwv/XBStationPilotApp-8.6.6.17.zip/file)

#### Note:  <a href="#id-1-choose-xbserver" id="id-1-choose-xbserver"></a>


# Ground Station


# Mission Planner

## Login

* User Name
* Password
* Server: <https://server.platform.xbstation.com:8007> (Default)&#x20;

![](/files/-M_yg-bQuy-dBRS9julS)

Note: Account is attached on you XBLink. If you don't have account, please contact us

## Connect to Telemetry data

At the top-right, choose **TCP** type and **Connect**

Host name/ip: **127.0.0.1** (default)&#x20;

&#x20;Remote port: **5760** (default) or 5761

![](/files/-MZb7hEa5ZiLLAksLGBr)

**NOTE: TCP Port must be the same as PilotApp**&#x20;

![](/files/-M_z01dNhT9PsqR5rfJ8)

## Connect to Video Streaming

At the Video HUD area, Right Click -> Video -> Set GStreamer source -> input GStreamer URL:

**`udpsrc port=5601 caps = "application/x-rtp, media=video, clock-rate=90000, encoding-name=H264, payload=103" ! rtpjitterbuffer ! rtph264depay ! avdec_h264 ! videoconvert ! video/x-raw,format=BGRA ! appsink name=outsink`**

```
udpsrc port=5601 caps = "application/x-rtp, media=video, clock-rate=90000, encoding-name=H264, payload=103" ! rtpjitterbuffer ! rtph264depay ! avdec_h264 ! videoconvert ! video/x-raw,format=BGRA ! appsink name=outsink
```

**NOTE: udpsrc port=560x must be the same as PilotApp**

![](/files/-M_z0Cg8exmV3XTNiD7K)

**NOTE:** The GStreamer URL just need to input at the first time, MissionPlanner will auto save this params, the next run with MissionPlanner, you just **Right Click -> Video -> Set GStreamer source -> and click OK to use video streaming**

![Mission Planner](https://i.imgur.com/kFRpzS9.png)

**NOTE:** Download and install the plugin (domestic environment download is slow, if it fails, please restart the MissionPlanner ground station and try again)

![Mission Planner](https://i.imgur.com/RurZ4jz.png)

After the installation is complete, restart the MissionPlanner ground station to display the following interface.

## Video Tutorials

* XBStationPilotApp - MissionPlanner: [link](https://youtu.be/7O2KfS0CPDY)

{% embed url="<https://youtu.be/7O2KfS0CPDY>" %}


# Qgroundcontrol

## Login

* User Name
* Password
* Server: <https://server.platform.xbstation.com:8007> (Default)&#x20;

![](/files/-M_yg-bQuy-dBRS9julS)

Note: Account is attached on you XBLink. If you don't have account, please contact us

### Connect to Telemetry data

Comm Links -> choose TCP type

![QGroundControl](https://i.imgur.com/vCiItjk.png)

* Host name/ip: **127.0.0.1** (default)
* Remote port: **5760** (default) or 5761

**NOTE: TCP Port must be the same as PilotApp**

![](/files/-M_z01dNhT9PsqR5rfJ8)

### Connect to Video Streaming

**General -> Video -> choose video source: UDP Video Stream, UDP port: 5600 or 5601**

![QGroundControl](https://i.imgur.com/i5kl4Y5.png)

**NOTE: UDP Port must be the same as PilotApp**

![](/files/-M_z0QerjzKtcJSs161j)

### Video Tutorials

* XBStationPilotApp - QgroundControl: [link](https://youtu.be/LV9jcsAaDSs)

{% embed url="<https://www.youtube.com/watch?v=LV9jcsAaDSs>" %}


# System Monitor

Display XBLink system informations

## Dashboard

![](/files/-Md1GAFjlPt3HICFLhIf)

## System Monitor Tab

![](/files/-Md1VZPyHkJdTuKhBDJp)

## Description

* **RSSI**:  Received Signal Strength Indicator

&#x20;   **RSSI** (Received Signal Strength Indicator) is a parameter which provides information about total received wide-band power (measure in all symbols) including all interference and thermal noise.

| **Value** | **RSSI dBm** | **Condition** |
| --------- | ------------ | ------------- |
| 2         | -109         | Marginal      |
| 3         | -107         | Marginal      |
| 4         | -105         | Marginal      |
| 5         | -103         | Marginal      |
| 6         | -101         | Marginal      |
| 7         | -99          | Marginal      |
| 8         | -97          | Marginal      |
| 9         | -95          | Marginal      |
| 10        | -93          | OK            |
| 11        | -91          | OK            |
| 12        | -89          | OK            |
| 13        | -87          | OK            |
| 14        | -85          | OK            |
| 15        | -83          | Good          |
| 16        | -81          | Good          |
| 17        | -79          | Good          |
| 18        | -77          | Good          |
| 19        | -75          | Good          |
| 20        | -73          | Excellent     |
| 21        | -71          | Excellent     |
| 22        | -69          | Excellent     |
| 23        | -67          | Excellent     |
| 24        | -65          | Excellent     |
| 25        | -63          | Excellent     |
| 26        | -61          | Excellent     |
| 27        | -59          | Excellent     |
| 28        | -57          | Excellent     |
| 29        | -55          | Excellent     |
| 30        | -53          | Excellent     |

* **Access Technology**: Radio Access Technology being used by XBLink
* **PC Ping:** Ping time from pilot app to streaming server
* **XBLink Ping**: Ping time from XBLink to streaming server
* **Cloud:** Streaming Server domain, (Ex: hk stand for HongKong)
* **CPU:** XBLink's CPU performance
* **Memory:** XBLink's Memory performance
* **Temperature:** XBLink's temperature
* **Bytes sent**: Total bytes sent from XBLink
*


# Advanced Configuration

## Camera Setting <a href="#camera-setting" id="camera-setting"></a>

![](/files/-M_yx60k09BpSQfsdk45)

#### a. **Video** Port <a href="#a-port_1" id="a-port_1"></a>

Destination video port, Mission Planner and QGroundControl supports video in HUD by default on port **5600 (or 5601, please see on XBSationPilopApp**)

#### b. Video source <a href="#b-video-source" id="b-video-source"></a>

Video device, default is **/dev/video0**

### c. Camera connection type <a href="#c-camera-connection-type" id="c-camera-connection-type"></a>

* UDP (default): to archive minimize latency
* TCP: method to achieve high reliability and anti grey-video on QGC

Note:

* **If you use MP, highly recommend UDP**
* **If you have grey-video on QGC, please change to TCP before turn on video**

#### d. Video Quality <a href="#e-video-quality" id="e-video-quality"></a>

#### **Note:**  Video streaming is start with auto quality (1280x720 pixels and 24fps with XBcamera ) <a href="#e-video-quality" id="e-video-quality"></a>

* **FPS:** Frame per second
* **Bitrate:** number of bits that can be either sent or received per time unit (kbps), default 0 is auto
* **Resolution:** resolution of stream video, you can change it during fly

**NOTE: You need to Turn OFF camera and Turn ON camera again to apply the change**

## Telemetry Setting <a href="#telemetry-setting" id="telemetry-setting"></a>

![](/files/-Ma1hf_sI6McOR8x8aWD)

#### a. Port <a href="#a-port" id="a-port"></a>

TCP telemetry server port, Ground Control Station can connect to this port via TCP to get telemetry data, default is **5760 (or 5761, please see on XBSationPilopApp)**

Change port number and click "**Restart**" button to change TCP server port

#### b. Connection <a href="#b-connection" id="b-connection"></a>

Telemetry data is relayed through internet in 2 connections method:

* UDP to archive minimize latency (possible packet loss, suitable for Joystick mode)
* TCP method to achieve high reliability

### Serial Setting

![Serial Setting](https://i.imgur.com/S5udDfZ.png)

#### a. Port <a href="#a-port_2" id="a-port_2"></a>

Port allows you to choose serial port on companion computer

The companion computer will show all available port (ttyS0, ttyUSB0, ttyUSB1…). You have to choose exactly serial port. If you don’t know name port, you can try them one by one.

With Rasp pi:

* Choose **ttyS0** (default) when you connect pi – pix via Direct Cable or **Stable Power Module, XBStatiom 4G LTE Module**
* Choose **ttyUSB0** when you connect pi – pix via USART USB

#### b. Baudrate <a href="#b-baudrate" id="b-baudrate"></a>

Baudrate allows you to choose serial baudrate on companion computer

The baudrate on companion computer have to same the baudrate (telemetry 2) on Pixhawk

* With PX4: **SER\_TEL2\_BAUD** (Default 921600), you should change **57600** for stable and save data.
* With ArduPilot: **SERIAL2\_BAUD** (Default **57**, it means 57600), **SERIAL2\_PROTOCOL**: **2** (mavlink 2)

**(If you have problem with Telemetry 2 port, you can use Telemetry 1 Port (Default baud rate Telemetry 1 is 57600 and SERIAL1\_PROTOCOL = 2))**

## **Gimbal Setting**

![](/files/-M_z-R1UDL1_-014GlGU)


# FlightSafety

This section contains information about Flight Safety with XBLink

## GCS Failsafe

When you make a BVLOS flight in an area with weak 4G signal. Disconnection between UAV and Ground Control Station may occur. XBLink will automatically reconnect to the nearest 4G base station (4G mobile tower).

If you flight in an area not covered 4G signal, UAVs return (RTL) is necessary. So, the best way to achieve safe flight is to activate GCS Failsafe on your UAVs.

The Ground Station Control (GCS) failsafe controls how UAVs will behave if contact with the GCS is lost. The GCS failsafe monitors the time since the last MAVLink heartbeat from the GCS. If no heartbeat is received FS\_GCS\_TIMEOUT seconds (Default seconds), the GCS failsafe event will trigger based on your parameter settings. Note that if no GCS is ever connected, the GCS failsafe will remain inactive regardless of parameter settings.

Please read the Ardupilot documentation carefully to activate GCS Failsafe

### Copter

&#x20;[FS\_GCS\_ENABLE](https://ardupilot.org/copter/docs/parameters.html#fs-gcs-enable) = 1 (Ground Station Failsafe Enable, switch the copter to RTL Mode. If the GPS position is not usable, the copter will change to Land Mode instead.)

&#x20;[FS\_GCS\_TIMEOUT](https://ardupilot.org/copter/docs/parameters.html#fs-gcs-timeout) = 35 (Timeout before triggering the GCS failsafe. 35 seconds is the time to reconect or restart the 4G module in XBLink)

{% hint style="info" %}
More detail, follow this section: <https://ardupilot.org/copter/docs/gcs-failsafe.html>
{% endhint %}

### Plane

&#x20;[FS\_GCS\_ENABL](https://ardupilot.org/plane/docs/parameters.html#fs-gcs-enabl) = 1 (GCS failsafe enable)

&#x20;[FS\_LONG\_TIMEOUT](https://ardupilot.org/plane/docs/parameters.html#fs-long-timeout) = 35 (he time in seconds that a failsafe condition has to persist before a long failsafe event will occur. 35 seconds is the time to reconect or restart the 4G module in XBLink)

&#x20;[FS\_LONG\_ACTN](https://ardupilot.org/plane/docs/parameters.html#fs-long-actn) = 1 (ReturnToLaunch)

{% hint style="info" %}
More detail, follow this section: <https://ardupilot.org/plane/docs/apms-failsafe-function.html>
{% endhint %}


# Account


# Register Your Email

When purchasing XBLink, you will be given an username and password to log in. You can use this username to log in, or register an email to do that.

## 1. Go to Pilot Web app

In your browser, access to pilot web app at this address: <https://platform.xbstation.com/pilot>

![XBStation Pilot Web App](/files/-McsyGHDErhqbPUcEpYH)

## 2. Login to pilot web app

Use the credentials we gave you to login

![](/files/-McsypWxkHiJZSNpFkuj)

You will receive a notification: **Email is empty, please update your email.** Input your email address and click **Update** button, an verification email will be sent to you.

{% hint style="info" %}
Email can only be registered once, you will not be able to change it.
{% endhint %}


# Quickstart Guide

This section provides a Quickstart guide

When you received XBLink Plus, all software has been installed, you can check your credential on your box.&#x20;

{% hint style="danger" %}
Please do not install any software or flash XBLink Plus.
{% endhint %}

## Step 1: Setup XBLink Plus

### 1. Insert Nano SIM Card

<div align="left"><figure><img src="/files/V7UhOgnjBsZho5SShYUK" alt=""><figcaption><p>      SIM Card must be faced up</p></figcaption></figure> <figure><img src="/files/vvXcDaMqjYFlP3CsIP4y" alt=""><figcaption><p>Push in/out card by using tool</p></figcaption></figure></div>

{% hint style="info" %}
The SIM card is recessed into the enclosure and you might need a tool to push it into the socket. You can hear a "**click**" when the card is inserted.
{% endhint %}

### 2. Connect antennas

<figure><img src="/files/ftIcmMZ5RQ4xNuDXDNhc" alt=""><figcaption><p> Connect Antennas to XBLink Plus </p></figcaption></figure>

{% hint style="warning" %}
**Note:** Be careful with the antenna port. Remove or Install it in a **straight angle**.

&#x20;**We are not responsible if the antenna is damaged due to physical impact**&#x20;
{% endhint %}

{% hint style="info" %}
**Antenna installation and removal instructions:** [**here**](https://www.youtube.com/watch?v=lAXGtti88gc)
{% endhint %}

### 3. Connect XBCam V2

Connect XBCam V2 to USB type C port.&#x20;

<figure><img src="/files/Dsxv7yQkUNVtWEf5bcN5" alt="" width="375"><figcaption><p>Connect XBCam V2 to USB type C port. </p></figcaption></figure>

{% hint style="danger" %}
Please don't connect any HDMI cameras like Gopro,... to **CSI port**. This is **CSI** not **HDMI port**.
{% endhint %}

{% hint style="info" %}
**Note:** We currently support variety of Cameras and Gimbals in [**here**](/xblink-plus/user-manual/advanced-configuration/cameras-and-gimbals)

For another payload via CSI or HDMI, please contact us.
{% endhint %}

### 4. Connect Flight Controller

You can use Telemetry 1 or 2 of Pixhawk for connection with XBLink Plus via [**COM1/2**](/xblink-plus/user-manual/getting-started/interfaces#com1-2-j3) (optional) or [**COM3**](/xblink-plus/user-manual/getting-started/interfaces#gps-com3-j4) port.

<div><figure><img src="/files/ktJBINgH6Iqukpm98ClV" alt="" width="375"><figcaption><p>XBLink Plus connect to Pixhawk Cube</p></figcaption></figure> <figure><img src="/files/1JhHfwnUI4slh2M0yX1m" alt=""><figcaption></figcaption></figure></div>

{% hint style="info" %}
**Note:** Config baud rate of Pixhawk to 57600,  SERIAL1\_BAUD (Default 57, it means 57600), SERIAL1\_PROTOCOL: 2 (MAVLink 2)
{% endhint %}

### 5. Power up

XBLink Plus supports 7-30V voltage input. We highly recommend **3-4 S battery  or 12V DC UBEC** (minimum 3A)  to power (6S battery is possible but make sure it's high quality and low discharge)

<figure><img src="/files/Ud6s8MnYYAGcPv7G9cbH" alt=""><figcaption><p>Power up XBLink Plus</p></figcaption></figure>

{% hint style="danger" %}
If you use low quality or high discharge 6S battery for drone, we are not responsible for damage.
{% endhint %}

### 6. Done

<figure><img src="/files/pfHEFbsZrNRcCDApgOhN" alt=""><figcaption><p>XBLink Plus connect to Pixhawk Cube</p></figcaption></figure>

{% hint style="success" %}
Once XBLink Plus has **green color** continue to the [next step](#step-2-configure-flight-controller).
{% endhint %}

#### More information: [here](https://youtu.be/npEB_8ehhlQ)

{% embed url="<https://youtu.be/npEB_8ehhlQ>" %}

## Step 2: Configure Flight Controller

You can use Telemetry 1 or 2 of Pixhawk for connection with XBLink Plus. Telemetry 1 is normally used for Telemetry Radio (like: RFD900...) and Telemetry 2 for XBLink Plus.

The baud rate on XBLink Plus **must be same** with Pixhawk baud rate (Telemetry**1** or **2**).&#x20;

* For ArduPilot : **SERIAL2\_BAUD = 57**(Default, it means 57600), &#x20;

  &#x20;                            **SERIAL2\_PROTOCOL**=**2** (MAVLink 2)     &#x20;

#### **More information:** [**here**](https://ardupilot.org/copter/docs/common-telemetry-port-setup.html)

* For PX4: **SER\_TEL2\_BAUD = 57600** (Default 921600, you should change to 57600 for save data)

{% hint style="info" %}
**Note:** If you have problem with Telemetry 2 port, you can use Telemetry 1 Port&#x20;

(Default baud rate Telemetry 1 is 57600, MAVLink:1).&#x20;

XBLink Plus still works normally with both MAVLink 1 and MALink 2.
{% endhint %}

## Step 3: Connect XBStationPilotApp and Ground Station Software

1. Download: [here](/xblink-plus/user-manual/xbstationpilotapp/download)
2. Open [XBStationPilotApp](/xblink-plus/user-manual/xbstationpilotapp)
3. Login (Username and password in XBLink Plus box)
4. Connect to [GCS](/xblink-plus/user-manual/xbstationpilotapp/ground-station)

#### **More detail, refer this link:** [**here**](https://youtu.be/8mLK-jrc7eE)

{% embed url="<https://youtu.be/8mLK-jrc7eE>" %}

## Step 4: Test and Flight

1. Put XBLink Plus on your drone
2. Check the connection between XBLink Plus to Pixhawk, Camera, SIM Card, Antennas
3. Connect battery
4. Waiting about 30s for XBLink Plus start up
5. Check led Indicator: [LED meanings](/xblink-plus/user-manual/getting-started/led-indicator)
6. Open XBStationPilotApp, Login
7. Connect to GCS: QGroundControl or Mission Planner

### **Optional: Register your Email and change your Password**

Please refer this link:&#x20;

{% content-ref url="/pages/MBFeiEYlk04PcerYAnPv" %}
[Register Your Email](/xblink-plus/xbcloud/pilot)
{% endcontent-ref %}


# User Manual

This section contains information about XBLink Plus

<figure><img src="/files/fwFLsvvMoNkRa8aGVF4n" alt=""><figcaption><p>XBLink Plus</p></figcaption></figure>

**XBLink Plus** is a Plug and Play hardware for BVLOS Flight based on **the 4th generation mobile network.**

To discover XBLink Plus, we need to understand the main components:

* **XBLink Hardware:** Companion computer combine cellular networking equipment, drone standard connectors and power module in one small factory design
* **XBFirm process:** a set of software base on Linux making an platform for live streaming and control telemetry data. It is also designed to easily integrate other functions, e.g. Gimbal/Payload control, computer vision, AI, UTM, ...
* **XBLinkApp(Wifi Hotspot):** Web interface to easily configure and communicate with XBLink without touching and wiring. You can connect XBLinkApp via Wifi hotspot from your phone, tablet or PC.

### Highlight feature

* High bandwidth and low latency
* Reliable connection
* Build for many drone application like mapping, drone delivery...([contact](https://xbstation.com/platform))
* Support Sony SDK and Gremsy Gimbal SDK  ([contact](https://xbstation.com/platform))
* GPS RTK/PPK ([contact](https://xbstation.com/platform))
* Support integrated with Siyi or Herelink and IP camera
* Compatible with *Ardupilot*/*PX4*&#x20;
* More interface like Ethernet port, IO port, USB
* Connecting to Cloud - Fleet manager drone ([contact](https://xbstation.com/platform))&#x20;


# Getting started

Before you get started you should explore XBLink Plus system you will use as below:

* [Overview](/xblink-plus/user-manual/getting-started/overview)
* [Setup](/xblink-plus/user-manual/getting-started/setup)
* [LED indicator](/xblink-plus/user-manual/getting-started/led-indicator)
* [Interfaces](/xblink-plus/user-manual/getting-started/interfaces)
* [Dimensions](/xblink-plus/user-manual/getting-started/dimensions-and-cad-model)
* [XBLinkApp(WifiHotspot)](/xblink-plus/user-manual/getting-started/xblink-webapp)
* [Firmware](/xblink-plus/user-manual/getting-started/xblink-webapp/upgrade-firmware)


# Overview

This section contains information about components included in the XBLink Plus and Accessories.

### Components

<figure><img src="/files/clnbmDBcUThtI0TqF0RM" alt="" width="563"><figcaption><p>XBLink Plus </p></figcaption></figure>

### Electronics

| Name                            | Quantity   |
| ------------------------------- | ---------- |
| XBLink Plus                     | 1          |
| XBCam V2                        | 1 (option) |
| Telemetry Cables                | 1          |
| Power Cables                    | 1          |
| USB type C to type C            | 1 (option) |
| JST-GH to RJ45 Ethernet Adapter | 1          |
| 4G LTE Antenna Cable            | 2          |
| 4G LTE  Antenna                 | 2          |

### Other (not include)

| Name                                           | Description                       |
| ---------------------------------------------- | --------------------------------- |
| HDMI to CSI convert                            | Read video for HDMI camera output |
| USB Type A Female to Type-C Male Adapter Cable | Connecting External hardware      |
| USB to Ethernet Adapter                        | LAN ethernet                      |
| USB Type-A to Micro USB Cable                  | Update Firmware                   |
| JST-GH to Airunit1.1  Herelink                 | Ethernet cable to Herelink        |
| JST-GH to Air Unit Siyi                        | Ethernet cable to Siyi            |

### Specifications <a href="#spectifications" id="spectifications"></a>

| **Product Performance** | ​**Content**                                                                           |
| ----------------------- | -------------------------------------------------------------------------------------- |
| Autopilot               | Pixhawk Cube, Pixhawk 4,Pixhawk etc...                                                 |
| Data protocol           | Mavlink1, Mavlink2                                                                     |
| Camera                  | XBCam V2 12 MP                                                                         |
| Video output            | 1080p、720p、480p、320 - Custom                                                           |
| Video codec             | H264                                                                                   |
| **Interface**           | ​**Content**                                                                           |
| Video input             | USB (XBCam V2 12MP) , HDMI (option - need extension board), ETH (ethernet) - IP camera |
| Antenna interface       | 2 x MMCX                                                                               |
| UART                    | UART 1 (telemetry), UART 2/3 (Payload)                                                 |
| Interface               | 3 X USB, 3 x UART, Sony multiport Port, ETH                                            |
| **Work Environment**    | ​**Content**                                                                           |
| Voltage input           | 7 - 30V                                                                                |
| Temperature             | -10 - +60°C                                                                            |
| **Appearance Size**     | ​**Content**                                                                           |
| Size                    | 73.4mmX48.4mmX20.44mm                                                                  |
| Weight                  | 96.6g                                                                                  |
| **Ground station**      | ​**Content**                                                                           |
| Support                 | PC (Windows, IOS), Android device                                                      |
| Software                | XBStation Pilot App                                                                    |
| Compatible              | *MissionPlanner*, *QGroundControl*                                                     |

### **XBCam V2** <a href="#xbcam" id="xbcam"></a>

| **Performance**     | ​Title                 |
| ------------------- | ---------------------- |
| Size                | 26mmX26mmX23mm         |
| 26mmX26mmX23mm      | 22.9g                  |
| Megapixels          | 12 Megapixels          |
| Field of view (FOV) | 120°(D)x102°(H)x67°(V) |

### 4G **Performance** <a href="#id-4g-lte-performance" id="id-4g-lte-performance"></a>

<table data-header-hidden><thead><tr><th width="246">Performance</th><th>​Title</th></tr></thead><tbody><tr><td><strong>Performance</strong></td><td>​Title</td></tr><tr><td>Network Frequency</td><td><p><strong>LLTE-FDD:</strong> B1/ B2/ B3/ B4/ B5/ B7/ B8/ B12/ B13/ B18/ B19/ B20/ B25/ B26/ B28 <strong>LTE-TDD:</strong> B38/ B39/ B40/ B41 </p><p><strong>WCDMA:</strong> B1/ B2/ B4/ B5/ B6/ B8/ B19</p><p><strong>GSM:</strong> B2/B3/B5/B8</p></td></tr><tr><td>Region</td><td>Global (All countries and carriers): Europe/Middle East/Africa/Korea/Thailand/India North America Australia/New Zealand/Taiwan/Brazil Japan</td></tr><tr><td>Regulatory</td><td>GCF/ PTCRB/ CE/ ANATEL / CCC/ RCM/ IC/ FCC/ JATE/ TELEC/ KC/ NCC</td></tr><tr><td>Carrier</td><td>T-Mobile/ Telstra/ AT&#x26;T/ Deutsche Telekom/ Verizon*/ Telefonica*/ NTT DOCOMO*/ SoftBank*/ KDDI*</td></tr><tr><td>Network Rate</td><td><p><strong>LTE:</strong> </p><p>LTE FDD: Max 150Mbps (DL)/Max 50Mbps (UL) </p><p>LTE TDD: Max 130Mbps (DL)/Max 30Mbps (UL) </p><p><strong>UMTS:</strong> </p><p>DC-HSDPA: Max 42Mbps (DL) </p><p>HSUPA: Max 5.76Mbps (UL) </p><p>WCDMA: Max 384Kbps (DL)/Max 384Kbps (UL) </p><p><strong>GSM:</strong> </p><p>EDGE: Max 296Kbps (DL)/Max 236.8Kbps (UL) </p><p>GPRS: Max 107Kbps (DL)/Max 85.6Kbps (UL)</p></td></tr></tbody></table>


# Setup

This section contains the hardware connection of XBLink Plus.

XBLink Plus hardware connection mainly includes SIM, Antenna, XBCamera V2, Flight Controller and Power up.

### Nano SIM Card <a href="#sim-card" id="sim-card"></a>

XBLink Plus supports push-push NanoSim connector.

Insert your SIM card into the SIM Card slot, the chip contacts have to **face up**.&#x20;

{% hint style="info" %}
The SIM card is recessed into the enclosure and you might need a tool to push it into the socket. You can hear a click when the card is inserted.
{% endhint %}

To remove the SIM card, push onto the card with a tool. You can hear a "click" and the card will be pushed out of the enclosure. To remove the card again, push it in once more and it will pop out.

<div align="left"><figure><img src="/files/V7UhOgnjBsZho5SShYUK" alt=""><figcaption><p>      SIM Card must be faced up</p></figcaption></figure> <figure><img src="/files/vvXcDaMqjYFlP3CsIP4y" alt=""><figcaption><p>Push in/out card by using tool</p></figcaption></figure></div>

### Antenna <a href="#antenna" id="antenna"></a>

Connect the four LTE antennas to the MMCX connectors.&#x20;

<figure><img src="/files/ftIcmMZ5RQ4xNuDXDNhc" alt=""><figcaption><p> Connect LTE Antennas to XBLink Plus </p></figcaption></figure>

{% hint style="danger" %}
**Note:** Be careful with the antenna port. Remove or Install it in a **straight angle**.

&#x20;**We are not responsible if the antenna is damaged due to physical impact**&#x20;
{% endhint %}

{% hint style="info" %}
**Antenna installation and removal instructions:** [**here**](https://www.youtube.com/watch?v=lAXGtti88gc)
{% endhint %}

### XBCam V2

Connect XBCam V2 to USB type C port.&#x20;

<figure><img src="/files/Dsxv7yQkUNVtWEf5bcN5" alt="" width="375"><figcaption><p>Connect XBCamera V2 to XBLink Plus </p></figcaption></figure>

{% hint style="danger" %}
Please don't connect any HDMI cameras like Gopro,... to **CSI port**. This is **CSI** not **HDMI port**.
{% endhint %}

{% hint style="info" %}
**Note:**  We currently support variety of Cameras and Gimbals in [**here**](/xblink-plus/user-manual/advanced-configuration/cameras-and-gimbals)

&#x20;           For another payload via **CSI** or **HDMI**, please contact us.
{% endhint %}

### Connect Flight Controller (Telemetry)

You can use Telemetry 1 or 2 of Pixhawk for connection with XBLink Plus via [**COM1/2**](/xblink-plus/user-manual/getting-started/interfaces#com1-2-j3) (optional) or [**COM3**](/xblink-plus/user-manual/getting-started/interfaces#gps-com3-j4) port.

<div><figure><img src="/files/ktJBINgH6Iqukpm98ClV" alt="" width="375"><figcaption><p>Connect <em>Pixhawk</em>  to XBLink Plus</p></figcaption></figure> <figure><img src="/files/1JhHfwnUI4slh2M0yX1m" alt=""><figcaption></figcaption></figure></div>

{% hint style="info" %}
**Note:** Config baud rate of Pixhawk to 57600,  SERIAL1\_BAUD (Default 57, it means 57600), SERIAL1\_PROTOCOL: 2 (MAVLink 2)
{% endhint %}

### Power up

XBLink Plus supports 7-30V voltage input. We highly recommend **3-4 S battery  or 12V DC UBEC** (minimum 3A)  to power (6S battery is possible but make sure it's high quality and low discharge)

<figure><img src="/files/Ud6s8MnYYAGcPv7G9cbH" alt=""><figcaption><p>Power up XBlink Plus</p></figcaption></figure>

{% hint style="danger" %}
If you use low quality or high discharge 6S battery for drone, we are not responsible for damage.
{% endhint %}

### Done

<figure><img src="/files/pfHEFbsZrNRcCDApgOhN" alt=""><figcaption><p>Completion of setup XBLink Plus</p></figcaption></figure>

Once XBLink Plus has green color continue to the next step to connect it to [XBStationPillotApp](/xblink-plus/user-manual/xbstationpilotapp).

More information: [here](https://youtu.be/npEB_8ehhlQ)

{% embed url="<https://youtu.be/npEB_8ehhlQ>" %}


# LED indicator

This article will describe the led indicator of XBLink Plus

<figure><img src="/files/aCBR6QPVPwk9qoTIk6lw" alt=""><figcaption><p>XBlink Plus - LED</p></figcaption></figure>

## Led Map

| **LED**   | **Color** | **Description**                     |
| --------- | --------- | ----------------------------------- |
| Main led  | RGB       | Indicates the status of XBLink Plus |
| SYS led   | Green     | System led                          |
| LTE led   | Orange    | Status of the cellular connection   |
| Cam led   | Orange    | Turn on when take a picture         |
| Power led | Red       | Inside XBLink Plus                  |

### 1.Main Led

<table data-full-width="true"><thead><tr><th width="100">Color</th><th width="193">Fast Blink(0.15s)</th><th width="205">Slow Blink(1.5s)</th><th width="231"> Blink(0.7s)</th><th>Solid</th></tr></thead><tbody><tr><td><mark style="color:blue;">Blue</mark></td><td>Network Scanning</td><td>Network Scanning</td><td>Network Scanning</td><td>App Starting</td></tr><tr><td><mark style="color:red;">Red</mark></td><td>Check SIM and APN (<strong>Error 1</strong>)</td><td><p>Datacap OK, </p><p>Internet connected</p></td><td><p>Check SIM </p><p>(<strong>Error 2</strong>)</p></td><td><p>Insert SIM  </p><p>(<strong>Error 3</strong>)</p></td></tr><tr><td><mark style="background-color:yellow;"><strong>Yellow</strong> (2G)</mark></td><td><ul><li>App running</li><li>Cloud connecting</li></ul></td><td><ul><li>XBFirm running</li><li>Internet connected</li><li>Cloud connecting</li><li> No sign in pilot app</li></ul></td><td><ul><li>XBFirm running </li><li>Pilot App connecting </li><li> Cloud connected </li><li>Signed in pilot app</li></ul></td><td><p>All good-</p><p>Connected to pilot app</p></td></tr><tr><td><mark style="background-color:red;"><strong>Pink</strong> (3G)</mark></td><td><p></p><ul><li>App running</li><li>Cloud connecting</li></ul></td><td><ul><li>XBFirm running</li><li>Internet connected</li><li>Cloud connecting</li><li> No sign in pilot app</li></ul></td><td><ul><li>XBFirm running </li><li>Pilot App connecting </li><li> Cloud connected </li><li>Signed in pilot app</li></ul></td><td><p>All good-</p><p>Connected to pilot app</p></td></tr><tr><td><mark style="color:green;background-color:green;"><strong>Green</strong> (4G)</mark></td><td><ul><li>App running</li><li>Cloud connecting</li></ul></td><td><ul><li>XBFirm running</li><li>Internet connected</li><li>Cloud connecting</li><li> No sign in pilot app</li></ul></td><td><ul><li>XBFirm running </li><li>Pilot App connecting </li><li> Cloud connected </li><li>Signed in pilot app</li></ul></td><td><p>All good-</p><p>Connected to pilot app</p></td></tr></tbody></table>

* Error 1: **Fast Red Blink (0.15s) -** Please [**check SIM card**](/xblink-plus/user-manual/getting-started/xblink-webapp/device) status, [**APN configuration**](/xblink-plus/user-manual/getting-started/xblink-webapp/config-network) and the current network environment.
* Error 2: **Red Blink (0.7s)  -** Please check your[ **hardware connection**](/xblink-plus/user-manual/getting-started/xblink-webapp/device) (SIM card status, antenna)
* Error 3: **Red Solid Blink  -** Please insert SIM card.

If the main LED blinks both a <mark style="color:blue;">**blue**</mark> and other colors as shown below.

* Wait another 10-15s for XBLink Plus to try to connect the internet in your area.
* Then, please check your internet connection and the current network environment.

| Blink (0.7s)                          | Yellow (2G)                                                                          | Pink (3G)                                                                         | Green (4G)                                                                          | Cobalt (5G)                                                                        |
| ------------------------------------- | ------------------------------------------------------------------------------------ | --------------------------------------------------------------------------------- | ----------------------------------------------------------------------------------- | ---------------------------------------------------------------------------------- |
| <mark style="color:blue;">Blue</mark> | <p><mark style="background-color:yellow;">Connecting 2G</mark></p><p>No Internet</p> | <p><mark style="background-color:red;">Connecting 3G</mark></p><p>No Internet</p> | <p><mark style="background-color:green;">Connecting 4G</mark></p><p>No Internet</p> | <p><mark style="background-color:blue;">Connecting 5G</mark></p><p>No Internet</p> |

In order to verify the particular status of XBLink, we highly recommend that you should visit [**XBLink-WebApp**](/xblink-plus/user-manual/getting-started/xblink-webapp)

### **2.SYS led**

* Blinks - Normal operation
* Solid - Firmware Upload

### **3. LTE led**

* When the connection is established and data is being transmitted/received, this led will blink at special intervals. Otherwise, if there is no connection, the led will remain off.

### **4.Power led**

* Light - Power is OK
* Off - No power input


# Interfaces

This article will describe the Interfaces of XBLink Plus

## Interface Function Map

<figure><img src="/files/2AnaBSS9xBg0dBXdOEyx" alt=""><figcaption><p>XBLink Plus - Interfaces</p></figcaption></figure>

## Connectors

<table data-header-hidden><thead><tr><th width="141">ID</th><th>Name</th><th>Connector</th><th>Description</th></tr></thead><tbody><tr><td><strong>ID</strong></td><td><strong>Name</strong></td><td><strong>Connector</strong></td><td><strong>Description</strong></td></tr><tr><td>J1</td><td>USB </td><td>USB Type-C</td><td>External Hardware (Coral AI, Payload, Microhand, Ethernet...)</td></tr><tr><td>J2</td><td>CSI </td><td>Micro HDMI</td><td>CSI Video Input (XBCAM or extension board)</td></tr><tr><td>J3</td><td>COM1/2</td><td>JST GH 6pin</td><td>Connect Flight controller or extend payload</td></tr><tr><td>J4</td><td>CAM</td><td>JST GH 7pin</td><td>Sony Camera or other USB devices)</td></tr><tr><td>J5</td><td>GPS/COM3</td><td>JST GH 7pin</td><td><p>Connect to GPS, Trigger GPS and </p><p>UART 3</p></td></tr><tr><td>J6</td><td>UPGR </td><td>Micro USB</td><td>Upgrade Firmware </td></tr><tr><td>J7</td><td>ETH</td><td>JST GH 4pin</td><td>Ethernet 100 Base-T</td></tr><tr><td>J8</td><td>Fan</td><td>JST GH 2pin</td><td>Cooling Fan</td></tr><tr><td>J9</td><td>Power</td><td>Micro-Lock Plus 4 pin</td><td>Power Input</td></tr></tbody></table>

## Pinout

#### COM1/2 (J3)

| **Pin** | **Description**     |
| ------- | ------------------- |
| 1       | VBUS 5V 2A          |
| 2       | UART1\_RX (ttyS0)   |
| 3       | UART1\_TX (ttyS0)   |
| 4       | UART2\_RX (ttyAMA4) |
| 5       | UART2\_TX (ttyAMA4) |
| 6       | GND                 |

#### CAM (J4)

<table data-header-hidden><thead><tr><th width="131.33333333333331">Pin </th><th width="287">Description</th><th></th></tr></thead><tbody><tr><td><strong>Pin</strong> </td><td><strong>Description</strong></td><td></td></tr><tr><td>1</td><td>VBUS 5V 2A</td><td>Power supply for Camera - 2A</td></tr><tr><td>2</td><td>Cam_Hotshoe</td><td>Control Camera</td></tr><tr><td>3</td><td>Cam_Trigger</td><td>Control Camera</td></tr><tr><td>4</td><td>Cam_PWR</td><td>Control Camera</td></tr><tr><td>5</td><td>D_N</td><td>USB D-</td></tr><tr><td>6</td><td>D_P</td><td>USB D+</td></tr><tr><td>7</td><td>GND</td><td></td></tr></tbody></table>

#### GPS/COM3 (J4)

<table data-header-hidden><thead><tr><th width="163.33333333333331">Pin </th><th width="287">Description</th><th></th></tr></thead><tbody><tr><td><strong>Pin</strong> </td><td><strong>Description</strong></td><td><strong>Item</strong></td></tr><tr><td>1</td><td>VBUS 5V 2A</td><td></td></tr><tr><td>2</td><td>D_N</td><td>USB D-</td></tr><tr><td>3</td><td>D_P</td><td>USB D+</td></tr><tr><td>4</td><td>GPS_Trigger</td><td>For Mapping</td></tr><tr><td>5</td><td>UART3_RX</td><td>(ttyAMA5)</td></tr><tr><td>6</td><td>UART3_TX</td><td>(ttyAMA5)</td></tr><tr><td>7</td><td>GND</td><td></td></tr></tbody></table>

#### ETH(J4) - Ethernet 100 Base-T

| **Pin** | **Description** | **Item** |
| ------- | --------------- | -------- |
| 1       | TRD0\_P         | TX+      |
| 2       | TRD0\_N         | TX-      |
| 3       | TRD0\_P         | RX+      |
| 4       | TRD0\_N         | RX-      |

**Note:** An Ethernet standard that transmits at 100 Mbps.

#### Power(J8)

| **Pin** | **Description** |
| ------- | --------------- |
| 1       | GND             |
| 2       | GND             |
| 3       | 7-30V Input     |
| 4       | 7-30V Input     |


# Dimensions and CAD Model

This section give you information of XBLInk such as Dimension and 3D CAD Model

## Dimensions

<figure><img src="/files/1UtOZX0QCimb1W56sOE9" alt=""><figcaption><p>XBLink Plus - Dimensions</p></figcaption></figure>

## 3D CAD Model

{% file src="/files/JTP5tUnDywEL8mgo5IYf" %}
XBLink Plus 3D CAD Model
{% endfile %}


# XBLink-WebApp

With XBLink Plus, All configs will be done via WebApp.

Web interface to easily configure and communicate with XBLink.&#x20;

{% hint style="success" %}
When you buy XBLink Plus, It is ready to use. Nothing to do. This section is useful when you want to upgrade new firmware, check device or re-login new account .
{% endhint %}

## Connect XBLink to WebApp

We support 3 method to connect to WebApp as below:

1. [**Connect via Hotspot**](#hotspot)
2. [**Connect via LAN network**](#lan-network)
3. [**Connect directly to PC**](#connect-directly-to-pc)

***

### Hotspot

You can easily connect WedApp via Wifi hotspot from your phone, table or PC.

1. Turn on XBlink.
2. Connect your PC/Phone to XBLink Wifi Hotspot

```
Name: XBLINK_your_account
Pass: xbstation.com
```

<figure><img src="/files/FnmX0w2vBTuYtWrjc7uP" alt=""><figcaption><p>PC, Tablet, Phone</p></figcaption></figure>

3. Open web browser on PC/Phone and go to this address **<http://10.0.0.1>  or <http://xblink.local>**

<figure><img src="/files/xeFpPvp71N6nf8URCiMn" alt=""><figcaption><p><strong>http://10.0.0.1  or http://xblink.local</strong></p></figcaption></figure>

### LAN network

1. &#x20;Connect [JST-GH to RJ45 Ethernet Adapter cable](/xblink-plus/user-manual/getting-started/overview#electronics) by Ethernet Cable (**only supported Cat6**) to your LAN network. Then, plug it into ETH port of XBLink.&#x20;
2. Turn on XBLink.

<figure><img src="/files/EIimgq5KCnU0L5LnHIbT" alt=""><figcaption><p>Connect to LAN network</p></figcaption></figure>

3. Open web browser on PC/Phone and go to this address **<http://xblink.local>** or **XBLink IP (Example: 192.168.1.24)**

<figure><img src="/files/ojuxmJJ25SzQHbkCcYdp" alt="" width="563"><figcaption><p><strong>http://xblink.local</strong></p></figcaption></figure>

{% hint style="warning" %}
If you can't connect by **<http://xblink.local>**

please use Advanced IP Scanner to find **XBLink IP**: [here](https://www.advanced-ip-scanner.com/vi/)
{% endhint %}

<figure><img src="/files/JLve7WThxdQFWi7LcM40" alt=""><figcaption><p>Example for Check IP</p></figcaption></figure>

### Connect directly to PC

1. Connect [JST-GH to RJ45 Ethernet Adapter cable](/xblink-plus/user-manual/getting-started/overview#electronics) by Ethernet Cable (**only supported Cat6**) to your table or PC. Then, plug it into ETH port of XBLink.
2. Turn on XBLink.

<figure><img src="/files/P9IfT2mbJRlZ3b0nntqL" alt=""><figcaption><p>Connect directly to PC</p></figcaption></figure>

3. Open web browser on PC/Phone and go to this address **<http://xblink.local>**

<figure><img src="/files/iUtghVOIJJKz04I7vrDE" alt=""><figcaption><p><strong>http://xblink.local</strong></p></figcaption></figure>

Let's discover the variety of feature's WebApp!


# Device

This article show you how to check clearly the status of SIM and Antennas.

After connecting successfully to [**WebApp**](/xblink-plus/user-manual/getting-started/xblink-webapp). Click to **Device Tab** to check the antennas and SIM status as below.

* If **Antennas Fail**, please check and make sure the antenna is installed correctly or you are in a weak signal area (like a closed room). No need to reset XBLink.
* If **SIM** **Fail**, Please **insert** SIM and **reset** XBLink.

![](/files/-Mb0rE3jS_1tBcLDJkdX)


# Config Network

This article show you how to check and config a lot of useful information of cellular module

After connecting successfully to [**WebApp**](/xblink-plus/user-manual/getting-started/xblink-webapp). Click to **Network**.

## APN Setting <a href="#apn" id="apn"></a>

We have 2 ways to configure the APN: **Auto** and **Manual**. XBLink supports Automatic APN detection (Default).&#x20;

### **Auto**

When you insert SIM into XBLink, APN configuration is automatically Auto mode. This meaning is XBLink use information of your SIM such as Cache MCC and Cache MNC to search and choose a proper APN.

<figure><img src="/files/JqVfsWGStZqggl6n0Ogl" alt=""><figcaption></figcaption></figure>

{% hint style="info" %}
You must **Stop Cellular Modem** and **Start Cellular Modem** to have valid command.
{% endhint %}

### **Manual**

You also can choose Manual mode up to your country and network provider.

<figure><img src="/files/oCktqNowRGWfzmqf4GnW" alt=""><figcaption></figcaption></figure>

{% hint style="info" %}
You must **Stop Cellular Modem** and **Start Cellular Modem** to have valid command.
{% endhint %}

In case you can't find suitable network operator in this list, please choose both **Country** and **Operator** section are **Other**, then typing into **APN** section.&#x20;

<figure><img src="/files/ySa8BNk5fqRE1EclF4QO" alt=""><figcaption></figcaption></figure>

{% hint style="info" %}
You must **Stop Cellular Modem** and **Start Cellular Modem** to have valid command.
{% endhint %}


# Login

This section show you how to login XBLink account in WedApp

After connecting successfully to [**WebApp**](/xblink-plus/user-manual/getting-started/xblink-webapp). Click to **Authentication tab** as below.

Input XBStation Account:&#x20;

* Username&#x20;
* Password&#x20;

**Note:** Please don’t change the IP Server

Click **LOGIN** <br>

![](/files/-Mb0sMLRptAyiqrVfdOs)

Make sure success

![](/files/-Mb0qpJQftUQvZeTOZWV)

After success, you need to reset XBLink Plus<br>


# Dashboard

This section show you how to use Dashboard tab in WedApp

After connecting successfully to [**WebApp**](/xblink-plus/user-manual/getting-started/xblink-webapp). Click to **Dashboard tab**.

### **Dashboard**

![](/files/-Mb0wpmwalRsyBfOxN1k)

### **Telemetry and Log**

![](/files/-Mb0wuBOeP8vEjuILRJo)

### **Terminal**

You can SSH directly to XBLink here.

![](/files/-Mb0x-QVB0SJHbLnezsO)


# SMS & USSD

This section show you how to use the SMS and USSD feature to check your data balance like as your phone.

After connecting successfully to [**WebApp**](/xblink-plus/user-manual/getting-started/xblink-webapp). Please change to the address \*\*<http://xblink.local:3000/SMS**&#x20>;

<figure><img src="/files/Ri3TRU5KDrfO8aBSPtwZ" alt=""><figcaption></figcaption></figure>

## [SMS](broken://pages/Oc5DbCcMxuodN644veat)

You can check your data balance directly by typing in a content section and send it to your local carrier.

<figure><img src="/files/Lx4Tu9o7v8SfVzv2TN7u" alt=""><figcaption></figcaption></figure>

Wait a minute or two to receive an SMS with data usage info.

{% hint style="info" %}
Refreshing this page to get the latest messages
{% endhint %}

## [USSD](broken://pages/9ZC3H6dsQhhzVH1vtQMM)

You just dial your code of network provider and wait for an alert containing your balance details

<figure><img src="/files/VXgTWVa5HSYKubDnssdq" alt=""><figcaption></figcaption></figure>

{% hint style="info" %}
Refreshing this page to get the latest messages
{% endhint %}


# Search Network

This article show you how to check and config a lot of useful information of cellular module

After connecting successfully to [**WebApp**](/xblink-plus/user-manual/getting-started/xblink-webapp).&#x20;

Please change to the address **<http://xblink.local:3000/network>**

<figure><img src="/files/7ToGqrXn38F6u8WtHZBC" alt=""><figcaption><p>Network </p></figcaption></figure>

## Cellular module status

This section contains many of important information about the status of cellular module as below.

<figure><img src="/files/gA9D9zFoCcDn9SIEHjQi" alt=""><figcaption><p>Cellular module status</p></figcaption></figure>

## Network search mode configuration

When you buy XBLink, It's status network is automatically AUTO (default)

<figure><img src="/files/yQNfrt3BNRJVRCFHu9EX" alt=""><figcaption><p>Network search mode configuration</p></figcaption></figure>

## Network configuration &  Network search mode configuration

Default configuration is Enable.

<figure><img src="/files/14kysBhdGePrUrwra1f3" alt=""><figcaption><p>Network configuration &#x26;  Network search mode configuration</p></figcaption></figure>

{% hint style="warning" %}
Don't change to **Disable mode** if you want to use cellular module
{% endhint %}


# Upgrade Firmware

This section show you how to upgrade the new firmware for XBLink

We highly recommend that you should select one of the methods as below to connect to WebApp

1. [**Connect via LAN network**](/xblink-plus/user-manual/getting-started/xblink-webapp#lan-network)
2. [**Connect directly to PC**](/xblink-plus/user-manual/getting-started/xblink-webapp#connect-directly-to-pc)

You can upgrade new firmware when to access this address: **<http://xblink.local:3002>**

<figure><img src="/files/QUEMquGk657vDkPF6ui6" alt=""><figcaption></figcaption></figure>

Please follow the instruction here carefully

1. In order to get a new firmware, you should contact us **here**
2. Click **UPGRADE,** this process may take a few minutes to complete.&#x20;

After upgrade successfully, you need to reboot XBLink.


# XBStationPilotApp

XBStationPilotApp is a Software on your station to control XBLink Plus and transmit video and telemetry streaming from it to Ground control station (Mission Planner, QGroundControl, ...).

<figure><img src="/files/Sv1UkVt6v5jPQC9ylwIH" alt=""><figcaption><p>Login Page </p></figcaption></figure>

## Supported

PC: Windows, MacOS

Phone/Tablet: Android

Note: XBStationPilotApp on Android version is beta version. you only fly with **limited time 15 minutes**

## Video Tutorials

#### XBStationPilotApp - Mission Planner: [link](https://youtu.be/WxmOfRFRJh4?si=WqxiXfhK4aHvsko7)

{% embed url="<https://youtu.be/WxmOfRFRJh4?si=WqxiXfhK4aHvsko7>" %}

#### XBStationPilotApp - QgroundControl: [link](https://www.youtube.com/watch?v=8mLK-jrc7eE)

{% embed url="<https://www.youtube.com/watch?v=8mLK-jrc7eE>" %}


# Download

How to install softwares

## Ground Control station software

* Mission Planner: ([Link Download](http://firmware.ardupilot.org/Tools/MissionPlanner/))
* QGroundControl: ([Link Download](https://docs.qgroundcontrol.com/en/getting_started/download_and_install.html))

## GStreamer

GStreamer is required in case you need to play the video on Mission Planner. If you're using QGroundControl, skip this step.

* GStreamer x86\_64 ([Link Download](https://gstreamer.freedesktop.org/download))

Note: Please select **complete** when installing gstreamer.

![](/files/-Ma9Hn8x9LXqzWLgqdy5)

## XBStationPilotApp <a href="#xbstationpilotapp" id="xbstationpilotapp"></a>

**Release Date:** 02/02/2024

XBStationPilotApp-8.6.6.4 is now available for general use.

* Windows: ([Link Download](https://www.mediafire.com/file_premium/ee234s21vyw0b3p/XBStationPilotApp-8.6.6.4.zip/file))
* MacOS Intel: Coming Soon

**Previous releases:** [here](/xblink-plus/user-manual/xbstationpilotapp/release-notes)


# Overview

## Dashboard

After login Pilot App is ready to use.&#x20;

![XBStationPilotApp: Dashboard interface](/files/JcMap9ht4UYYVi4Sopwy)

## Menu

Explore more functions on the Menu Tab

![XBStationPilotApp: Menu Tab](/files/jjsWWTJUYAf9Cg9zEkEe)

**Setting Tab**&#x20;

![XBStationPilotApp:Setting Tab](/files/-M_yw2tpv-GTu8DN7pfl)

**System Monitor Tab**&#x20;

Real time monitor the XBLink Plus's performance.&#x20;

![](/files/-M_yveNmaa3YB39HwPIW)

More Info, please refer:

{% content-ref url="/pages/cOtyME7jrBLcdMWjqstk" %}
[System Monitor](/xblink-plus/user-manual/xbstationpilotapp/system-monitor)
{% endcontent-ref %}

**Streaming Sharing Tab**

Share live data(telemetry and video) with your field operators/clients/customers

{% hint style="info" %}
This feature is for Enterprise user, contact us to upgrade your account
{% endhint %}

![](/files/-Md1ZdGLQ8fo0skT-2FM)

More Info, please refer:

{% content-ref url="/pages/xPY9wQD1q2Bja1l5iVtl" %}
[Streaming Sharing](/xblink-plus/user-manual/advanced-configuration/streaming-sharing)
{% endcontent-ref %}


# Ground Station

The following is a list of Desktop Ground Control Stations that XBLink can stream video and telemetry.

## [Mission Planner](/xblink-plus/user-manual/xbstationpilotapp/ground-station/mission-planner)

## [Qgroundcontrol](/xblink-plus/user-manual/xbstationpilotapp/ground-station/qgroundcontrol)


# Mission Planner

This article provides basic guidelines for configuring telemetry and stream video by XBCamV2

## Login

* User Name
* Password
* Server: <https://server.platform.xbstation.com:8007> (Default)&#x20;

![](/files/-M_yg-bQuy-dBRS9julS)

Note: Account is attached on your XBLinkbox. If you don't have account, please contact us.

## Connect to Telemetry data

1. Open Mission Planner, at the top-right, choose **TCP** type and **Connect.**

<figure><img src="/files/ICh50jd2xcqbJN2vUGJ8" alt="" width="315"><figcaption></figcaption></figure>

2. Host name/ip: **127.0.0.1** (default)&#x20;

<figure><img src="/files/iWJzjspFO0rg1jftumCb" alt="" width="248"><figcaption></figcaption></figure>

3. &#x20;Remote port: **5760** (default) or 5761 (*remember it must be same Telemetry Host Port in PilotApp*)

<figure><img src="/files/tDXXp1m8nlhB3iBGqW7d" alt="" width="248"><figcaption></figcaption></figure>

![](/files/-M_z01dNhT9PsqR5rfJ8)

For telemetry instructions and more information, please click here.

{% content-ref url="/pages/vvC18li9n5vB4r372zMG" %}
[Broken mention](broken://pages/vvC18li9n5vB4r372zMG)
{% endcontent-ref %}

## Connect to Video Streaming&#x20;

### XBCamV2

1. At the Video HUD area, Right Click -> Video -> GStreamer Stop as below instruction

<figure><img src="/files/JpymCSVpmc3HDR7uziuT" alt="" width="352"><figcaption><p>Stop GStreamer</p></figcaption></figure>

2. At the Video HUD area, Right Click -> Video -> Set GStreamer source -> input GStreamer URL:

**`udpsrc port=5601 caps = "application/x-rtp, media=video, clock-rate=90000, encoding-name=H264, payload=96" ! rtpjitterbuffer ! rtph264depay ! avdec_h264 ! videoconvert ! video/x-raw,format=BGRA ! appsink name=outsink`**

```
udpsrc port=5601 caps = "application/x-rtp, media=video, clock-rate=90000, encoding-name=H264, payload=96" ! rtpjitterbuffer ! rtph264depay ! avdec_h264 ! videoconvert ! video/x-raw,format=BGRA ! appsink name=outsink
```

{% hint style="info" %}
**NOTE: udpsrc port=560x must be the same as PilotApp**
{% endhint %}

![](/files/-M_z0Cg8exmV3XTNiD7K)

{% hint style="info" %}
**NOTE:** The GStreamer URL just need to input at the first time, MissionPlanner will auto save this params, the next run with MissionPlanner, you just **Right Click -> Video -> Set GStreamer source -> and click OK to use video streaming**
{% endhint %}

![Mission Planner](https://i.imgur.com/kFRpzS9.png)

{% hint style="warning" %}
Download and install the plugin (domestic environment download is slow, if it fails, please restart the MissionPlanner ground station and try again)
{% endhint %}

![Mission Planner](https://i.imgur.com/RurZ4jz.png)

After the installation is complete, restart the MissionPlanner ground station to display the following interface.

### Other Cameras

Let's explore more setup and advanced configuration of other cameras here

{% content-ref url="/pages/cVBUNtVage3SdIgdrGb8" %}
[Cameras and Gimbals](/xblink-plus/user-manual/advanced-configuration/cameras-and-gimbals)
{% endcontent-ref %}

## Video Tutorials

* XBStationPilotApp - MissionPlanner: [link](https://youtu.be/WxmOfRFRJh4?si=WqxiXfhK4aHvsko7)

{% embed url="<https://youtu.be/WxmOfRFRJh4?si=WqxiXfhK4aHvsko7>" %}
Connect Telemetry to Pixhawk and video data with XBCam V2&#x20;
{% endembed %}

{% hint style="info" %}
Let's explore the variety of features that XBLink supports **here!**
{% endhint %}

{% content-ref url="/pages/ELXE0nfd8zDzmKMUCjVa" %}
[Advanced Configuration](/xblink-plus/user-manual/advanced-configuration)
{% endcontent-ref %}


# Qgroundcontrol

This article provides basic guidelines for configuring telemetry and stream video by XBCamV2

## Login

* User Name
* Password
* Server: <https://server.platform.xbstation.com:8007> (Default)&#x20;

![](/files/-M_yg-bQuy-dBRS9julS)

Note: Account is attached on your XBLink Plus box. If you don't have account, please contact us.

## Connect to Telemetry data

1. Open QGroundControl -> Comm Links ->  choose TCP type
2. Enter Host name/ip: **127.0.0.1** (default)
3. Remote port: **5760** or **5761** (*remember it must be same Telemetry Host Port in PilotApp*)

<figure><img src="/files/SGlCHou58j8zD8PsfV2f" alt=""><figcaption></figcaption></figure>

<figure><img src="/files/hXXWBWTHbUslvQRhhxj8" alt=""><figcaption></figcaption></figure>

Please click [**here**](broken://pages/vvC18li9n5vB4r372zMG) to for telemetry instructions and more information.

## Connect to Video Streaming

### XBCam V2

1. Open QGroundControl -> General -> Video Settings
2. Video source: **UDP h.261 Video Stream**
3. UDP Port: **5600** or **5601** (*remember it must be same Video Port in PilotApp*)

<figure><img src="/files/qXA0IdMMIlIcQMKEERdj" alt=""><figcaption></figcaption></figure>

<figure><img src="/files/ocTc3W3zIbKF4GJa3ltU" alt=""><figcaption></figcaption></figure>

### Other Cameras

Let's explore more setup and advanced configuration of other cameras **here**!

{% content-ref url="/pages/cVBUNtVage3SdIgdrGb8" %}
[Cameras and Gimbals](/xblink-plus/user-manual/advanced-configuration/cameras-and-gimbals)
{% endcontent-ref %}

## Video Tutorials

* XBStationPilotApp - QgroundControl: [here](https://www.youtube.com/watch?v=8mLK-jrc7eE)

{% embed url="<https://www.youtube.com/watch?v=8mLK-jrc7eE>" %}
Connect Telemetry to Pixhawk and video data with XBCam V2&#x20;
{% endembed %}

{% hint style="info" %}
Let's explore the variety of features that XBLink supports here
{% endhint %}

{% content-ref url="/pages/ELXE0nfd8zDzmKMUCjVa" %}
[Advanced Configuration](/xblink-plus/user-manual/advanced-configuration)
{% endcontent-ref %}


# System Monitor

Display XBLink system informations

## Dashboard

![](/files/-Md1GAFjlPt3HICFLhIf)

## System Monitor Tab

![](/files/-Md1VZPyHkJdTuKhBDJp)

## Description

* **RSSI**:  Received Signal Strength Indicator

&#x20;   **RSSI** (Received Signal Strength Indicator) is a parameter which provides information about total received wide-band power (measure in all symbols) including all interference and thermal noise.

| **Value** | **RSSI dBm** | **Condition** |
| --------- | ------------ | ------------- |
| 2         | -109         | Marginal      |
| 3         | -107         | Marginal      |
| 4         | -105         | Marginal      |
| 5         | -103         | Marginal      |
| 6         | -101         | Marginal      |
| 7         | -99          | Marginal      |
| 8         | -97          | Marginal      |
| 9         | -95          | Marginal      |
| 10        | -93          | OK            |
| 11        | -91          | OK            |
| 12        | -89          | OK            |
| 13        | -87          | OK            |
| 14        | -85          | OK            |
| 15        | -83          | Good          |
| 16        | -81          | Good          |
| 17        | -79          | Good          |
| 18        | -77          | Good          |
| 19        | -75          | Good          |
| 20        | -73          | Excellent     |
| 21        | -71          | Excellent     |
| 22        | -69          | Excellent     |
| 23        | -67          | Excellent     |
| 24        | -65          | Excellent     |
| 25        | -63          | Excellent     |
| 26        | -61          | Excellent     |
| 27        | -59          | Excellent     |
| 28        | -57          | Excellent     |
| 29        | -55          | Excellent     |
| 30        | -53          | Excellent     |

* **Access Technology**: Radio Access Technology being used by XBLink Plus
* **PC Ping:** Ping time from pilot app to streaming server
* **XBLink Ping**: Ping time from XBLink Plusto streaming server
* **Cloud:** Streaming Server domain, (Ex: hk stand for HongKong)
* **CPU:** XBLink Plus's CPU performance
* **Memory:** XBLink Plus's Memory performance
* **Temperature:** XBLink Plus'stemperature
* **Bytes sent**: Total bytes sent from XBLink Plus


# Release Notes

### [**Link to Current Release Notes**](/xblink-plus/user-manual/xbstationpilotapp/download#xbstationpilotapp)

### Older Releases

* February 02, 2024: XBstationPilotApp-8.6.6.4 released. Windows: ([Link Download](https://www.mediafire.com/file_premium/ee234s21vyw0b3p/XBStationPilotApp-8.6.6.4.zip/file)); MacOS intel: (Coming Soon)
* Dec 08, 2023: XBStationPilotApp-8.6.3.2 released. Windows: ([Link Download](https://www.mediafire.com/file_premium/g9u6ji53um96amk/XBStationPilotApp-8.6.3.2.zip/file)); MacOS Intel: ([Link Download](https://www.mediafire.com/file_premium/8osoykzg7sshkae/XBStationPilotApp-8.6.4.zip/)).


# Advanced Configuration

This section will take you through the more advanced configuration as below.

## [Cameras and Gimbals](/xblink-plus/user-manual/advanced-configuration/cameras-and-gimbals) <a href="#camera-setting" id="camera-setting"></a>

## [Remote Controller](/xblink-plus/user-manual/advanced-configuration/remote-controller)

## [Telemetry](/xblink-plus/user-manual/advanced-configuration/telemetry)

## [Streaming Sharing](/xblink-plus/user-manual/advanced-configuration/streaming-sharing)


# Cameras and Gimbals

This section describes how to setup and configure these Cameras and Gimbals

&#x20;XBLink Plus supports a variety of cameras and gimbals, including many of advanced features.&#x20;

Follow the links below to explanations to how to configure:

* [IP Cameras](/xblink-plus/user-manual/advanced-configuration/cameras-and-gimbals/ip-cameras)
* [USB Cameras](/xblink-plus/user-manual/advanced-configuration/cameras-and-gimbals/usb-cameras)
* [HDMI to CSI-2 Bridge](/xblink-plus/user-manual/advanced-configuration/cameras-and-gimbals/hdmi-to-csi-2-bridge)


# IP Cameras

This article show you how to set up and config IP Cameras with XBLink

## [Siyi Gimbal Cameras](/xblink-plus/user-manual/advanced-configuration/cameras-and-gimbals/ip-cameras/siyi-camera-gimbal)

## [Other IP Cameras](broken://pages/s9aAlhbCquVWhEo5rezn)


# Siyi Camera Gimbal

This article describes how to set up and config Siyi Gimbal Cameras with XBLink

The [SIYI ZR10](https://shop.siyi.biz/products/siyi-zr10), [ZR30](https://shop.siyi.biz/products/siyi-zr30) and [A8](https://shop.siyi.biz/products/siyi-a8-mini) are IP cameras which can communicate with XBLink via ethernet protocol to stream video.

## Hardware Setup

We support 3 methods to connect it to XBLink as below

* **Method 1:**  Connect to ETH0 port's XBLink.&#x20;

<figure><img src="/files/9OLcWIXTMBoWvvg7ozIv" alt="" width="375"><figcaption></figcaption></figure>

* **Method 2:** Using [USB to Ethernet Adapte](/xblink-plus/user-manual/getting-started/overview#other-not-include)r. (In case ETH0 port of XBLink is occupied)

<figure><img src="/files/sVwAzpqp2GdJY3iHoH9u" alt=""><figcaption></figcaption></figure>

* **Method  3:** Using Dual FPV Camera Hub.

<figure><img src="/files/D1mjIzeACnuS8E5IrJN1" alt=""><figcaption></figcaption></figure>

### Method 1:  Connect to ETH0 port's XBLink&#x20;

The simplest way to connect a Siyi Gimbal Camera to XBLink is to use it's ETH0 port. You just need to plug in the wire according to the instructions below.

<figure><img src="/files/7yIXW5RHxLETCtqHDTjg" alt="" width="563"><figcaption></figcaption></figure>

Finally, power up XBLink and Siyi Gimbal Camera.

{% hint style="info" %}
Note: ETH port is ETH0 of XBLink Plus
{% endhint %}

### Method 2: Using USBtoETH Adapter

If you are intending to use both [the remote control](/xblink-plus/user-manual/advanced-configuration/remote-controller) and Siyi Gimbal Cameras, we recommend that you use the [USB to Ethernet Adapter](/xblink-plus/user-manual/getting-started/overview#other-not-include) to connect to the USB port of the XBLink

You can connect Siyi Gimbal Cameras to USB port of XBLink Plus via [USB to Ethernet Adapter](/xblink-plus/user-manual/getting-started/overview#other-not-include) as below

<figure><img src="/files/jD1L11kYavYIc2g1mj7W" alt=""><figcaption></figcaption></figure>

{% hint style="info" %}
Note: USB port is ETH1 of XBLink Plus
{% endhint %}

Finally, power up XBLink and Siyi Gimbal Camera.

### Method  3: Using Dual FPV Camera Hub

In case you have Dual FPV Camera Hub of Siyi, you can connect it XBLink following instruction

<figure><img src="/files/quHIcBtvGhOsCNL9by44" alt="" width="563"><figcaption></figcaption></figure>

Finally, power up XBLink and Siyi Gimbal Camera.

{% hint style="info" %}
Note: ETH port is ETH0 of XBLink Plus
{% endhint %}

## Configuration

### XBStationPilotApp&#x20;

If you are using ETH0 Port's XBLink (**method 1 and 3**), please open XBStationPilotApp and configure as below:

1. Internet connection: **TCP**
2. Video Port: **5601**
3. Video Source: **SIYI**
4. Ethernet: **eth0**
5. IP: **.25**

<figure><img src="/files/AxIAAfBwegONCHPeoUMl" alt=""><figcaption></figcaption></figure>

In case that you using USB Port( ETH1) to connect IP Camera (**method 2**), just change Ethernet section to **eth1**

<figure><img src="/files/mUWcIuX6Fstzdg4VEERm" alt=""><figcaption></figcaption></figure>

### Ground Station

#### QGroundControl

* Open QGroundControl, Change Source section to **UDP H.265 Video Stream** as below.

<figure><img src="/files/qk3Oh8kQ9L9pJ729uGWp" alt="" width="293"><figcaption></figcaption></figure>

#### Mission Planner

1. At the Video HUD area, Right Click -> Video -> GStreamer Stop as below instruction

<figure><img src="/files/dQRrQoLqgyrm0lZIrMh4" alt="" width="528"><figcaption><p>GStreamer Stop</p></figcaption></figure>

2. At the Video HUD area, Right Click -> Video -> Set GStreamer source -> input GStreamer URL:

`udpsrc port=5601 caps = "application/x-rtp, media=video, clock-rate=90000, encoding-name=H265, payload=96" ! rtpjitterbuffer ! rtph265depay ! avdec_h265 ! videoconvert ! video/x-raw,format=BGRA ! appsink name=outsink`

```
udpsrc port=5601 caps = "application/x-rtp, media=video, clock-rate=90000, encoding-name=H265, payload=96" ! rtpjitterbuffer ! rtph265depay ! avdec_h265 ! videoconvert ! video/x-raw,format=BGRA ! appsink name=outsink
```

{% hint style="info" %}
**NOTE: udpsrc port=560x must be the same as PilotApp**
{% endhint %}

![](/files/-M_z0Cg8exmV3XTNiD7K)

{% hint style="info" %}
**NOTE:** The GStreamer URL just need to input at the first time, Mission Planner will auto save this params, the next run with Mission Planner, you just **Right Click -> Video -> Set GStreamer source -> and click OK to use video streaming**
{% endhint %}

![Mission Planner](https://i.imgur.com/kFRpzS9.png)

{% hint style="info" %}
**NOTE:** Download and install the plugin (domestic environment download is slow, if it fails, please restart the Mission Planner ground station and try again)
{% endhint %}

![Mission Planner](https://i.imgur.com/RurZ4jz.png)

After the installation is complete, restart the MissionPlanner ground station to display the following interface.

## Video tutorial

For more information see video as below

{% embed url="<https://www.youtube.com/watch?v=sXnlv0z1MvI>" %}


# Other IP Cameras

This article describes how to set up and config Other IP Cameras with XBLink

The Other IP cameras which cadn communicate with XBLink via ethernet protocol to stream video.

## Hardware Setup

We support 2 methods to connect it to XBLink as below

**Method 1**:  Connect to ETH0 port's XBLink.&#x20;

<figure><img src="/files/dWCDgq1i32YSWERS7Xmc" alt="" width="375"><figcaption></figcaption></figure>

**Method 2**: Using USBtoETH Adapter (Nhớ gắn link). (In case ETH0 port of XBLink is occupied)

<figure><img src="/files/ih5y0hVQZm6vxlHxmjrd" alt=""><figcaption></figcaption></figure>

**Method  3**: Using Dual FPV Camera Hub.

<figure><img src="/files/ZtoyJBQOaq8s94Jb7H1h" alt=""><figcaption></figcaption></figure>

### Method 1:  Connect to ETH0 port's XBLink&#x20;

The simplest way to connect a IP Camera to XBLink is to use it's ETH0 port. You just need to plug in the wire according to the instructions below.

<figure><img src="/files/RFMqoN7IrB0knJBKweKT" alt="" width="287"><figcaption></figcaption></figure>

Finally, power up XBLink and a IP Camera.

{% hint style="info" %}
Note: ETH port is ETH0 of XBLink Plus
{% endhint %}

### Method 2: Using USBtoETH Adapter

If you are intending to use both [the remote control](/xblink-plus/user-manual/advanced-configuration/remote-controller) and a IP Camera, we recommend that you use the [USB to Ethernet Adapter](/xblink-plus/user-manual/getting-started/overview#other-not-include) to connect to the USB port of the XBLink

You can connect IP Camera to USB port of XBLink Plus via [USB to Ethernet Adapter](/xblink-plus/user-manual/getting-started/overview#other-not-include) as below

<figure><img src="/files/S46x56CKRDAxWLP1iY9l" alt="" width="226"><figcaption></figcaption></figure>

{% hint style="info" %}
Note: USB port is ETH1 of XBLink Plus
{% endhint %}

Finally, power up XBLink and a IP Camera.

## Configuration <a href="#camera-setting" id="camera-setting"></a>

### XBStationPilotApp&#x20;

If you are using ETH0 Port's XBLink (**method 1**), please open XBStationPilotApp and configure as below:

1. Internet connection: **TCP**
2. Video Port: **5601**
3. Video Source: Other IP CAM
4. Ethernet: **eth0**
5. Ip Address: **Please fill out your IP address Camera (find from your document of IP Camera)**
6. Pipeline: **Please fill out your Pipeline Camera (find from your document of IP Camera)**

{% hint style="info" %}
The address format should be rtsp\://*\<camera-ip-address>/\<video-format>*

Example with ZR10:

* Ip Address: 192.168.144.25
* Pipeline: rtsp\://192.168.144.25:8554/main.264
  {% endhint %}

7. **TURN ON**.

<figure><img src="/files/gK3tH0r5hXeDSW4vUBEw" alt=""><figcaption></figcaption></figure>

In case that you using USB Port( ETH1) to connect IP Camera (**method 2**), just change Ethernet section to **eth1**

<figure><img src="/files/bHIzLZl6BkQ1SKmSRqAt" alt=""><figcaption></figcaption></figure>

### Ground Station

#### QGroundControl

* Open QGroundControl, Change Source section to **UDP H.265 Video Stream** or **UDP H.264 Video Stream** up to your IPCamera as below.

<div><figure><img src="/files/TC45VhCVGmKmgJrtoqwY" alt="" width="293"><figcaption><p><strong>UDP H.265 Video Stream</strong></p></figcaption></figure> <figure><img src="/files/fFyZ4t88iKE0xLhaMPz6" alt="" width="294"><figcaption><p><strong>UDP H.264 Video Stream</strong></p></figcaption></figure></div>

#### Mission Planner

1. At the Video HUD area, Right Click -> Video -> GStreamer Stop as below instruction

<figure><img src="/files/dQRrQoLqgyrm0lZIrMh4" alt="" width="528"><figcaption><p>GStreamer Stop</p></figcaption></figure>

2. At the Video HUD area, Right Click -> Video -> Set GStreamer source -> input GStreamer URL:

**`udpsrc port=5601 caps = "application/x-rtp, media=video, clock-rate=90000, encoding-name=H264, payload=96" ! rtpjitterbuffer ! rtph264depay ! avdec_h264 ! videoconvert ! video/x-raw,format=BGRA ! appsink name=outsink`**

```
udpsrc port=5601 caps = "application/x-rtp, media=video, clock-rate=90000, encoding-name=H264, payload=96" ! rtpjitterbuffer ! rtph264depay ! avdec_h264 ! videoconvert ! video/x-raw,format=BGRA ! appsink name=outsink
```

{% hint style="info" %}
**NOTE: udpsrc port=560x must be the same as PilotApp**

**NOTE:** The GStreamer URL just need to input at the first time, Mission Planner will auto save this params, the next run with Mission Planner, you just **Right Click -> Video -> Set GStreamer source -> and click OK to use video streaming**
{% endhint %}

![Mission Planner](https://i.imgur.com/kFRpzS9.png)

{% hint style="info" %}
**NOTE:** Download and install the plugin (domestic environment download is slow, if it fails, please restart the Mission Planner ground station and try again)
{% endhint %}

![Mission Planner](https://i.imgur.com/RurZ4jz.png)

After the installation is complete, restart the Mission Planner ground station to display the following interface.

## Video tutorial

For more information see video as below

{% embed url="<https://youtu.be/LDAwsTO1HTY>" %}


# USB Cameras

This article shows how to setting USB Cameras

## [XBCam V2](/xblink-plus/user-manual/advanced-configuration/cameras-and-gimbals/usb-cameras/xbcam-v2)

## [ Other USB Cameras](/xblink-plus/user-manual/advanced-configuration/cameras-and-gimbals/usb-cameras/other-usb-cameras)


# XBCam V2

This article shows how to setting XBCam V2

## **1. Hardware Setup** <a href="#camera-setting" id="camera-setting"></a>

Connect XBCamV2 to XBLink via USB type C cable.

<figure><img src="/files/5XRhqwYWXIfWm4gQGe0h" alt="" width="375"><figcaption><p>Hardware Setup</p></figcaption></figure>

## **2. Settings in PilotApp** <a href="#camera-setting" id="camera-setting"></a>

After connecting XBCam V2 to XBlink, open XBStationPilotApp and configure as below:

<figure><img src="/files/URxhOjepSqCosxFNMVSn" alt=""><figcaption></figcaption></figure>

### a. **Video** Port <a href="#a-port_1" id="a-port_1"></a>

Destination video port, Mission Planner and QGroundControl supports video in HUD by default on port **5600** (or 5601)**.**

### b. Video source <a href="#b-video-source" id="b-video-source"></a>

{% hint style="warning" %}
Please choose **XBCam V2.**
{% endhint %}

### c. Internet connection <a href="#c-camera-connection-type" id="c-camera-connection-type"></a>

{% hint style="warning" %}
Default is **TCP** to archive minimize latency, please **don't change to UDP.**
{% endhint %}

## 3. Settings in QGroundControl <a href="#camera-setting" id="camera-setting"></a>

&#x20;Open **QGroundControl**, choose **Application Setting -> General**, and scroll to "**Video Setting**" section\
&#x20;as belo&#x77;**:**

<figure><img src="/files/F7l5wCfU65WLFTlwht7o" alt=""><figcaption><p>Settings in QGroundControl</p></figcaption></figure>

{% hint style="warning" %}
**Source: UDP h.264 Video Stream**&#x20;

**UDP Port** must be the same in [**Video Port**](#a-port_1) selected above.
{% endhint %}

## 4. Settings in Mission Planner

1. At the Video HUD area, Right Click -> Video -> GStreamer Stop as below instruction

<figure><img src="/files/dQRrQoLqgyrm0lZIrMh4" alt="" width="528"><figcaption><p>GStreamer Stop</p></figcaption></figure>

2. At the Video HUD area, Right Click -> Video -> Set GStreamer source -> input GStreamer URL:

**`udpsrc port=5601 caps = "application/x-rtp, media=video, clock-rate=90000, encoding-name=H264, payload=96" ! rtpjitterbuffer ! rtph264depay ! avdec_h264 ! videoconvert ! video/x-raw,format=BGRA ! appsink name=outsink`**

```
udpsrc port=5601 caps = "application/x-rtp, media=video, clock-rate=90000, encoding-name=H264, payload=96" ! rtpjitterbuffer ! rtph264depay ! avdec_h264 ! videoconvert ! video/x-raw,format=BGRA ! appsink name=outsink
```

{% hint style="info" %}
**NOTE: udpsrc port=560x must be the same as PilotApp**

**NOTE:** The GStreamer URL just need to input at the first time, Mission Planner will auto save this params, the next run with Mission Planner, you just **Right Click -> Video -> Set GStreamer source -> and click OK to use video streaming**
{% endhint %}

![Mission Planner](https://i.imgur.com/kFRpzS9.png)

{% hint style="info" %}
**NOTE:** Download and install the plugin (domestic environment download is slow, if it fails, please restart the Mission Planner ground station and try again)
{% endhint %}

![Mission Planner](https://i.imgur.com/RurZ4jz.png)

After the installation is complete, restart the MissionPlanner ground station to display the following interface.

## 5. XBCam V2 - Setting <a href="#camera-setting" id="camera-setting"></a>

Moreover, you can adjust camera parameters such as **ExposureTime**, **Brightness, AutoExposure**:

<figure><img src="/files/oPFwH9gaPPEPtAurkd6v" alt=""><figcaption><p>Click here to open list of parameters's XBCAM V2</p></figcaption></figure>

To receive the best display quality under different conditions, we highly recommend making the adjustments below:

* Indoor or low light conditions: Just tick the **AutoExposure** check bo&#x78;**.**
* Outdoor: Untick **AutoExposure** -> Decrease the **ExposureTimeAbsolute** and **Brightness** value.

#### For more information see [XBCam V2 - Setting](https://www.youtube.com/watch?v=rUh23f0tULk).

{% embed url="<https://www.youtube.com/watch?v=rUh23f0tULk>" %}
XBCam V2-Setting
{% endembed %}


# Other USB Cameras

Coming soon!


# HDMI to CSI-2 Bridge

Coming soon!


# Remote Controller

This section describes how to set up and configure remote controller such as Siyi or Herelink.

## [SIYI](/xblink-plus/user-manual/advanced-configuration/remote-controller/siyi)

## [HERELINK](/xblink-plus/user-manual/advanced-configuration/remote-controller/herelink)


# SIYI

This section will describe how to connect and configure Air Unit of Siyi  & Camera to XBLink Plus.

<figure><img src="/files/LNI2JBqx1UfoUUKfBUQ2" alt="" width="563"><figcaption></figcaption></figure>

## Hardware Setup

### Connect Pixhawk&#x20;

#### &#x20;Method 1: Connect to both XBLink and Siyi Air Unit.

In case the telemetry port of flight controller is unoccupied, we highly recommend to use this method to ensure stable and reliable telemetry signal.

<figure><img src="/files/ymdXEjW8w3u4mDT8Gcou" alt="" width="563"><figcaption><p> Connect to both XBLink and Siyi Air Unit.</p></figcaption></figure>

#### Method 2: Connect only to XBLink

XBLink will read telemetry data, then stream it through ethernet to Siyi Air Unit and 4G at the same time.

<figure><img src="/files/28n9KfOGDI5h5OthbVgV" alt="" width="488"><figcaption><p> Connect only to XBLink</p></figcaption></figure>

### Connect Siyi Air Unit

We support 2 methods to connect it to XBLink as below

#### Method 1:  Connect directly to ETH0 port's XBLink.&#x20;

In case you are using USB port of XBLink for IP Cameras or USB Cameras, we recommend you connect Siyi Air Unit as below.

<figure><img src="/files/YVlI8QNpimCyw2n6wiK9" alt="" width="375"><figcaption></figcaption></figure>

<figure><img src="/files/rt2mwBTLVx4XG0K0aT12" alt="" width="563"><figcaption></figcaption></figure>

#### Method 2: **Connect via Dual FPV Camera Hub**&#x20;

In case you have Dual FPV Camera Hub of Siyi, you can connect it XBLink following instruction

<figure><img src="/files/l4t6QvLXqjQr7AqA8JpV" alt="" width="375"><figcaption></figcaption></figure>

<figure><img src="/files/FTlmoy0eUVPwraZ1aYr5" alt="" width="563"><figcaption></figcaption></figure>

{% hint style="info" %}
Note: ETH port is ETH0 of XBLink Plus
{% endhint %}

### Connect Cameras

We support a variety of cameras to stream video. Please connect it base on hardware setup as below links

1. [**XBCam V2**](/xblink-plus/user-manual/advanced-configuration/cameras-and-gimbals/usb-cameras/xbcam-v2#camera-setting)
2. [**Siyi Gimbal Cameras**](/xblink-plus/user-manual/advanced-configuration/cameras-and-gimbals/ip-cameras/siyi-camera-gimbal#hardware-setup)
3. [**Other IP Cameras** ](/xblink-plus/user-manual/advanced-configuration/cameras-and-gimbals/ip-cameras/other-ip-cameras#hardware-setup)

## Configuration

### XBStationPilotApp

&#x20;Open XBStationPilotApp and configure as below:

&#x20;In **RC Remote Controlle**r Section:

1. Interfaces: **eth0**
2. Remote Controller: **SIYI**

&#x20;In **Camera Settings** Section:

1. Internet connection: **TCP**
2. Video Port: **5601**
3. Video Source: Please select a kind of Camera connecting.

**I. Siyi Gimbal Cameras**

3. Video Source: SIYI

{% hint style="info" %}
if you choose Siyi Gimbal Camera to connect to :&#x20;

* USB port -> 4.  Ethernet: **eth1**
* FPV Camera Hub -> 4.  Ethernet: **eth0**
  {% endhint %}

5. IP: **.25**
6. Tick **-> RTSP**
7. Encoder: **H265**
8. **TURN ON**

<figure><img src="/files/uT41uMrovwroOcexXpBv" alt=""><figcaption><p>Example for method 1 &#x26; USB port -> IP Camera</p></figcaption></figure>

***

**II. XBCam V2**

1. Video Source: **XBCam V2**
2. Tick **-> RTSP**
3. **TURN ON**

<figure><img src="/files/AHt9YYGhOaSjro3NYkbH" alt=""><figcaption><p>Example for method 1 &#x26; USB port -> USB port -> XBCAM V2</p></figcaption></figure>

**III. Other IP Cameras**

**Method 1:**  Connect to ETH0 port's XBLink

1. Internet connection: **TCP**
2. Video Port: **5601**
3. Video Source: **Other IP CAM**
4. Ethernet: **eth0**
5. Ip Address: **Please fill out your IP address Camera (find from your document of IP Camera)**
6. Pipeline: **Please fill out your Pipeline Camera (find from your document of IP Camera)**

{% hint style="info" %}
The address format should be rtsp\://*\<camera-ip-address>/\<video-format>*

Example with ZR10:

* Ip Address: 192.168.144.25
* Pipeline: rtsp\://192.168.144.25:8554/main.264
  {% endhint %}

7. Tick **-> RTSP**
8. Encoder: Select H264 or H265 option up to your Camera.
9. **TURN ON**.

<figure><img src="/files/eOud2AbAnplek8VMHjtE" alt=""><figcaption></figcaption></figure>

&#x20; **Method 2**: Using USBtoETH Adapter

&#x20; Just change Ethernet section to **eth1**

<figure><img src="/files/gZ4onQDIY2VstPoOlHdf" alt=""><figcaption></figcaption></figure>

***

### Ground Station

#### QGroundControl (PC)

After turning on Camera, open QGroundControl and configure as below.

{% hint style="info" %}
Please select Source:  **UDP h.265 Video Stream** with only Siyi Camera

&#x20;                        Source:  **UDP h.264 Video Stream** with **USB, HDMI, CSI or almost IP cameras**

If you don’t know name port, you can try them one by one.
{% endhint %}

<div><figure><img src="/files/ZsUg3RDMzK2xIOD5lkWY" alt="" width="293"><figcaption><p> Siyi Camera</p></figcaption></figure> <figure><img src="/files/fj8QZ4k104C9WJMbryMy" alt="" width="294"><figcaption><p><strong>USB, HDMI, CSI or almost IP cameras</strong></p></figcaption></figure></div>

#### Mission Planner (PC)

1. At the Video HUD area, Right Click -> Video -> GStreamer Stop as below instruction

<figure><img src="/files/dQRrQoLqgyrm0lZIrMh4" alt="" width="528"><figcaption><p>GStreamer Stop</p></figcaption></figure>

2. At the Video HUD area, Right Click -> Video -> Set GStreamer source -> input GStreamer URL:

**Siyi Cameras:**

`udpsrc port=5601 caps = "application/x-rtp, media=video, clock-rate=90000, encoding-name=H265, payload=96" ! rtpjitterbuffer ! rtph265depay ! avdec_h265 ! videoconvert ! video/x-raw,format=BGRA ! appsink name=outsink`

```
udpsrc port=5601 caps = "application/x-rtp, media=video, clock-rate=90000, encoding-name=H265, payload=96" ! rtpjitterbuffer ! rtph265depay ! avdec_h265 ! videoconvert ! video/x-raw,format=BGRA ! appsink name=outsink
```

**USB, HDMI, CSI or almost IP cameras:**

`udpsrc port=5601 caps = "application/x-rtp, media=video, clock-rate=90000, encoding-name=H264, payload=96" ! rtpjitterbuffer ! rtph264depay ! avdec_h264 ! videoconvert ! video/x-raw,format=BGRA ! appsink name=outsink`

```
udpsrc port=5601 caps = "application/x-rtp, media=video, clock-rate=90000, encoding-name=H264, payload=96" ! rtpjitterbuffer ! rtph264depay ! avdec_h264 ! videoconvert ! video/x-raw,format=BGRA ! appsink name=outsink
```

{% hint style="info" %}
**NOTE: udpsrc port=560x must be the same as PilotApp**

**NOTE:** The GStreamer URL just need to input at the first time, Mission Planner will auto save this params, the next run with Mission Planner, you just **Right Click -> Video -> Set GStreamer source -> and click OK to use video streaming**
{% endhint %}

<img src="https://i.imgur.com/kFRpzS9.png" alt="Mission Planner" width="563">

{% hint style="info" %}
**NOTE:** Download and install the plugin (domestic environment download is slow, if it fails, please restart the Mission Planner ground station and try again)
{% endhint %}

![Mission Planner](https://i.imgur.com/RurZ4jz.png)

After the installation is complete, restart the Mission Planner ground station to display the following interface.

For more information see video as below

{% embed url="<https://youtu.be/dtoMcUA3uwE>" %}

#### SiyiQGroundControl

SiyiQGroundControl will connect to telemetry with Air unit automatically when you open it.

After turning on Camera, go to General -> Video Settings ->configure as below.

1. Source: **RTSP Video Stream**
2. RTSP URL: **rtsp\://192.168.144.100:8554/xb**

<figure><img src="/files/vgPSMOUFuV99M5fM2ypn" alt="" width="375"><figcaption></figcaption></figure>

For more information, please see a video as below

{% embed url="<https://youtu.be/r-IhVsf_hO4>" %}


# HERELINK

This section will describe how to connect and configure Air Unit of Herelink  & Camera to XBLink Plus.

<figure><img src="/files/wvVi49Jtq8cuZVBrxHg8" alt="" width="563"><figcaption></figcaption></figure>

## Hardware Setup

### Connect Pixhawk&#x20;

#### &#x20;Method 1: Connect to both XBLink and Herelink Air Unit.

In case the telemetry port of flight controller is unoccupied, we highly recommend to use this method to ensure stable and reliable telemetry signal.

<figure><img src="/files/MXzNa7omvwO247OzHjM7" alt="" width="563"><figcaption></figcaption></figure>

#### Method 2: Connect only to XBLink

XBLink will read telemetry data, then stream it through ethernet to Herelink Air Unit and 4G at the same time.

<figure><img src="/files/28n9KfOGDI5h5OthbVgV" alt="" width="488"><figcaption></figcaption></figure>

***

### Connect Herelink Air Unit

#### Connect directly to ETH0 port's XBLink.&#x20;

In case you are using USB port of XBLink for IP Cameras or USB Cameras, we recommend you connect Herelink Air Unit to  XBLink ETH port as below.

<figure><img src="/files/q2oq67MoGTI2ytpy1Cqk" alt="" width="375"><figcaption></figcaption></figure>

<figure><img src="/files/DRkxXEmroOVTnNYy8IEm" alt="" width="563"><figcaption></figcaption></figure>

{% hint style="warning" %}
&#x20;Warning: GND signal of Herelink must be connect to XBLink to prevent data loss
{% endhint %}

{% hint style="info" %}
Note: ETH port is ETH0 of XBLink Plus
{% endhint %}

***

### Connect Cameras

We support a variety of cameras to stream video. Please connect it base on hardware setup as below links

1. [**Siyi Gimbal Cameras**](/xblink-plus/user-manual/advanced-configuration/cameras-and-gimbals/ip-cameras/siyi-camera-gimbal#hardware-setup)&#x20;
2. [**Other IP Cameras** ](/xblink-plus/user-manual/advanced-configuration/cameras-and-gimbals/ip-cameras/other-ip-cameras#hardware-setup)
3. [**XBCam V2**](/xblink-plus/user-manual/advanced-configuration/cameras-and-gimbals/usb-cameras/xbcam-v2#camera-setting)
4. **Herelink Air Unit HMDI** ([HERELINK - Compatible camera list](https://docs.cubepilot.org/user-guides/herelink/herelink-faq#herelink-compatible-camera-list))

<figure><img src="/files/m6XGqRCRvXbHFPohUhSV" alt="" width="563"><figcaption><p><strong>Herelink Air Unit HDMI</strong></p></figcaption></figure>

## Configuration

### XBStationPilotApp

&#x20;Open XBStationPilotApp and configure as below:

#### &#x20;In **RC Remote Controlle**r Section:

1. Interfaces: **eth0**
2. Remote Controller: **HERELINK**

#### In **Camera Settings** Section:

1. Internet connection: **TCP**
2. Video Port: **5601**
3. Video Source: Please select a kind of connecting Cameras&#x20;

***

**Siyi Gimbal Cameras**

3. Video Source: **SIYI**
4. Ethernet: **eth1**
5. IP: **.25**
6. Tick **-> RTSP**
7. Encoder: **H265**
8. **TURN ON**

<figure><img src="/files/nh0X4gKnQdDoMIEdNlo6" alt=""><figcaption><p>Example for method 1 &#x26; USB port -> IP Camera</p></figcaption></figure>

***

**Other IP Cameras**&#x20;

&#x20; **Method 1:**  Connect to ETH0 port's XBLink

1. Internet connection: **TCP**
2. Video Port: **5601**
3. Video Source: **Other IP CAM**
4. Ethernet: **eth0**
5. Ip Address: **Please fill out your IP address Camera (find from your document of IP Camera)**
6. Pipeline: **Please fill out your Pipeline Camera (find from your document of IP Camera)**

{% hint style="info" %}
The address format should be rtsp\://*\<camera-ip-address>/\<video-format>*

Example with ZR10:

* Ip Address: 192.168.144.25
* Pipeline: rtsp\://192.168.144.25:8554/main.264
  {% endhint %}

7. Tick **-> RTSP**
8. Encoder: Select H264 or H265 option up to your Camera.
9. **TURN ON**.

<figure><img src="/files/eOud2AbAnplek8VMHjtE" alt=""><figcaption></figcaption></figure>

&#x20; **Method 2**: Using USBtoETH Adapter

&#x20; Just change Ethernet section to **eth1**

<figure><img src="/files/gZ4onQDIY2VstPoOlHdf" alt=""><figcaption></figcaption></figure>

***

**XBCam V2**

1. Video Source: **XBCam V2**
2. Tick **-> RTSP**
3. **TURN ON**

<figure><img src="/files/Nv8VCwI7YNUyN1InNJ6Y" alt=""><figcaption><p>Example for method 1 &#x26; USB port -> USB port -> XBCAM V2</p></figcaption></figure>

***

**Herelink Air Unit HMDI**&#x20;

1. Internet connection: **TCP**
2. Video Port: **5601**
3. Video Source: **HERELINK**
4. Ethernet: **eth0**

<figure><img src="/files/kXeFXMpBuYJoq6SjpYfh" alt=""><figcaption></figcaption></figure>

***

### Ground Station

#### QGroundControl (PC)

After turning on Camera, open QGroundControl and configure as below.

{% hint style="info" %}
Please select Source:  **UDP h.265 Video Stream** with only Siyi Camera

&#x20;                        Source:  **UDP h.264 Video Stream** with **USB, HDMI, CSI or almost IP cameras**

If you don’t know name port, you can try them one by one.
{% endhint %}

<div><figure><img src="/files/ZsUg3RDMzK2xIOD5lkWY" alt=""><figcaption><p>Siyi Camera</p></figcaption></figure> <figure><img src="/files/fj8QZ4k104C9WJMbryMy" alt=""><figcaption><p><strong>USB, HDMI, CSI or almost IP cameras</strong></p></figcaption></figure></div>

***

#### Mission Planner (PC)

1. At the Video HUD area, Right Click -> Video -> GStreamer Stop as below instruction

<figure><img src="/files/dQRrQoLqgyrm0lZIrMh4" alt="" width="528"><figcaption><p>GStreamer Stop</p></figcaption></figure>

2. At the Video HUD area, Right Click -> Video -> Set GStreamer source -> input GStreamer URL:

* **Siyi Camera:**

`udpsrc port=5601 caps = "application/x-rtp, media=video, clock-rate=90000, encoding-name=H265, payload=96" ! rtpjitterbuffer ! rtph265depay ! avdec_h265 ! videoconvert ! video/x-raw,format=BGRA ! appsink name=outsink`

```
udpsrc port=5601 caps = "application/x-rtp, media=video, clock-rate=90000, encoding-name=H265, payload=96" ! rtpjitterbuffer ! rtph265depay ! avdec_h265 ! videoconvert ! video/x-raw,format=BGRA ! appsink name=outsink
```

* **USB, Herelink Air Unit HMDI, CSI or almost IP cameras:**

**udpsrc port=5601 caps = "application/x-rtp, media=video, clock-rate=90000, encoding-name=H264, payload=96" ! rtpjitterbuffer ! rtph264depay ! avdec\_h264 ! videoconvert ! video/x-raw,format=BGRA ! appsink name=outsink**

```
udpsrc port=5601 caps = "application/x-rtp, media=video, clock-rate=90000, encoding-name=H264, payload=96" ! rtpjitterbuffer ! rtph264depay ! avdec_h264 ! videoconvert ! video/x-raw,format=BGRA ! appsink name=outsink
```

{% hint style="info" %}
**NOTE: udpsrc port=560x must be the same as PilotApp**

**NOTE:** The GStreamer URL just need to input at the first time, Mission Planner will auto save this params, the next run with Mission Planner, you just **Right Click -> Video -> Set GStreamer source -> and click OK to use video streaming**
{% endhint %}

![Mission Planner](https://i.imgur.com/kFRpzS9.png)

{% hint style="info" %}
**NOTE:** Download and install the plugin (domestic environment download is slow, if it fails, please restart the Mission Planner ground station and try again)
{% endhint %}

![Mission Planner](https://i.imgur.com/RurZ4jz.png)

After the installation is complete, restart the MissionPlanner ground station to display the following interface.

For more information see video as below

{% embed url="<https://youtu.be/lN5N9yZ6EAc>" %}

***

#### Herelink QGroundControl

* **XBCamV2, Siyi or IP cameras**

**Configure Telemetry**

1. Open QGroundControl -> Comm Links -> Add
2. Type: Click to **UDP**
3. In UDP Link Settings-> Listening Port: **19856**

**Configure Cameras**

1. Open QGroundControl -> General -> Video Settings -> configure as below.
2. Source: **RTSP Video Stream**
3. RTSP URL: **rtsp\://192.168.144.100:8554/xb**

<figure><img src="/files/E7aYMPm4mMRNSLbXfAqh" alt="" width="563"><figcaption></figcaption></figure>

For more information see video as below

{% embed url="<https://youtu.be/vXvVmYJ7teM>" %}

***

* **Herelink Air Unit HDMI**&#x20;

**Configure Telemetry**

1. Open QGroundControl -> Comm Links -> Add
2. Type: Click to **UDP**
3. In UDP Link Settings-> Listening Port: **19856**

**Configure Cameras**

**In case QGroundControl v4.2.6 64 (Default)**

1. Open QGroundControl -> General -> Video Settings -> configure as below.
2. Video Source: **RTSP Video Stream**
3. RTSP URL: **rtsp\://192.168.0.10:8554/H264Video**

{% embed url="<https://www.youtube.com/watch?v=cKZKY7QeDYM>" %}

**In case  QGroundControl (Development herelink)**

1. Open QGroundControl -> General -> Video Settings -> configure as below.
2. Video Source: **Auto Connection Video Stream**

{% embed url="<https://www.youtube.com/watch?v=2_WL5Mi5eY4>" %}


# Telemetry

This section describes how to configure Telemetry.

## Hardware Setup

You can use Telemetry 1 or 2 of Pixhawk for connection with XBLink via **COM1** (Default), **COM2** or **COM3** port.

<div><figure><img src="/files/stRyO8E9Distyulvj0PV" alt="" width="375"><figcaption></figcaption></figure> <figure><img src="/files/1JhHfwnUI4slh2M0yX1m" alt=""><figcaption></figcaption></figure></div>

More information for pinout of COM Port, please click to [**Pinout - Interface**](/xblink-plus/user-manual/getting-started/interfaces#pinout)

## Software Setup <a href="#telemetry-setting" id="telemetry-setting"></a>

### XBStationPilotApp <a href="#telemetry-setting" id="telemetry-setting"></a>

#### 1. Telemetry Setting <a href="#telemetry-setting" id="telemetry-setting"></a>

<figure><img src="/files/M1EK8UVbZXKx5ZmmsSNS" alt=""><figcaption><p>Telemetry Setting</p></figcaption></figure>

**a. Telemetry Host port**

TCP telemetry server port, Ground Control Station can connect to this port via TCP to get telemetry data. Default is **5760 (or 5761, please see on XBStationPilotApp)**

**b. Telemetry stream protocol**

Telemetry data is relayed through internet in 2 connections method:

* UDP to archive minimize latency (possible packet loss, suitable for Joystick mode)
* TCP method to achieve high reliability (**default**)

#### 2. Serial Setting

<figure><img src="/files/JGDvCRwSIQVqR3GVFsFh" alt=""><figcaption><p>Serial Setting</p></figcaption></figure>

**a. Serial Port**

Port allows you to choose serial port on companion computer

The companion computer will show all available port (ttyS0, ttyUSB0, ttyUSB1…). You have to choose exactly serial port. If you don’t know name port, you can try them one by one.

{% hint style="info" %}
Choose option is ttyS0 if you connect to **COM1** ( ttyAMA4 -> **COM2** or ttyAMA5  -> **COM3**)&#x20;
{% endhint %}

**b. Serial Baudrate**

Baudrate allows you to choose serial baudrate on companion computer

The baudrate on companion computer have to same the baudrate (telemetry 2) on Pixhawk

* With PX4: **SER\_TEL2\_BAUD** (Default 921600), you should change **57600** for stable and save data.
* With ArduPilot : **SERIAL2\_BAUD** (Default **57**, it means 57600), \
  &#x20;                             **SERIAL2\_PROTOCOL**: **2** (MAVLink 2)

{% hint style="info" %}
**If you have problem with Telemetry 2 port, you can use Telemetry 1 Port**&#x20;

**(Default baud rate Telemetry 1 is 57600 and SERIAL1\_PROTOCOL = 2)**
{% endhint %}

### GroundStation <a href="#telemetry-setting" id="telemetry-setting"></a>

#### Mission Planner

1. Open Mission Planner, at the top-right, choose **TCP** type and **Connect.**

<figure><img src="/files/ICh50jd2xcqbJN2vUGJ8" alt="" width="315"><figcaption></figcaption></figure>

2. Host name/ip: **127.0.0.1** (default)&#x20;

<figure><img src="/files/iWJzjspFO0rg1jftumCb" alt="" width="248"><figcaption></figcaption></figure>

3. &#x20;Remote port: **5760** (default) or 5761 (*remember it must be same Telemetry Host Port in PilotApp*)

<figure><img src="/files/tDXXp1m8nlhB3iBGqW7d" alt="" width="248"><figcaption></figcaption></figure>

![](/files/-M_z01dNhT9PsqR5rfJ8)

{% embed url="<https://youtu.be/WxmOfRFRJh4>" %}
&#x20; Mission Planner Setup
{% endembed %}

#### QGroundControl

1. Open QGroundControl -> Comm Links ->  choose TCP type
2. Enter Host name/ip: **127.0.0.1** (default)
3. Remote port: **5760** or **5761** (*remember it must be same Telemetry Host Port in PilotApp*)

<figure><img src="/files/SGlCHou58j8zD8PsfV2f" alt=""><figcaption></figcaption></figure>

<figure><img src="/files/hXXWBWTHbUslvQRhhxj8" alt=""><figcaption><p> QGroundControl Setup</p></figcaption></figure>

{% embed url="<https://youtu.be/8mLK-jrc7eE>" %}


# Enterprise Features

This article demonstrate a various features of XBLink

## CAMERA SONY

## GPS

## SECONDARY


# CAMERA SONY

This article show you how to set up and configure Camera Sony

Coming soon!


# SECONDARY

Coming soon!


# GPS RTK/PPK

This section describes how to configure GPS RTK/PPK.

Coming soon!


# Streaming Sharing

XBStation provides low latency, reliable video live stream and telemetry from drones to any location in the world.

You can send a shareable link to coworkers/customers with a specific start time. The streaming interface will be play on web browser without the need of any prerequisite of plugins to be installed.

{% embed url="<https://www.youtube.com/watch?v=b23T-lG4kFA>" %}

## **Required Materials**

This feature supported all Ardupilot/PX4 drone which is using XBLink


# Generate Link

You can send a shareable link to coworkers/customers with a specific start time. The streaming interface will be play on web browser without the need of any prerequisite of plugins to be installed.

{% embed url="<https://www.youtube.com/watch?v=4fdRAzXVnKk>" %}

{% hint style="info" %}
This service need a monthly/yearly subscription fee. Please contact us for 7 days free trial.
{% endhint %}

1. In XBStationPilotApp, go to **Streaming Sharing** tab

![](/files/-Mhgm_u1okarl5K80Hvz)

**2. In Streaming Sharing tab, fill the event information**

![](/files/-MhgnLQc8IQsRKT6N46c)

3\. **Click Generate button, The invitation will be sent to your customer email**

![](/files/-MhlqQAf-dx7My9t0xui)

4\. **Your customer just click to the link to monitor the flight.**

![](/files/-MhlrS0u2KLK7JV2I-cV)


# User Interface

![](/files/-Mhlht_j117nz9McsRob)

## Flight Information

### Drone Information

* **Satellite:** The number of satellites
* **Pilot:** The username of the pilot who is controlling the flight
* **Mode:** Flying Mode
* **Frame:** UAV frame
* **Attitude:** The drone attitude (Roll, pitch, yaw)
* **Heading:** The drone heading

### Cellular Information

* **RSSI -** Received Signal Strength Indicator of 4G LTE module
* **Band -** Frequency band
* **Ping -** Ping time from XBLink to server(ms)
* **Act -** Radio Access technology

One of these technologies:

| Technology       | Generation |
| ---------------- | ---------- |
| FDD LTE          | 4G         |
| TDD LTE          | 4G         |
| TDSCDMA          | 3G         |
| HSPA+            | 3G         |
| HSUPA            | 3G         |
| HSDPA            | 3G         |
| WCDMA            | 3G         |
| EDGE             | 2G         |
| GPRS             | 2G         |
| GSM              | 2G         |
| HDR EHRPD        | 2G         |
| HDR              | 2G         |
| CDMA1X AND EHRPD | 2G         |
| CDMA1X AND HDR   | 2G         |
| CDMA1X           | 2G         |

## **Values (Telemetry)**

The values page shows telemetry information, by default the altitude (relative to the home location) and the ground speed.

![](/files/-MhgfNClAp_nHcpA-g0Q)

You can configure what information is display by pressing the small gear icon on the top left of the panel.

![](/files/-MhgfXJUFcTI_YveBShW)

## **Video/Switcher**

**XBStation Streaming sharing web interface** will display the video stream in the "video switcher window" at the bottom left of the map. You can press the switcher anywhere to toggle *Video* and *Map* to foreground (below we show the video in the foreground).

![](/files/-MhlycX7_qKOaPk9tLU0)

{% hint style="info" %}
In some browsers, you need to click the **play** button to play the video streaming
{% endhint %}

* **Resize** the switcher by dragging the icon in the to right corner.

![](/files/-Mhlwc_JyW-JomF0ZNy8)

* **Show/Hide** the switcher by pressing the toggle icon in the lower left.

![](/files/-MhlxBLUzcNP-EoS8yGm)

* **Toogle Video and Map to foreground** by pressing the switcher anywhere
* **Full screen video** by double clicking the video (on the foreground)
* **Picture in picture mode by** clicking the button on the top left

Picture-in-Picture (PiP) allows you to watch videos in a floating window (always on top of other windows) so you can keep an eye on what you’re watching while interacting with other sites, or applications.

## **Gimbal control**

This XBStation streaming sharing web interface allows you to control a gimbal using a real joystick or virtual button

![](/files/-MhgkMLC-NWNXmKJT-AC)

Using the real **game pad** to control the gimbal by enabling the gamepad mode.

![](/files/-Mhgkyd-aDyB3Zm1cCKh)


# Secondary Pilot Connections

## Overview

<figure><img src="https://cdn-images.xbstation.com/secondary-pilot-overview.png" alt=""><figcaption></figcaption></figure>

The XBStation Pilot App is designed to manage and control pilot accounts through a hierarchical structure of MainPilot and Secondary Pilots. The MainPilot serves as the primary account, with full control and management capabilities, while Secondary Pilots act as auxiliary accounts linked to the MainPilot. This structure allows for flexibility in account management, enabling multiple users to access and control different aspects of the system while maintaining overall control through the MainPilot.

* MainPilot Mode: The MainPilot connection is the central account with complete access and control over the system. The main pilot operates independently of the secondary pilot's connection. The main pilot only loses connection or is logged out when another user with main pilot rights logs in. This implies that the system does not allow multiple users with main pilot rights to be connected simultaneously, enforcing a single active session for the main pilot role.
* &#x20;Secondary Pilots: These are auxiliary accounts linked to the MainPilot. They allow different users to log in and control specific aspects of the system, providing flexibility and enhancing collaborative operations.&#x20;
  * Secondary Pilots are only accessible once the main pilot key has been set.
  * The system is configured to allow a certain number of secondary pilots to connect simultaneously. If over this certain number, the system then disconnects one of the currently connected secondary pilots to allow the new one to connect

## **Activation**

You need to purchase a subscription to activate this feature:

1. **Access the Payment Page in XBStationPilotApp:**

   * Navigate to the `Payment` section and select the `Products` option.
   * Choose the desired package(s) to purchase.

   <figure><img src="https://cdn-images.xbstation.com/secondary-pilot-purchasing.webp" alt=""><figcaption></figcaption></figure>

2. **Purchase the feature with Paypal or Debit/Credit card:**

   <figure><img src="https://cdn-images.xbstation.com/secondary-paypal.webp" alt=""><figcaption></figcaption></figure>

3. **Successful Payment:**

* If the payment is successful, you will be redirected to a confirmation page, similar to the one shown below.

<figure><img src="https://cdn-images.xbstation.com/secondary-payment-success.webp" alt=""><figcaption></figcaption></figure>

## **USAGE**

* Setting the Main Pilot Key:

  * To activate the main pilot key, go to the app’s main menu, select 'Pilot Connection,' enter the password, and press 'UPDATE.'

  <figure><img src="https://cdn-images.xbstation.com/secondary-payment-update-key.webp" alt=""><figcaption></figcaption></figure>

  * After setting the main pilot key, restart the app.&#x20;
    * Tick the MainPilot checkbox and input the key, your connection will be logged in as main pilot

  <figure><img src="https://cdn-images.xbstation.com/secondary-login.webp" alt=""><figcaption></figcaption></figure>

  * If the MainPilot box is not checked after setting the key, the system will automatically default to Secondary Pilot mode.

{% hint style="info" %}
If another user logs in under MainPilot mode, the initially logged-in account will lose connection. This ensures that only one MainPilot account maintains control at a time.

Secondary Pilots can only be activated after the main pilot key has been set.

Multiple secondary pilots logging in: If multiple Secondary Pilots are logged in, the system will prioritize connections based on login order, with the earliest login losing connection if the maximum number of Secondary Pilots is exceeded.
{% endhint %}


# Other Configuration


# VLC Media Player

This page describes how to use VLC Media Player to play video from XBStationPilotApp

## Step 1: **Download and Install**

[VLC for Windows](https://www.videolan.org/vlc/download-windows.html)

[VLC for Mac OS X](https://www.videolan.org/vlc/download-macosx.ast.html)

## Step 2: Settings in PilotApp

After connecting camera to XBlink, Open XBStationPilotApp -> Camera Settings.

1. Internet connection: **TCP**
2. Video port: **5602. (Optional)**
3. Video Source: Please select a kind of camera.

More information about configuring camera, please see here.

{% content-ref url="/pages/cVBUNtVage3SdIgdrGb8" %}
[Cameras and Gimbals](/xblink-plus/user-manual/advanced-configuration/cameras-and-gimbals)
{% endcontent-ref %}

4. Press to **TURN ON** butto&#x6E;**.**

## Step 3: Edit **xbstation.sdp file**

Go to XBStationPilotApp folder -> Search file "**xbstation.sdp**" -> **Right Click** -> **Edit in Notepad**

<figure><img src="/files/pJftE17TSGZthPlj2pv6" alt="" width="375"><figcaption></figcaption></figure>

Follow the instruction as below to edit xbstation.sdp file

1. v = 0 *(Please don't change)*
2. m=video **<*****Video Port*****>**&#x52;TP/AVP 96

{% hint style="info" %}
*Remember* **<*****Video Port*****>** *must be same Video Port in PilotApp.*

*Example: "*&#x6D;=video 5602 RTP/AVP 9&#x36;*"*
{% endhint %}

3. c=IN IP4 *(Please don't change)*
4. a=rtpmap:96 **\<Encoder>**/90000

{% hint style="info" %}
if Video Source is Siyi -> **Encoder : H265**

*Example: "*&#x61;=rtpmap:96 H265/9000&#x30;*"*
{% endhint %}

<figure><img src="/files/2MjTF8Nj00xtGkIN2cM0" alt="" width="301"><figcaption><p>Example: <em>Video Port: 5602 &#x26;</em> Video Source: Siyi</p></figcaption></figure>

{% hint style="info" %}
if Video Source is XBCam V2-> **Encoder : H264**

*Example: "*&#x61;=rtpmap:96 H264/9000&#x30;*"*
{% endhint %}

<figure><img src="/files/Si8mRfEY0oqKuLBFQtST" alt="" width="302"><figcaption><p>Example: <em>Video Port: 5602 &#x26;</em> Video Source: XBCam V2</p></figcaption></figure>

Finally, Save and close it.

## Step 4: Open **xbstation.sdp file**

Right Click to file "**xbstation.sdp**" -> Open with -> VLC Media Player.

## Video Tutorials

{% embed url="<https://www.youtube.com/watch?v=mgwzEQ5BvGE>" %}
Setup VLC Media for Siyi Camera.
{% endembed %}


# FlightSafety

This section contains information about Flight Safety with XBLink Plus

## GCS Failsafe

When you make a BVLOS flight in an area with weak 4G signal. Disconnection between UAV and Ground Control Station may occur. XBLink will automatically reconnect to the nearest 4G base station (4G mobile tower).

If you flight in an area not covered 4G signal, UAVs return (RTL) is necessary. So, the best way to achieve safe flight is to activate GCS Failsafe on your UAVs.

The Ground Station Control (GCS) failsafe controls how UAVs will behave if contact with the GCS is lost. The GCS failsafe monitors the time since the last MAVLink heartbeat from the GCS. If no heartbeat is received FS\_GCS\_TIMEOUT seconds (Default seconds), the GCS failsafe event will trigger based on your parameter settings. Note that if no GCS is ever connected, the GCS failsafe will remain inactive regardless of parameter settings.

Please read the Ardupilot documentation carefully to activate GCS Failsafe

### Copter

&#x20;[FS\_GCS\_ENABLE](https://ardupilot.org/copter/docs/parameters.html#fs-gcs-enable) = 1 (Ground Station Failsafe Enable, switch the copter to RTL Mode. If the GPS position is not usable, the copter will change to Land Mode instead.)

&#x20;[FS\_GCS\_TIMEOUT](https://ardupilot.org/copter/docs/parameters.html#fs-gcs-timeout) = 35 (Timeout before triggering the GCS failsafe. 35 seconds is the time to reconnect or restart the 4G module in XBLink)

{% hint style="info" %}
More detail, follow this section: <https://ardupilot.org/copter/docs/gcs-failsafe.html>
{% endhint %}

### Plane

&#x20;[FS\_GCS\_ENABL](https://ardupilot.org/plane/docs/parameters.html#fs-gcs-enabl) = 1 (GCS failsafe enable)

&#x20;[FS\_LONG\_TIMEOUT](https://ardupilot.org/plane/docs/parameters.html#fs-long-timeout) = 35 (he time in seconds that a failsafe condition has to persist before a long failsafe event will occur. 35 seconds is the time to reconect or restart the 4G module in XBLink)

&#x20;[FS\_LONG\_ACTN](https://ardupilot.org/plane/docs/parameters.html#fs-long-actn) = 1 (ReturnToLaunch)

{% hint style="info" %}
More detail, follow this section: <https://ardupilot.org/plane/docs/apms-failsafe-function.html>
{% endhint %}


# Account


# Register Your Email

When purchasing XBLink Plus, you will be given an username and password to log in. You can use this username to log in, or register an email to do that.

## 1. Go to Pilot Web app

In your browser, access to pilot web app at this address: <https://platform.xbstation.com/pilot>

![XBStation Pilot Web App](/files/-McsyGHDErhqbPUcEpYH)

## 2. Login to pilot web app

Use the credentials we gave you to login

![](/files/-McsypWxkHiJZSNpFkuj)

You will receive a notification: **Email is empty, please update your email.** Input your email address and click **Update** button, an verification email will be sent to you.

{% hint style="info" %}
Email can only be registered once, you will not be able to change it.
{% endhint %}


# Payment

Coming soon!


# Quickstart Guide

This section provides a Quickstart guide

When you received XBLink Mini, all software has been installed, you can check your credential on your box.

{% hint style="danger" %}
Please do not install any software or flash XBLink Mini.
{% endhint %}

## Step 1: Setup XBLink Mini

### 1. Insert Nano SIM Card

<figure><img src="https://files.gitbook.com/v0/b/gitbook-x-prod.appspot.com/o/spaces%2FTEnid8slfk8yG87EyboI%2Fuploads%2FeZyDcv0Nv9gEMlPi6E4J%2FSIM_card.png?alt=media&#x26;token=a5cf20ca-aa2a-4f22-b57c-0f4709fc67da" alt=""><figcaption><p>SIM Card must be faced up</p></figcaption></figure>

{% hint style="info" %}
The SIM card is recessed into the enclosure and you might need a tool to push it into the socket. You can hear a "**click**" when the card is inserted.
{% endhint %}

### 2. Connect antennas

<figure><img src="https://files.gitbook.com/v0/b/gitbook-x-prod.appspot.com/o/spaces%2FTEnid8slfk8yG87EyboI%2Fuploads%2FQotzKGTvnI9M0DvmzRY1%2FAntenna.png?alt=media&#x26;token=e17eef76-ee09-4889-8a8e-319f50781f2f" alt=""><figcaption><p>Connect Antennas to XBLink Mini</p></figcaption></figure>

{% hint style="warning" %}
**Note:** Be careful with the antenna port. Remove or Install it in a **straight angle**.

**We are not responsible if the antenna is damaged due to physical impact**
{% endhint %}

{% hint style="info" %}
**Antenna installation and removal instructions:** [**here**](https://www.youtube.com/watch?v=lAXGtti88gc)
{% endhint %}

### 3. Connect XBCam V2

<figure><img src="https://files.gitbook.com/v0/b/gitbook-x-prod.appspot.com/o/spaces%2FTEnid8slfk8yG87EyboI%2Fuploads%2FbOHMMNYwGfJyEHAUlEMv%2FXBCam_Mini.png?alt=media&#x26;token=7cd2febb-0111-405f-8e2d-48b9cc736b6f" alt=""><figcaption><p>Connect XBCam V2 to USB type C port.</p></figcaption></figure>

{% hint style="info" %}
**Note:** We only currently support XBCam
{% endhint %}

### 4. Connect Flight Controller

You can use Telemetry 1 or 2 of Pixhawk for connection with XBLink Mini via [**COM1/AUX**](/xblink-mini/user-manual/getting-started/interfaces#com1-aux-j3) port.

<div><figure><img src="https://files.gitbook.com/v0/b/gitbook-x-prod.appspot.com/o/spaces%2FTEnid8slfk8yG87EyboI%2Fuploads%2FCq7lmEeWRMyJLDMHalXT%2FFC_connect_MINI.png?alt=media&#x26;token=63b99fe3-f5ce-4d45-a8bb-8681b10e324c" alt=""><figcaption><p><em>XBLink Mini connect to Pixhawk 6C</em></p></figcaption></figure> <figure><img src="https://files.gitbook.com/v0/b/gitbook-x-prod.appspot.com/o/spaces%2FTEnid8slfk8yG87EyboI%2Fuploads%2FdmELPBVaN5ztGKrn4HDA%2FTelem_setup_Mini.png?alt=media&#x26;token=7a4a4af3-35bd-43f8-a166-e0bd2f72a028" alt=""><figcaption></figcaption></figure></div>

{% hint style="info" %}
**Note:** Config baud rate of Pixhawk to 57600, SERIAL1\_BAUD (Default 57, it means 57600), SERIAL1\_PROTOCOL: 2 (MAVLink 2)
{% endhint %}

### 5. Power up

XBLink Mini supports 7-30V voltage input. We highly recommend **3-4 S battery or 12V DC UBEC** **(minimum 1.42A)** to power (6S battery is possible but make sure its high quality and low discharge)

<figure><img src="https://files.gitbook.com/v0/b/gitbook-x-prod.appspot.com/o/spaces%2FTEnid8slfk8yG87EyboI%2Fuploads%2FVtnxLpuWSrRhbCjZ9hka%2FPower_jst_MINI.png?alt=media&#x26;token=84ae08aa-896b-4bc7-969a-2f0e2b32bba0" alt=""><figcaption></figcaption></figure>

{% hint style="danger" %}
If you use low quality or high discharge 6S battery for drone, we are not responsible for damage.
{% endhint %}

### 6. Done

{% hint style="success" %}
Once XBLink Mini's LED has blinked a g**reen color** continue to the [next step](#step-2-configure-flight-controller).
{% endhint %}

#### More information: [here](https://youtu.be/npEB_8ehhlQ)

{% embed url="<https://www.youtube.com/watch?v=qTjosVhCdic>" %}

## Step 2: Configure Flight Controller

You can use Telemetry 1 or 2 of Pixhawk for connection with XBLink Mini. Telemetry 1 is normally used for Telemetry Radio (like: RFD900...) and Telemetry 2 for XBLink Mini.

The baud rate on XBLink Mini **must be same** with Pixhawk baud rate (Telemetry **1** or **2**).

* For ArduPilot : **SERIAL2\_BAUD = 57**(Default, it means 57600),

  **SERIAL2\_PROTOCOL**=**2** (MAVLink 2)

#### **More information:** [**here**](https://ardupilot.org/copter/docs/common-telemetry-port-setup.html)

* For PX4: **SER\_TEL2\_BAUD = 57600** (Default 921600, you should change to 57600 for save data)

{% hint style="info" %}
**Note:** If you have problem with Telemetry 2 port, you can use Telemetry 1 Port

(Default baud rate Telemetry 1 is 57600, MAVLink:1).

XBLink Mini still works normally with both MAVLink 1 and MAVLink 2.
{% endhint %}

## Step 3: Connect XBStationPilotApp and Ground Station Software

1. Download: [here](/xblink-mini/user-manual/xbstationpilotapp/download)
2. Open [XBStationPilotApp](/xblink-mini/user-manual/xbstationpilotapp)
3. Login (Username and password in XBLink Mini's box)
4. Connect to [GCS](/xblink-mini/user-manual/xbstationpilotapp/ground-station)

#### **More detail, refer this link:** [**here**](https://youtu.be/8mLK-jrc7eE)

{% embed url="<https://youtu.be/8mLK-jrc7eE>" %}

## Step 4: Test and Flight

1. Put XBLink Mini on your drone
2. Check the connection between XBLink Mini to Pixhawk, Camera, SIM Card, Antennas
3. Connect battery
4. Waiting about 30s for XBLink Mini start up
5. Check led Indicator: [LED meanings](/xblink-mini/user-manual/getting-started/led-indicator)
6. Open XBStationPilotApp, Login
7. Connect to GCS: QGroundControl or Mission Planner

### **Optional: Register your Email and change your Password**

Please refer this link:

{% content-ref url="/pages/TWwMMkNe9HeHHLFNWdlb" %}
[Register Your Email](/xblink-mini/xbcloud/pilot)
{% endcontent-ref %}


# User Manual

This section contains information about XBLink Mini

**XBLink Mini** is a Plug and Play hardware for BVLOS Flight based on **4G connectivity.**

<figure><img src="https://files.gitbook.com/v0/b/gitbook-x-prod.appspot.com/o/spaces%2FTEnid8slfk8yG87EyboI%2Fuploads%2FQuWtCFpUmXnSU4Xd2m8N%2Fkeyshot%20xbl%20mini.139%20(1).png?alt=media&#x26;token=9917d3a3-fd63-4ae7-894a-415d0c9c258b" alt=""><figcaption><p>XBLink Mini</p></figcaption></figure>

To discover XBLink Mini, we need to understand the main components:

* **XBLink Hardware:** Companion computer combine cellular networking equipment, drone standard connectors and power module in one small factory design.
* **XBFirm process:** a set of software base on Linux making an platform for live streaming and control telemetry data. It is also designed to easily integrate other function like UTM, ...
* **XBLinkApp(Wifi Hotspot):** Web interface to easily configure and communicate with XBLink without touching and wiring. You can connect XBLinkApp via Wifi hotspot from your phone, tablet or PC.

### Highlight feature

* Compact design, effortlessly portable footprint.
* Smooth streaming with dynamic quality.
* High bandwidth and low latency.
* Reliable connection.
* Build for many drone applications like mapping, drone delivery...([contact](https://xbstation.com/contact)).
* Compatible with *Ardupilot*/*PX4.*
* Connecting to Cloud - Fleet manager drone ([contact](https://xbstation.com/contact)).


# Getting started

Before you get started you should explore XBLink Mini system you will use as below:

* [Overview](/xblink-mini/user-manual/getting-started/overview)
* [Setup](/xblink-mini/user-manual/getting-started/setup)
* [LED indicator](/xblink-mini/user-manual/getting-started/led-indicator)
* [Interfaces](/xblink-mini/user-manual/getting-started/interfaces)
* [Dimensions](/xblink-mini/user-manual/getting-started/dimensions-and-cad-model)
* [XBLink-WebApp](/xblink-mini/user-manual/getting-started/xblink-webapp)
* [Firmware](/xblink-mini/user-manual/getting-started/xblink-webapp/upgrade-firmware)


# Overview

This section contains information about components included in the XBLink Mini and Accessories.

### Components

<figure><img src="https://files.gitbook.com/v0/b/gitbook-x-prod.appspot.com/o/spaces%2FTEnid8slfk8yG87EyboI%2Fuploads%2F5WnYXSlexmUKYTLy8zFs%2Fcomponent_MINI.png?alt=media&#x26;token=74f97906-1195-4f3b-813f-f2f16d208f77" alt=""><figcaption><p>XBLink Mini's Accessories</p></figcaption></figure>

### Electronics

| Name                 | Quantity   |
| -------------------- | ---------- |
| XBLink Mini          | 1          |
| XBCam V2             | 1 (option) |
| Telemetry Cables     | 1          |
| Power Cables         | 1          |
| USB type C to type C | 1 (option) |
| 4G LTE Antenna Cable | 2          |
| 4G LTE Antenna       | 2          |

### Other (not include)

| Name                          | Description     |
| ----------------------------- | --------------- |
| USB Type-A to Micro USB Cable | Update Firmware |

### Specifications <a href="#spectifications" id="spectifications"></a>

<table data-header-hidden><thead><tr><th width="374"></th><th></th></tr></thead><tbody><tr><td><strong>Product Performance</strong></td><td>​<strong>Content</strong></td></tr><tr><td>Autopilot</td><td>Pixhawk Cube, Pixhawk 4,Pixhawk 6X etc...</td></tr><tr><td>Data protocol</td><td>Mavlink1, Mavlink2</td></tr><tr><td>Camera</td><td>XBCam V2 12 MP</td></tr><tr><td>Video output</td><td>1080p、720p、480p、320 - Custom</td></tr><tr><td>Video codec</td><td>H264</td></tr><tr><td><strong>Interface</strong></td><td>​<strong>Content</strong></td></tr><tr><td>Video input</td><td>Only XBCam V2 12MP</td></tr><tr><td>Antenna interface</td><td>2 x MMCX</td></tr><tr><td>UART</td><td>UART 1 (telemetry), UART 2/3 (Payload)</td></tr><tr><td><strong>Work Environment</strong></td><td>​<strong>Content</strong></td></tr><tr><td>Voltage input</td><td>7 - 30V</td></tr><tr><td>Temperature</td><td>-10 - +60°C</td></tr><tr><td><strong>Appearance Size</strong></td><td>​<strong>Content</strong></td></tr><tr><td>Size</td><td>59mm X 43mm X 25mm</td></tr><tr><td>Weight</td><td>71.0g</td></tr><tr><td><strong>Ground station</strong></td><td>​<strong>Content</strong></td></tr><tr><td>Support</td><td>PC (Windows, IOS), Android device</td></tr><tr><td>Software</td><td>XBStation Pilot App</td></tr><tr><td>Compatible</td><td><em>MissionPlanner</em>, <em>QGroundControl</em></td></tr></tbody></table>

### **XBCam V2** <a href="#xbcam" id="xbcam"></a>

| **Performance**     | ​Title                 |
| ------------------- | ---------------------- |
| Size                | 26mmX26mmX23mm         |
| Weight              | 22.9g                  |
| Megapixels          | 12 Megapixels          |
| Field of view (FOV) | 120°(D)x102°(H)x67°(V) |

### 4G **Performance** <a href="#id-4g-lte-performance" id="id-4g-lte-performance"></a>

<table data-header-hidden><thead><tr><th width="246">Performance</th><th>​Title</th></tr></thead><tbody><tr><td>Network Frequency</td><td><p><strong>NR-FDD</strong>: n1 / n2 / n3 / n5 / n7 / n8 / n12 / n13 / n18 / n20 / n25 / n28 / n66 / n71<br><strong>NR-TDD:</strong> n38 / n40 / n41 / n48 / n77 / n78 / n79</p><p><strong>LLTE-FDD:</strong> B1/ B2/ B3/ B4/ B5/ B7/ B8/ B12/ B13/ B18/ B19/ B20/ B25/ B26/ B28 <strong>LTE-TDD:</strong> B38/ B39/ B40/ B41</p><p><strong>WCDMA:</strong> B1/ B2/ B4/ B5/ B6/ B8/ B19</p><p><strong>GSM:</strong> B2/B3/B5/B8</p></td></tr><tr><td>Region</td><td>Global (All countries and carriers): Europe/Middle East/Africa/Korea/Thailand/India/North America/Australia/New Zealand/Taiwan/Brazil/Japan</td></tr><tr><td>Regulatory</td><td>GCF/ PTCRB/ CE/ ANATEL / CCC/ RCM/ IC/ FCC/ JATE/ TELEC/ KC/ NCC</td></tr><tr><td>Carrier</td><td>T-Mobile/ Telstra/ AT&#x26;T/ Deutsche Telekom/ Verizon*/ Telefonica*/ NTT DOCOMO*/ SoftBank*/ KDDI*</td></tr><tr><td>Network Rate</td><td><p><strong>NR:</strong></p><p>NR-FDD: Max 2.5Gbps (DL) / Max 500Mbps (UL)<br>NR-TDD: Max 4.5Gbps (DL) / Max 900Mbps (UL)</p><p><strong>LTE:</strong></p><p>LTE FDD: Max 150Mbps (DL)/Max 50Mbps (UL)</p><p>LTE TDD: Max 130Mbps (DL)/Max 30Mbps (UL)</p><p><strong>UMTS:</strong></p><p>DC-HSDPA: Max 42Mbps (DL)</p><p>HSUPA: Max 5.76Mbps (UL)</p><p>WCDMA: Max 384Kbps (DL)/Max 384Kbps (UL)</p><p><strong>GSM:</strong></p><p>EDGE: Max 296Kbps (DL)/Max 236.8Kbps (UL)</p><p>GPRS: Max 107Kbps (DL)/Max 85.6Kbps (UL)</p></td></tr></tbody></table>


# Setup

This section contains the hardware connection of XBLink Mini.

XBLink Mini hardware connection mainly includes SIM, Antenna, XBCamera V2, Flight Controller and Power up.

### Nano SIM Card <a href="#sim-card" id="sim-card"></a>

XBLink Mini supports push-push NanoSim connector.

Insert your SIM card into the SIM Card slot, the chip contacts have to **face up**.

{% hint style="info" %}
The SIM card is recessed into the enclosure and you might need a tool to push it into the socket. You can hear a click when the card is inserted.
{% endhint %}

To remove the SIM card, push onto the card with a tool. You can hear a "click" and the card will be pushed out of the enclosure. To remove the card again, push it in once more and it will pop out.

<figure><img src="https://files.gitbook.com/v0/b/gitbook-x-prod.appspot.com/o/spaces%2FTEnid8slfk8yG87EyboI%2Fuploads%2FeZyDcv0Nv9gEMlPi6E4J%2FSIM_card.png?alt=media&#x26;token=a5cf20ca-aa2a-4f22-b57c-0f4709fc67da" alt=""><figcaption><p>SIM Card must be faced up</p></figcaption></figure>

### Antenna <a href="#antenna" id="antenna"></a>

Connect the two LTE antennas to the MMCX connectors.

<figure><img src="https://files.gitbook.com/v0/b/gitbook-x-prod.appspot.com/o/spaces%2FTEnid8slfk8yG87EyboI%2Fuploads%2FQotzKGTvnI9M0DvmzRY1%2FAntenna.png?alt=media&#x26;token=e17eef76-ee09-4889-8a8e-319f50781f2f" alt=""><figcaption><p>Connect LTE Antennas to XBLink Mini</p></figcaption></figure>

{% hint style="danger" %}
**Note:** Be careful with the antenna port. Remove or Install it in a **straight angle**.

**We are not responsible if the antenna is damaged due to physical impact**
{% endhint %}

{% hint style="info" %}
**Antenna installation and removal instructions:** [**here**](https://www.youtube.com/watch?v=lAXGtti88gc)
{% endhint %}

### XBCam V2

Connect XBCam V2 to USB type C port.

<figure><img src="https://files.gitbook.com/v0/b/gitbook-x-prod.appspot.com/o/spaces%2FTEnid8slfk8yG87EyboI%2Fuploads%2FbOHMMNYwGfJyEHAUlEMv%2FXBCam_Mini.png?alt=media&#x26;token=7cd2febb-0111-405f-8e2d-48b9cc736b6f" alt=""><figcaption><p>Connect XBCamera V2 to XBLink Mini</p></figcaption></figure>

{% hint style="info" %}
**Note:** We **ONLY** support XB Camera for this model.
{% endhint %}

### Connect Flight Controller (Telemetry)

You can use Telemetry 1 or 2 of Pixhawk for connection with XBLink Mini via [**COM1/AUX**](/xblink-5g-r2/user-manual/getting-started/interfaces#com1-aux-j3) port.

<div><figure><img src="https://files.gitbook.com/v0/b/gitbook-x-prod.appspot.com/o/spaces%2FTEnid8slfk8yG87EyboI%2Fuploads%2FCq7lmEeWRMyJLDMHalXT%2FFC_connect_MINI.png?alt=media&#x26;token=63b99fe3-f5ce-4d45-a8bb-8681b10e324c" alt=""><figcaption><p>Connect <em>Pixhawk</em> to XBLink Mini</p></figcaption></figure> <figure><img src="https://files.gitbook.com/v0/b/gitbook-x-prod.appspot.com/o/spaces%2FTEnid8slfk8yG87EyboI%2Fuploads%2FdmELPBVaN5ztGKrn4HDA%2FTelem_setup_Mini.png?alt=media&#x26;token=7a4a4af3-35bd-43f8-a166-e0bd2f72a028" alt=""><figcaption></figcaption></figure></div>

{% hint style="info" %}
**Note:** Config baud rate of Pixhawk to 57600, SERIAL1\_BAUD (Default 57, it means 57600), SERIAL1\_PROTOCOL: 2 (MAVLink 2)
{% endhint %}

### Power up

<figure><img src="https://files.gitbook.com/v0/b/gitbook-x-prod.appspot.com/o/spaces%2FTEnid8slfk8yG87EyboI%2Fuploads%2FVtnxLpuWSrRhbCjZ9hka%2FPower_jst_MINI.png?alt=media&#x26;token=84ae08aa-896b-4bc7-969a-2f0e2b32bba0" alt=""><figcaption><p>Power up XBlink Mini</p></figcaption></figure>

XBLink Mini supports 7-30V voltage input. We highly recommend **3-4 S battery or 12V DC UBEC** (minimum 3A) to power (6S battery is possible but make sure it's high quality and low discharge)

{% hint style="danger" %}
If you use low quality or high discharge 6S battery for drone, we are not responsible for damage.
{% endhint %}

### Done

<figure><img src="https://files.gitbook.com/v0/b/gitbook-x-prod.appspot.com/o/spaces%2FTEnid8slfk8yG87EyboI%2Fuploads%2FktY2LF7JTgox9e14bLve%2FFull_setup.png?alt=media&#x26;token=327182c5-087f-480f-863b-d5c93c7c26d3" alt=""><figcaption><p>Completion of setup XBLink Mini</p></figcaption></figure>

Once XBLink Mini's LED has the green color continue to the next step to connect it to [XBStationPillotApp](/xblink-mini/user-manual/xbstationpilotapp).

More information: [here](https://www.youtube.com/watch?v=qTjosVhCdic)

{% embed url="<https://www.youtube.com/watch?v=qTjosVhCdic>" %}


# LED indicator

This article will describe the led indicator of XBLink Mini

<figure><img src="https://files.gitbook.com/v0/b/gitbook-x-prod.appspot.com/o/spaces%2FTEnid8slfk8yG87EyboI%2Fuploads%2FVRMwMJCcPrPtHbU6EuLV%2FLED_Mini.png?alt=media&#x26;token=3ed83fcc-693a-421b-88ff-0af390f06c6f" alt="" width="375"><figcaption></figcaption></figure>

## Led Map

| **LED**   | **Color** | **Description**                                  |
| --------- | --------- | ------------------------------------------------ |
| Main led  | RGB       | <p>Indicates the status of XBLink</p><p>Mini</p> |
| SYS led   | Green     | System LED                                       |
| LTE led   | Orange    | Status of the cellular connection                |
| Cam led   | Orange    | Turn on when take a picture                      |
| Power led | Red       | Inside XBLink Mini                               |

### 1.Main Led

<table data-full-width="true"><thead><tr><th width="100">Color</th><th width="193">Fast Blink(0.15s)</th><th width="205">Slow Blink(1.5s)</th><th width="231">Blink(0.7s)</th><th>Solid</th></tr></thead><tbody><tr><td><mark style="color:blue;">Blue</mark></td><td>Network Scanning</td><td>Network Scanning</td><td>Network Scanning</td><td>App Starting</td></tr><tr><td><mark style="color:red;">Red</mark></td><td>Check SIM and APN (<strong>Error 1</strong>)</td><td><p>Datacap OK,</p><p>Internet connected</p></td><td><p>Check SIM</p><p>(<strong>Error 2</strong>)</p></td><td><p>Insert SIM</p><p>(<strong>Error 3</strong>)</p></td></tr><tr><td><mark style="background-color:yellow;"><strong>Yellow</strong> (2G)</mark></td><td><ul><li>App running</li><li>Cloud connecting</li></ul></td><td><ul><li>XBFirm running</li><li>Internet connected</li><li>Cloud connecting</li><li>No sign in pilot app</li></ul></td><td><ul><li>XBFirm running</li><li>Pilot App connecting</li><li>Cloud connected</li><li>Signed in pilot app</li></ul></td><td><p>All good-</p><p>Connected to pilot app</p></td></tr><tr><td><mark style="background-color:red;"><strong>Pink</strong> (3G)</mark></td><td><ul><li>App running</li><li>Cloud connecting</li></ul></td><td><ul><li>XBFirm running</li><li>Internet connected</li><li>Cloud connecting</li><li>No sign in pilot app</li></ul></td><td><ul><li>XBFirm running</li><li>Pilot App connecting</li><li>Cloud connected</li><li>Signed in pilot app</li></ul></td><td><p>All good-</p><p>Connected to pilot app</p></td></tr><tr><td><mark style="color:green;background-color:green;"><strong>Green</strong> (4G)</mark></td><td><ul><li>App running</li><li>Cloud connecting</li></ul></td><td><ul><li>XBFirm running</li><li>Internet connected</li><li>Cloud connecting</li><li>No sign in pilot app</li></ul></td><td><ul><li>XBFirm running</li><li>Pilot App connecting</li><li>Cloud connected</li><li>Signed in pilot app</li></ul></td><td><p>All good-</p><p>Connected to pilot app</p></td></tr></tbody></table>

* Error 1: **Fast Red Blink (0.15s) -** Please [**check SIM card**](/xblink-mini/user-manual/getting-started/xblink-webapp/device) status, [**APN configuration**](/xblink-mini/user-manual/getting-started/xblink-webapp/config-network) and the current network environment.
* Error 2: **Red Blink (0.7s) -** Please check your[ **hardware connection**](/xblink-mini/user-manual/getting-started/xblink-webapp/device) (SIM card status, antenna)
* Error 3: **Red Solid Blink -** Please insert SIM card.

If the main LED blinks both a <mark style="color:green;">**green**</mark> and other colors as shown below.

* Wait another 10-15s for XBLink Mini to try to connect the internet in your area.
* Then, please check your internet connection and the current network environment.

| Blink (0.7s)                                | Yellow (2G)                                                                          | Pink (3G)                                                                         | Green (4G)                                                                          |
| ------------------------------------------- | ------------------------------------------------------------------------------------ | --------------------------------------------------------------------------------- | ----------------------------------------------------------------------------------- |
| <mark style="color:green;">**Green**</mark> | <p><mark style="background-color:yellow;">Connecting 2G</mark></p><p>No Internet</p> | <p><mark style="background-color:red;">Connecting 3G</mark></p><p>No Internet</p> | <p><mark style="background-color:green;">Connecting 4G</mark></p><p>No Internet</p> |

In order to verify the particular status of XBLink, we highly recommend that you should visit [**XBLink-WebApp**](/xblink-mini/user-manual/getting-started/xblink-webapp)

### **2.SYS led**

* Blinks - Normal operation
* Solid - Firmware Upload

### **3. LTE led**

* When the connection is established and data is being transmitted/received, this led will blink at special intervals. Otherwise, if there is no connection, the LED will remain off.

### **4.Power led**

* Light - Power is OK
* Off - No power input


# Interfaces

This article will describe the Interfaces of XBLink Mini
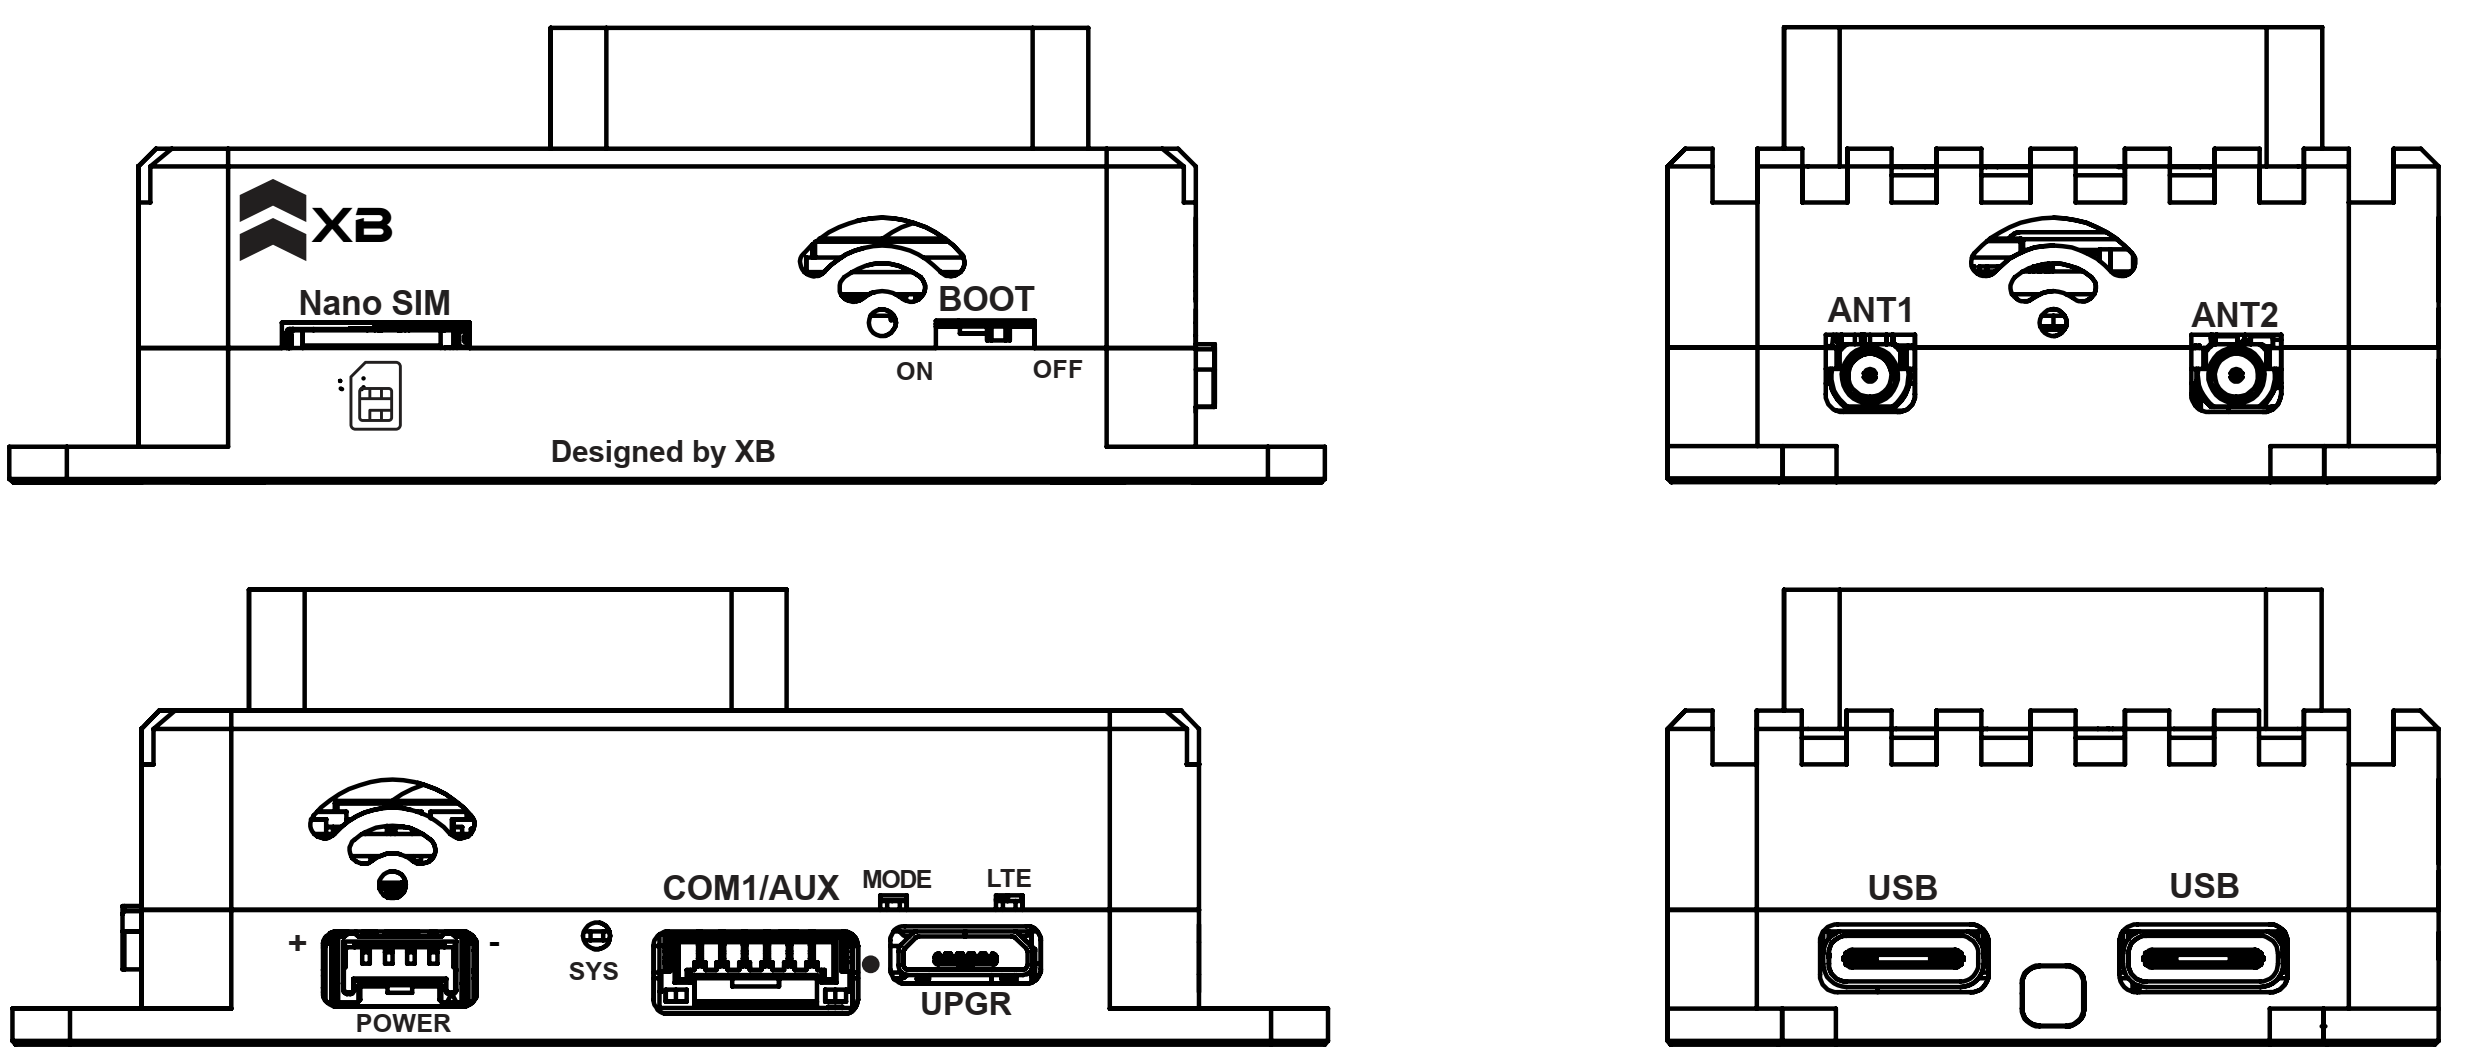
<figure><img src="https://files.gitbook.com/v0/b/gitbook-x-prod.appspot.com/o/spaces%2FTEnid8slfk8yG87EyboI%2Fuploads%2F5wHODvjijodemmUnnzvL%2FScreenshot%202026-01-30%20121832.png?alt=media&#x26;token=cec65580-ed28-4c6b-880b-06fc170a414d" alt=""><figcaption></figcaption></figure>

## Interface Function Map

## Connectors

<table data-header-hidden><thead><tr><th width="141">ID</th><th>Name</th><th>Connector</th><th>Description</th></tr></thead><tbody><tr><td><strong>ID</strong></td><td><strong>Name</strong></td><td><strong>Connector</strong></td><td><strong>Description</strong></td></tr><tr><td>J1</td><td>USB</td><td>USB Type-C</td><td>External Hardware (XBCam)</td></tr><tr><td>J2</td><td>USB</td><td>USB Type-C</td><td>External Hardware (XBCam)</td></tr><tr><td>J3</td><td>COM1/AUX</td><td>JST GH 6pin</td><td>Connect Flight controller or extend payload</td></tr><tr><td>J4</td><td>UPGR</td><td>Micro USB</td><td>Upgrade Firmware</td></tr><tr><td>J5</td><td>Power</td><td>Micro-Lock Plus 4pin</td><td>Power Input</td></tr></tbody></table>

## Pinout

#### COM1/AUX (J3)

| **Pin** | **Description**   |
| ------- | ----------------- |
| 1       | VBUS 5V 2A        |
| 2       | UART1\_RX (ttyS0) |
| 3       | UART1\_TX (ttyS0) |
| 4       | Pixhawk\_Trigger  |
| 5       | Hotshow\_Out      |
| 6       | GND               |

#### Power(J8)

| **Pin** | **Description** |
| ------- | --------------- |
| 1       | GND             |
| 2       | GND             |
| 3       | 7-30V Input     |
| 4       | 7-30V Input     |


# Dimensions and CAD Model

This section give you information of XBLink such as Dimension and 3D CAD Model

## Dimensions

<figure><img src="https://files.gitbook.com/v0/b/gitbook-x-prod.appspot.com/o/spaces%2FTEnid8slfk8yG87EyboI%2Fuploads%2FX4NntutHNT11CdTGtkzA%2FScreenshot%202026-01-30%20122730.png?alt=media&#x26;token=f482b03d-f7ac-4787-a7a0-0ea054f12982" alt=""><figcaption></figcaption></figure>

## 3D CAD Model

{% file src="/files/714xB84XgQRKrLymegEs" %}
XBLink Mini's 3D CAD Model
{% endfile %}


# XBLink-WebApp

With XBLink Mini, All configs will be done via WebApp.

Web interface to easily configure and communicate with XBLink.

{% hint style="success" %}
When you buy XBLink Mini, it is ready to use. Nothing to do. This section is useful when you want to upgrade new firmware, check device or re-login new account.
{% endhint %}

## Connect XBLink to WebApp

We support 3 method to connect to WebApp as below:

1. [**Connect via Hotspot**](#hotspot)
2. [**Connect via LAN network**](#lan-network)

***

### Hotspot

You can easily connect WedApp via Wifi hotspot from your phone, table or PC.

1. Turn on XBlink.
2. Connect your PC/Phone to XBLink Wifi Hotspot

```
Name: XBLINK_your_account
Pass: xbstation.com
```

<figure><img src="https://files.gitbook.com/v0/b/gitbook-x-prod.appspot.com/o/spaces%2FTEnid8slfk8yG87EyboI%2Fuploads%2FBtfCdT7InSHGPYmOoyaK%2FScreenshot%202026-01-30%20124428.png?alt=media&#x26;token=931d946c-fdaf-46af-bc5b-b368dffeb811" alt=""><figcaption></figcaption></figure>

3. Open web browser on PC/Phone and go to this address **<http://10.0.0.1>**

<figure><img src="https://files.gitbook.com/v0/b/gitbook-x-prod.appspot.com/o/spaces%2FTEnid8slfk8yG87EyboI%2Fuploads%2FdtTq6z9zIZfCOWKCjF3i%2FScreenshot%202026-02-09%20151542.png?alt=media&#x26;token=513a738f-fd5b-47ac-9d80-a96bb4f14e84https://files.gitbook.com/v0/b/gitbook-x-prod.appspot.com/o/spaces%2FTEnid8slfk8yG87EyboI%2Fuploads%2FdtTq6z9zIZfCOWKCjF3i%2FScreenshot%202026-02-09%20151542.png?alt=media&#x26;token=513a738f-fd5b-47ac-9d80-a96bb4f14e84" alt=""><figcaption></figcaption></figure>

### LAN network

1. Connect Ethernet Cable (**only supported Cat6**) to your LAN network. Then, plug it into ETH port of XBLink via a USB type-C to Ethernet Adapter.
2. Turn on XBLink.

<figure><img src="https://files.gitbook.com/v0/b/gitbook-x-prod.appspot.com/o/spaces%2FTEnid8slfk8yG87EyboI%2Fuploads%2FgE7jvPdBUdsxmyAdo4bG%2FScreenshot%202026-02-03%20100515.png?alt=media&#x26;token=356c2e96-37ea-406a-bd34-317d485d88cd" alt=""><figcaption></figcaption></figure>

3. Open web browser on PC/Phone and go to this address **XBLink IP (Example: 192.168.1.24)**

<figure><img src="https://files.gitbook.com/v0/b/gitbook-x-prod.appspot.com/o/spaces%2FTEnid8slfk8yG87EyboI%2Fuploads%2FC8sD6wxmKj3io75ZE9IS%2FScreenshot%202026-02-09%20151518.png?alt=media&#x26;token=9e0e08c2-79d3-44c6-94b9-bf7f9b588513" alt=""><figcaption></figcaption></figure>

{% hint style="warning" %}
If you can't find your **XBLink IP**, please use Advanced IP Scanner to find it: [here](https://www.advanced-ip-scanner.com/vi/)
{% endhint %}

<figure><img src="/files/JLve7WThxdQFWi7LcM40" alt=""><figcaption><p>Example for Check IP</p></figcaption></figure>

Let's discover the variety of feature's WebApp!


# Device

This article show you how to check clearly the status of SIM and Antennas.

After connecting successfully to [**WebApp**](/xblink-mini/user-manual/getting-started/xblink-webapp). Click to **Device Tab** to check the antennas and SIM status as below.

* If **Antennas Fail**, please check and make sure the antenna is installed correctly or you are in a weak signal area (like a closed room). No need to reset XBLink.
* If **SIM** **Fail**, Please **insert** SIM and **reset** XBLink.

![](/files/-Mb0rE3jS_1tBcLDJkdX)


# Config Network

This article show you how to check and config a lot of useful information of cellular module

After connecting successfully to [**WebApp**](/xblink-mini/user-manual/getting-started/xblink-webapp). Click to **Network**.

## APN Setting <a href="#apn" id="apn"></a>

We have 2 ways to configure the APN: **Auto** and **Manual**. XBLink supports Automatic APN detection (Default).

### **Auto**

When you insert SIM into XBLink, APN configuration is automatically Auto mode. This meaning is XBLink use information of your SIM such as Cache MCC and Cache MNC to search and choose a proper APN.

<figure><img src="/files/JqVfsWGStZqggl6n0Ogl" alt=""><figcaption></figcaption></figure>

{% hint style="info" %}
You must **Stop Cellular Modem** and **Start Cellular Modem** to have valid command.
{% endhint %}

### **Manual**

You also can choose Manual mode up to your country and network provider.

<figure><img src="/files/oCktqNowRGWfzmqf4GnW" alt=""><figcaption></figcaption></figure>

{% hint style="info" %}
You must **Stop Cellular Modem** and **Start Cellular Modem** to have valid command.
{% endhint %}

In case you can't find suitable network operator in this list, please choose both **Country** and **Operator** section are **Other**, then typing into **APN** section.

<figure><img src="/files/ySa8BNk5fqRE1EclF4QO" alt=""><figcaption></figcaption></figure>

{% hint style="info" %}
You must **Stop Cellular Modem** and **Start Cellular Modem** to have valid command.
{% endhint %}


# Login

This section show you how to login XBLink account in WedApp

After connecting successfully to [**WebApp**](/xblink-mini/user-manual/getting-started/xblink-webapp). Click to **Authentication tab** as below.

Input XBStation Account:

* Username
* Password

**Note:** Please don’t change the IP Server

Click **LOGIN**

<figure><img src="https://content.gitbook.com/content/TEnid8slfk8yG87EyboI/blobs/sOKCIuEjiIQzk3utEts8/login.PNG" alt=""><figcaption></figcaption></figure>

Make sure success

![](/files/-Mb0qpJQftUQvZeTOZWV)

After success, you need to reset XBLink Mini


# Dashboard

This section show you how to use Dashboard tab in WebApp

After connecting successfully to [**WebApp**](/xblink-mini/user-manual/getting-started/xblink-webapp). Click to **Dashboard tab**.

### **Dashboard**

![](/files/-Mb0wpmwalRsyBfOxN1k)

### **Telemetry and Log**

<div align="center"><figure><img src="https://content.gitbook.com/content/TEnid8slfk8yG87EyboI/blobs/WaejyODrqcq3CNvrmLO5/12.PNG" alt=""><figcaption></figcaption></figure></div>

### **Terminal**

You can SSH directly to XBLink here.

<figure><img src="https://content.gitbook.com/content/TEnid8slfk8yG87EyboI/blobs/RZ4m3PnhV2kFfGeWFlka/13.PNG" alt=""><figcaption></figcaption></figure>


# Search Network

This article show you how to check and config a lot of useful information of cellular module

After connecting successfully to [**WebApp**](/xblink-mini/user-manual/getting-started/xblink-webapp).

Please change to the address **<http://xblink.local:3000/network>**

<figure><img src="/files/7ToGqrXn38F6u8WtHZBC" alt=""><figcaption><p>Network</p></figcaption></figure>

## Cellular module status

This section contains many of important information about the status of cellular module as below.

<figure><img src="/files/gA9D9zFoCcDn9SIEHjQi" alt=""><figcaption><p>Cellular module status</p></figcaption></figure>

## Network search mode configuration

When you buy XBLink, It's status network is automatically AUTO (default)

<figure><img src="/files/yQNfrt3BNRJVRCFHu9EX" alt=""><figcaption><p>Network search mode configuration</p></figcaption></figure>

## Network configuration & Network search mode configuration
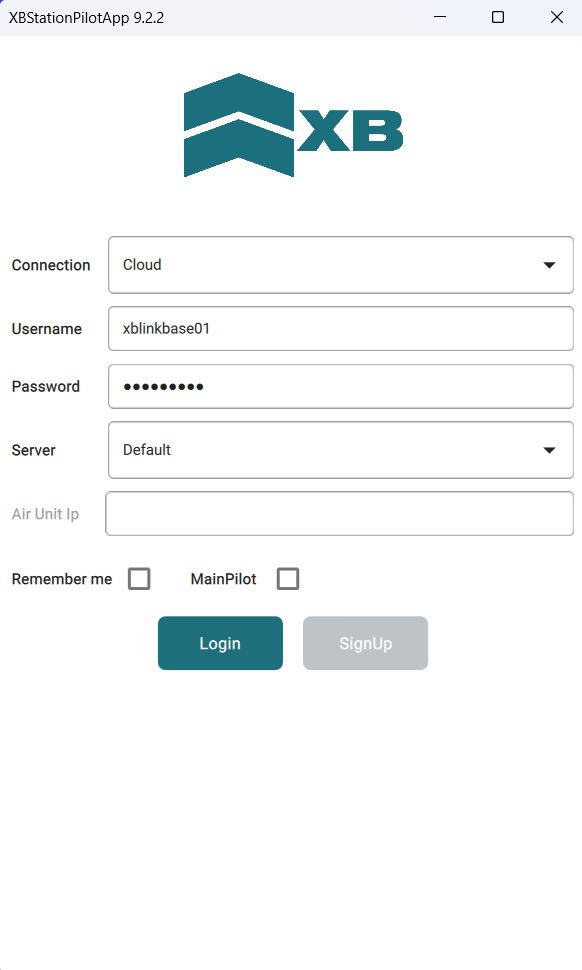
Default configuration is Enable.

<figure><img src="/files/14kysBhdGePrUrwra1f3" alt=""><figcaption><p>Network configuration &#x26; Network search mode configuration</p></figcaption></figure>

{% hint style="warning" %}
Don't change to **Disable mode** if you want to use cellular module
{% endhint %}


# Upgrade Firmware

This section show you how to upgrade the new firmware for XBLink

We highly recommend that you should select one of the methods as below to connect to WebApp using this method [**Connect via LAN network**](/xblink-mini/user-manual/getting-started/xblink-webapp#lan-network)

You can upgrade new firmware when to access this address: **<http://xblink.local:3002>**

<figure><img src="/files/QUEMquGk657vDkPF6ui6" alt=""><figcaption></figcaption></figure>

Please follow the instruction here carefully

1. In order to get a new firmware, you should contact us [**here**](/xblink-mini/xbcloud/payment)
2. Click **UPGRADE,** this process may take a few minutes to complete.

After upgrade successfully, you need to reboot XBLink.


# XBStationPilotApp

XBStationPilotApp is a Software on your station to control XBLink Mini and transmit video and telemetry streaming from it to Ground control station (Mission Planner, QGroundControl, ...).

<figure><img src="https://files.gitbook.com/v0/b/gitbook-x-prod.appspot.com/o/spaces%2FTEnid8slfk8yG87EyboI%2Fuploads%2F0jcjiW8H3X7ZW2b7tdBU%2FScreenshot%202026-02-03%20140225.png?alt=media&#x26;token=09d86209-d873-499d-bf80-de4151a788b6" alt=""><figcaption><p>XBStationPilotApp's login panel</p></figcaption></figure>

## Supported

PC: Windows

Phone/Tablet: Android

{% hint style="info" %}
Note: XBStationPilotApp on Android version is beta version. you only fly with **limited time 15 minutes**
{% endhint %}

## Video Tutorials

#### XBStationPilotApp - Mission Planner: [link](https://youtu.be/WxmOfRFRJh4?si=WqxiXfhK4aHvsko7)

{% embed url="<https://youtu.be/WxmOfRFRJh4?si=WqxiXfhK4aHvsko7>" %}

#### XBStationPilotApp - QGroundControl: [link](https://www.youtube.com/watch?v=8mLK-jrc7eE)

{% embed url="<https://www.youtube.com/watch?v=8mLK-jrc7eE>" %}


# Download

How to install softwares

## Ground Control station software

* Mission Planner: ([Link Download](http://firmware.ardupilot.org/Tools/MissionPlanner/))
* QGroundControl: ([Link Download](https://docs.qgroundcontrol.com/en/getting_started/download_and_install.html))

## GStreamer

GStreamer is required in case you need to play the video on Mission Planner. If you're using QGroundControl, skip this step.

* GStreamer x86\_64 ([Link Download](https://gstreamer.freedesktop.org/download/#windows))

Note: Please select **complete** when installing gstreamer.

![](/files/-Ma9Hn8x9LXqzWLgqdy5)

## XBStationPilotApp <a href="#xbstationpilotapp" id="xbstationpilotapp"></a>

* Windows Version 9.2.2: [Link](https://github.com/xb-uav/XBStationPilotApp/releases/download/v9.2.2/XBStationPilotApp_9.2.2.zip)
* Android Version 9.1.9: [Link](https://github.com/xb-uav/XBStationPilotApp/releases/tag/v9.1.9)


# Overview

## Dashboard

After login Pilot App is ready to use.

<figure><img src="https://files.gitbook.com/v0/b/gitbook-x-prod.appspot.com/o/spaces%2FTEnid8slfk8yG87EyboI%2Fuploads%2FF6Cj7OmGJV90dx9ZlmDB%2FDashBoard.png?alt=media&#x26;token=5b6c6b20-854d-42a7-8d50-59497bd89567" alt=""><figcaption><p>XBStationPilotApp: Dashboard interface</p></figcaption></figure>

## Menu

Explore more functions on the Menu Tab

<figure><img src="https://files.gitbook.com/v0/b/gitbook-x-prod.appspot.com/o/spaces%2FTEnid8slfk8yG87EyboI%2Fuploads%2FAGWAwqfXcUiOkytcwszu%2FScreenshot%202026-02-03%20153954.png?alt=media&#x26;token=74bac255-5125-4a7c-bc91-efa5730cda69" alt=""><figcaption><p>XBStationPilotApp: Menu Tab</p></figcaption></figure>

**Setting Tab**

<figure><img src="https://files.gitbook.com/v0/b/gitbook-x-prod.appspot.com/o/spaces%2FTEnid8slfk8yG87EyboI%2Fuploads%2FxKy56fSBOE2iiG362uLI%2FScreenshot%202026-02-03%20154029.png?alt=media&#x26;token=5fbb09da-8d94-4a32-9a48-06e5ce3c6d49" alt=""><figcaption><p>XBStationPilotApp: Setting Tab</p></figcaption></figure>

**System Monitor Tab**

Real time monitor the XBLink Mini's performance.

<figure><img src="https://files.gitbook.com/v0/b/gitbook-x-prod.appspot.com/o/spaces%2FTEnid8slfk8yG87EyboI%2Fuploads%2FjNOd2MSbvGTOdUn4bLFz%2FScreenshot%202026-02-03%20144157.png?alt=media&#x26;token=b975161b-0ce3-4fa3-8937-efbe34c6051b" alt=""><figcaption></figcaption></figure>

More Info, please refer:

{% content-ref url="/pages/vCr79j9nZHph3s93soMQ" %}
[System Monitor](/xblink-mini/user-manual/xbstationpilotapp/system-monitor)
{% endcontent-ref %}

**Streaming Sharing Tab**

Share live data(telemetry and video) with your field operators/clients/customers

{% hint style="info" %}
This feature is for Enterprise user, contact us to upgrade your account
{% endhint %}

![](/files/UeWlNU47alVXkeYUgMaV)

More Info, please refer:

{% content-ref url="/pages/TWwMMkNe9HeHHLFNWdlb" %}
[Register Your Email](/xblink-mini/xbcloud/pilot)
{% endcontent-ref %}


# Ground Station

The following is a list of Desktop Ground Control Stations that XBLink can stream video and telemetry.

## [Mission Planner](/xblink-mini/user-manual/xbstationpilotapp/ground-station/mission-planner)

## [Qgroundcontrol](/xblink-mini/user-manual/xbstationpilotapp/ground-station/qgroundcontrol)


# Mission Planner

This article provides basic guidelines for configuring telemetry and stream video by XBCamV2

## Login

* User Name
* Password
* Server: <https://server.platform.xbstation.com:8007> (Default)

<figure><img src="https://files.gitbook.com/v0/b/gitbook-x-prod.appspot.com/o/spaces%2FTEnid8slfk8yG87EyboI%2Fuploads%2F0jcjiW8H3X7ZW2b7tdBU%2FScreenshot%202026-02-03%20140225.png?alt=media&#x26;token=09d86209-d873-499d-bf80-de4151a788b6" alt="" width="563"><figcaption></figcaption></figure>

{% hint style="info" %}
**NOTE**: Account is attached on your XBLink's Box. If you don't have account, please contact us.
{% endhint %}

## Connect to Telemetry data

1. Open Mission Planner, at the top-right, choose **TCP** type and **Connect.**

<figure><img src="/files/ICh50jd2xcqbJN2vUGJ8" alt="" width="315"><figcaption></figcaption></figure>

2. Host name/ip: **127.0.0.1** (default)

<figure><img src="/files/iWJzjspFO0rg1jftumCb" alt="" width="248"><figcaption></figcaption></figure>

3. Remote port: **5760** (default) or 5761 (*remember it must be same Telemetry Host Port in PilotApp*)

<figure><img src="/files/tDXXp1m8nlhB3iBGqW7d" alt="" width="248"><figcaption></figcaption></figure>

## Connect to Video Streaming

### XBCamV2

1. At the Video HUD area, Right Click ⇒ Video ⇒ GStreamer Stop as below instruction

<figure><img src="/files/JpymCSVpmc3HDR7uziuT" alt="" width="352"><figcaption><p>Stop GStreamer</p></figcaption></figure>

2. At the Video HUD area, Right Click ⇒ Video ⇒ Set GStreamer source ⇒ Insert GStreamer URL:

**`udpsrc port=5601 caps = "application/x-rtp, media=video, clock-rate=90000, encoding-name=H264, payload=96" ! rtpjitterbuffer ! rtph264depay ! avdec_h264 ! videoconvert ! video/x-raw,format=BGRA ! appsink name=outsink`**

```
udpsrc port=5601 caps = "application/x-rtp, media=video, clock-rate=90000, encoding-name=H264, payload=96" ! rtpjitterbuffer ! rtph264depay ! avdec_h264 ! videoconvert ! video/x-raw,format=BGRA ! appsink name=outsink
```

{% hint style="info" %}
**NOTE: udpsrc port=560x must be the same as PilotApp**
{% endhint %}

{% hint style="info" %}
**NOTE:** The GStreamer URL just need to input at the first time, MissionPlanner will auto save this params, the next run with MissionPlanner, you just **Right Click** ⇒ **Video** ⇒ **Set GStreamer source** ⇒ **and click OK to use video streaming**
{% endhint %}

![Mission Planner](https://i.imgur.com/kFRpzS9.png)

{% hint style="warning" %}
Download and install the plugin (domestic environment download is slow, if it fails, please restart the MissionPlanner ground station and try again)
{% endhint %}

![Mission Planner](https://i.imgur.com/RurZ4jz.png)

After the installation is complete, restart the MissionPlanner ground station to display the following interface.

## Video Tutorials

* XBStationPilotApp - MissionPlanner: [link](https://youtu.be/WxmOfRFRJh4?si=WqxiXfhK4aHvsko7)

{% embed url="<https://youtu.be/WxmOfRFRJh4?si=WqxiXfhK4aHvsko7>" %}
Connect Telemetry to Pixhawk and video data with XBCam V2
{% endembed %}

{% hint style="info" %}
Let's explore the variety of features that XBLink Mini supports [**here**](/xblink-mini/user-manual/advanced-configuration)**!**
{% endhint %}

{% content-ref url="/pages/Nvv8jVAodDejZcNcz0LB" %}
[Advanced Configuration](/xblink-mini/user-manual/advanced-configuration)
{% endcontent-ref %}


---

[Next Page](/llms-full.txt/1)